DataBridge
Overview
The Haivision DataBridge creates a data tunnel between a StreamHub and Pro and Air Series transmitters, enabling communication between an RCP and a RIO over the same cellular or network connection used for Haivision video transmission.
The RIO enables you to connect serial cameras or any other type of supported cameras through the Data Bridge. Using a RIO on the camera or video transmitter side offers several key benefits. By handling camera control locally, the RIO ensures reliable operation even over network connections with higher latency, which many camera protocols are not designed to tolerate. It also helps minimize latency effects for IP-based cameras such as PTZ models.
Operating as a Layer 3 VPN, the Haivision DataBridge links two or more distinct networks, each with its own IP address range. Unlike a Layer 2 bridge, which acts like a direct Ethernet cable and merges networks, a Layer 3 VPN keeps them separate. To allow devices on either side of the bridge to communicate, you must set up routing rules so each device knows how to reach the other network. Without these routes, devices cannot send packets to their remote counterparts, even if the DataBridge is active.
If you’re new to IP network routing, this guide will walk you through the process. It includes a typical workflow and a clear, step-by-step example to help you configure the required routing rules and establish a connection between an RCP and a RIO.
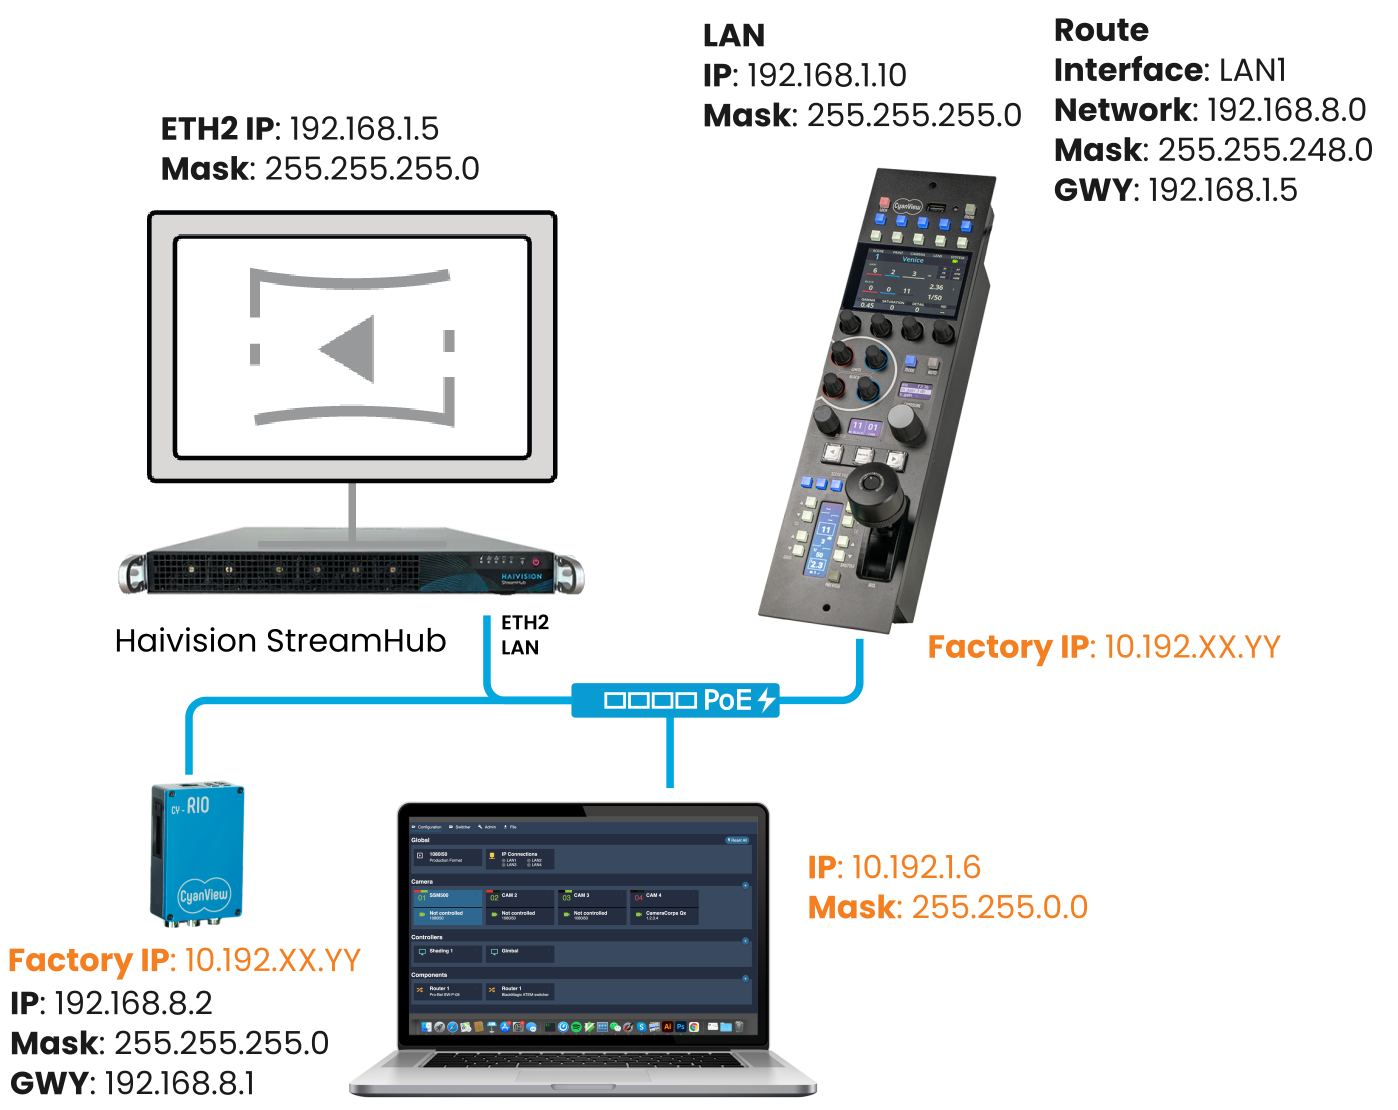
A typical workflow involves multiple transmitters, each with its own network. The following diagram shows how the DataBridge connects these networks. In this example, both the StreamHub and the RCP are on the same network and have internet access.
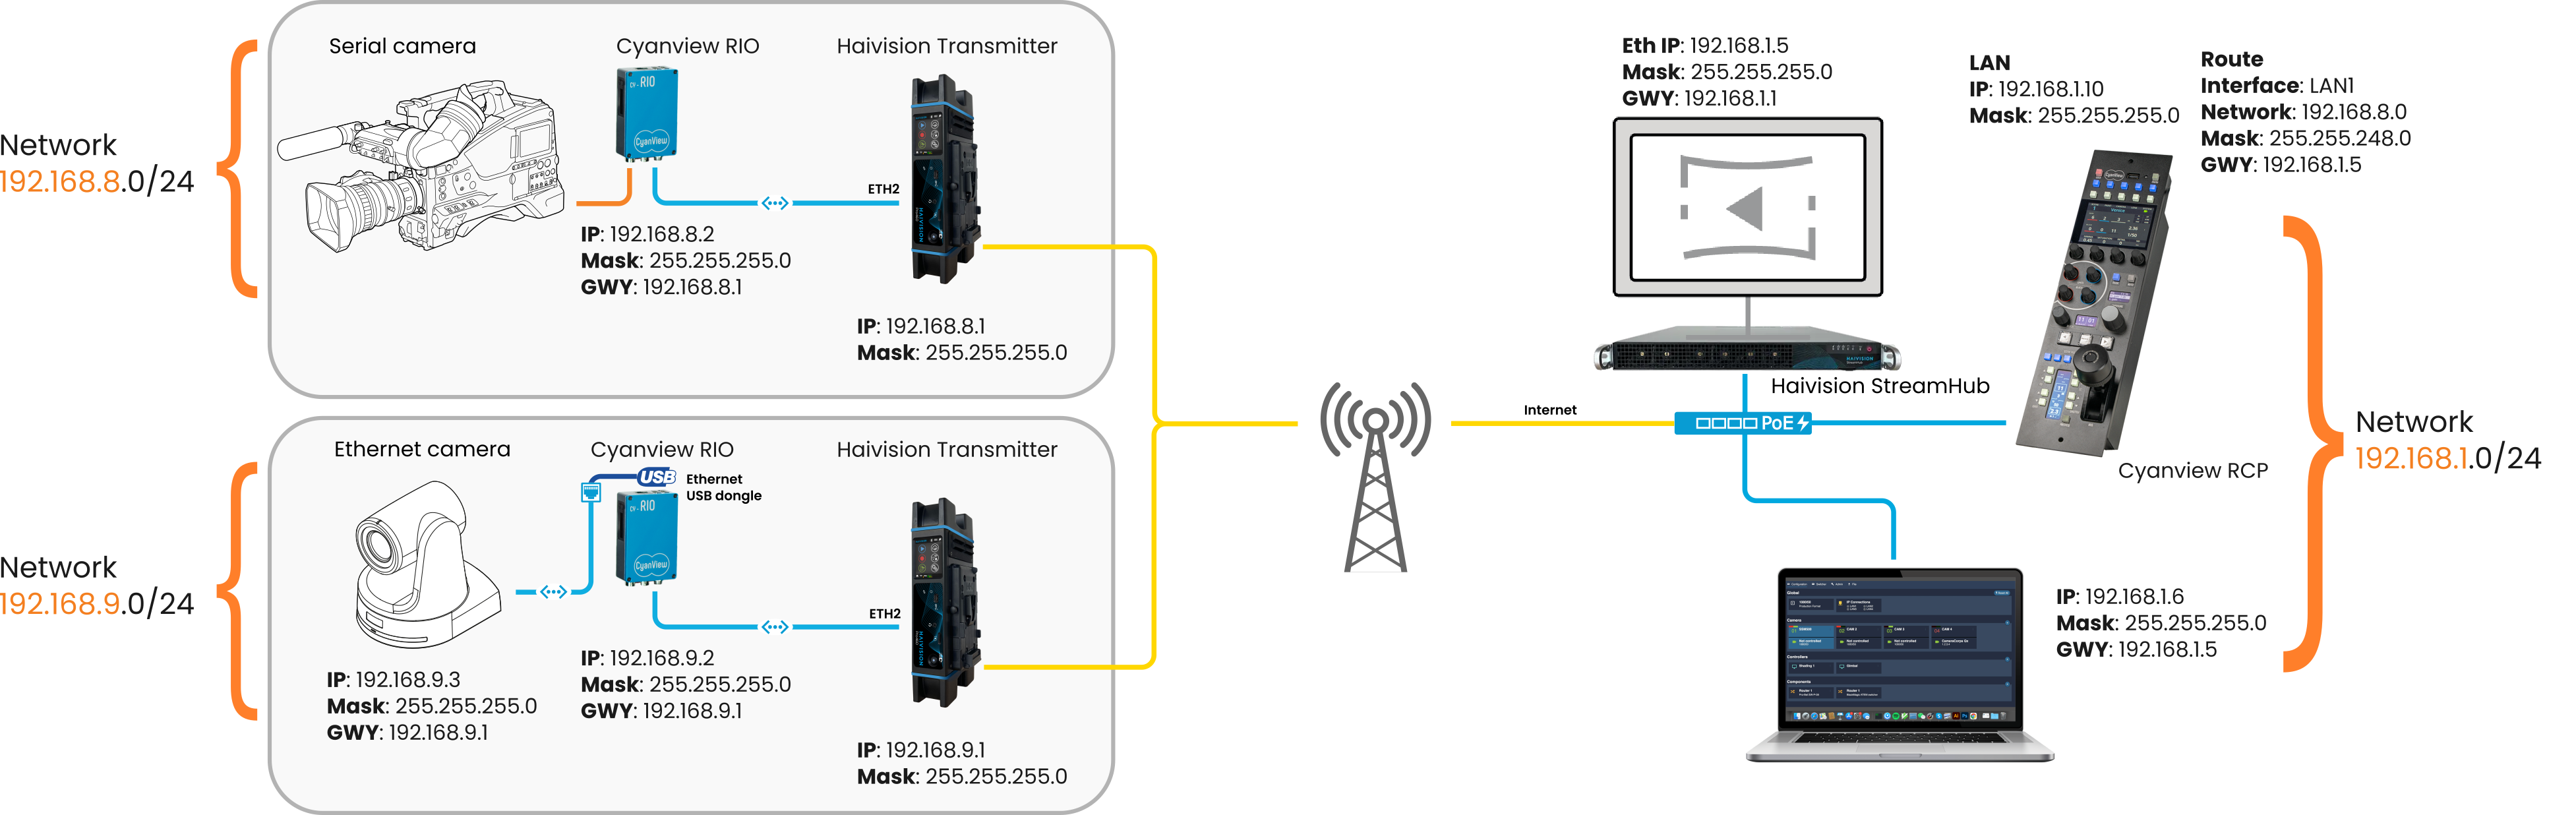
In this example, the RCP is part of the 192.168.1.0/24 network. To connect to the RIO, which is on the 192.168.8.0/24 network, you need to set up routing rules through the StreamHub, which acts as a gateway to the RIO's network. For return communication, the RIO also requires routing rules to send packets back to the RCP, using the transmitter as its gateway.
Each additional transmitter added to the workflow requires its own network, and the associated RIO will use that transmitter as its gateway. If more than one StreamHub is used, the RCP will need additional routing rules to ensure packets are routed to the correct StreamHub.
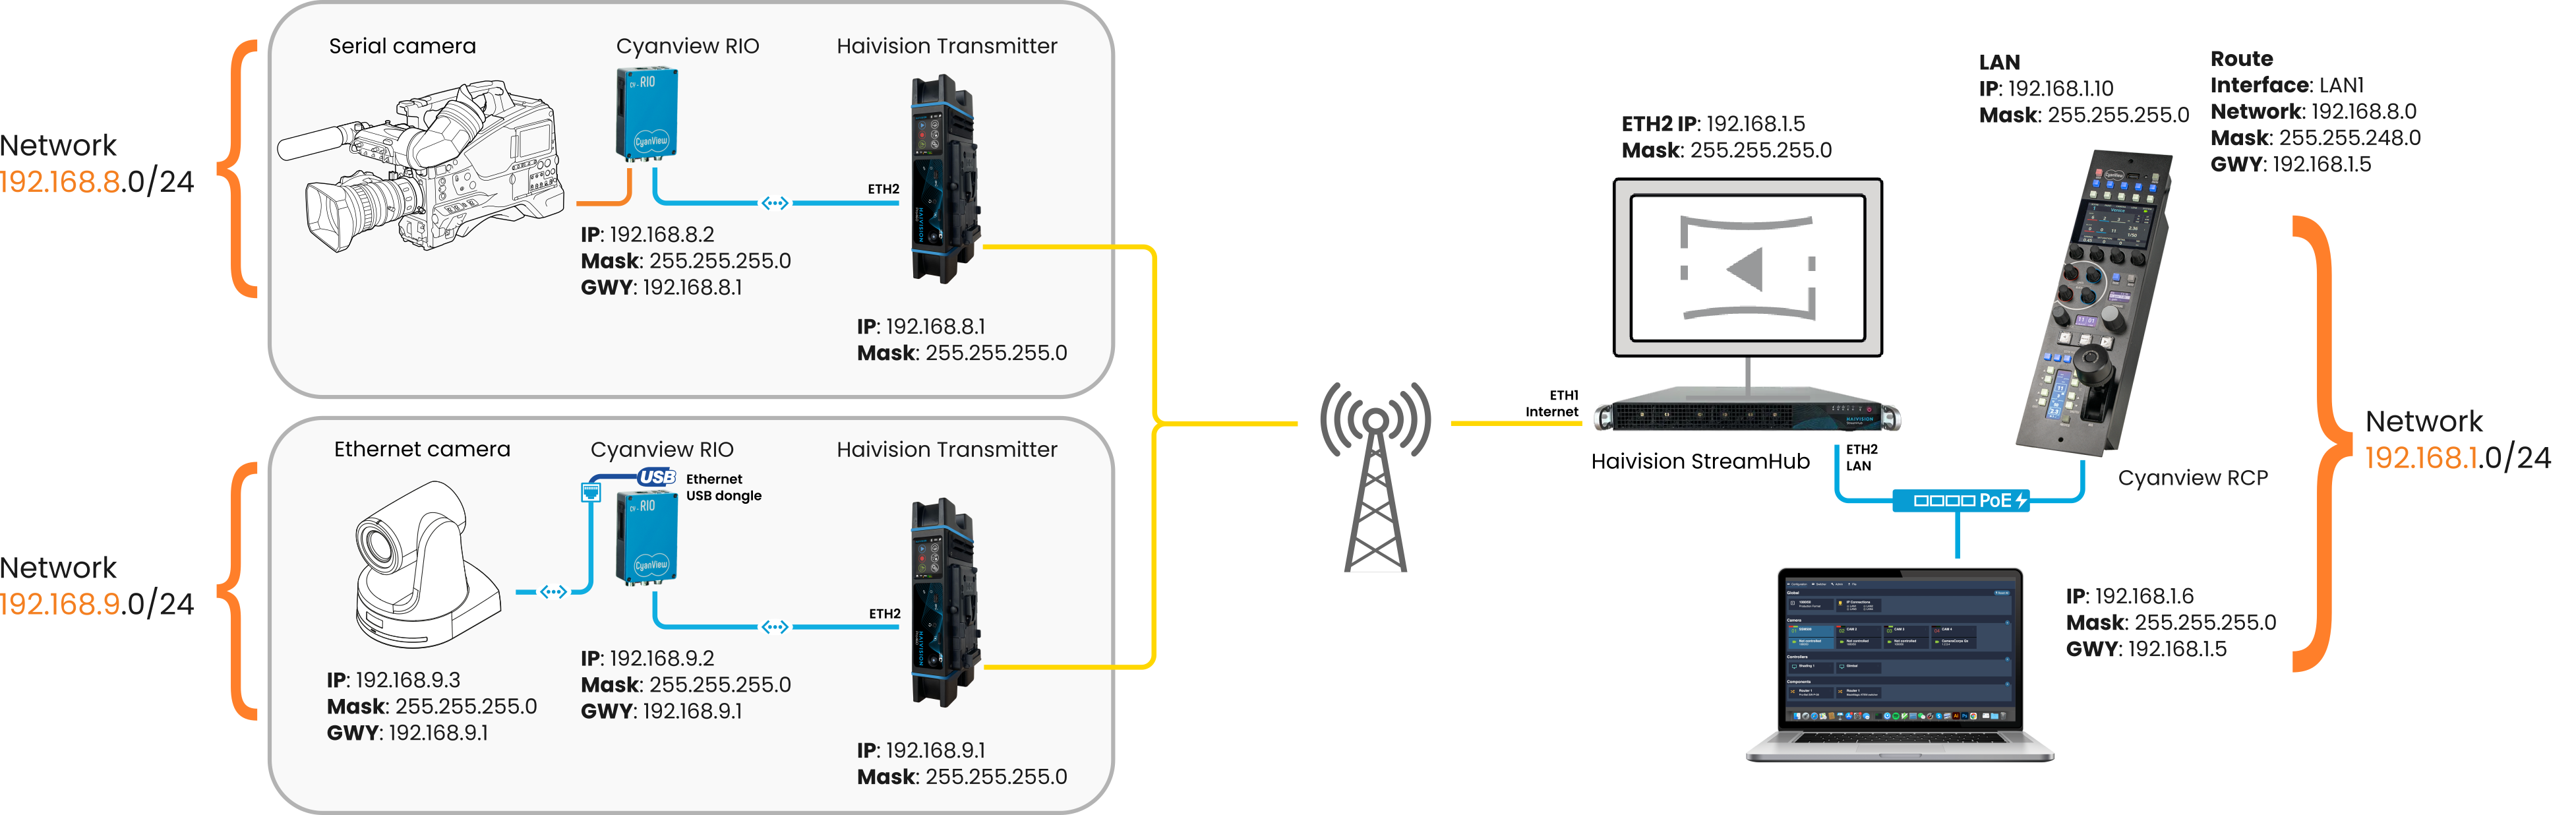
In some workflows, internet access is provided through a separate port on the StreamHub. The port connected to the LAN serves as the gateway for the DataBridge. The diagram below shows a different connection setup around the Haivision StreamHub.
Read this Primer on IP networking if you don't fully understand the notation above and how to configure routing between separate networks
Configuration of the Haivision DataBridge
From a working Haivision setup, activating the DataBridge only requires a few more steps:
-
On the StreamHub, no special configuration is required, but you need a DataBridge license.

-
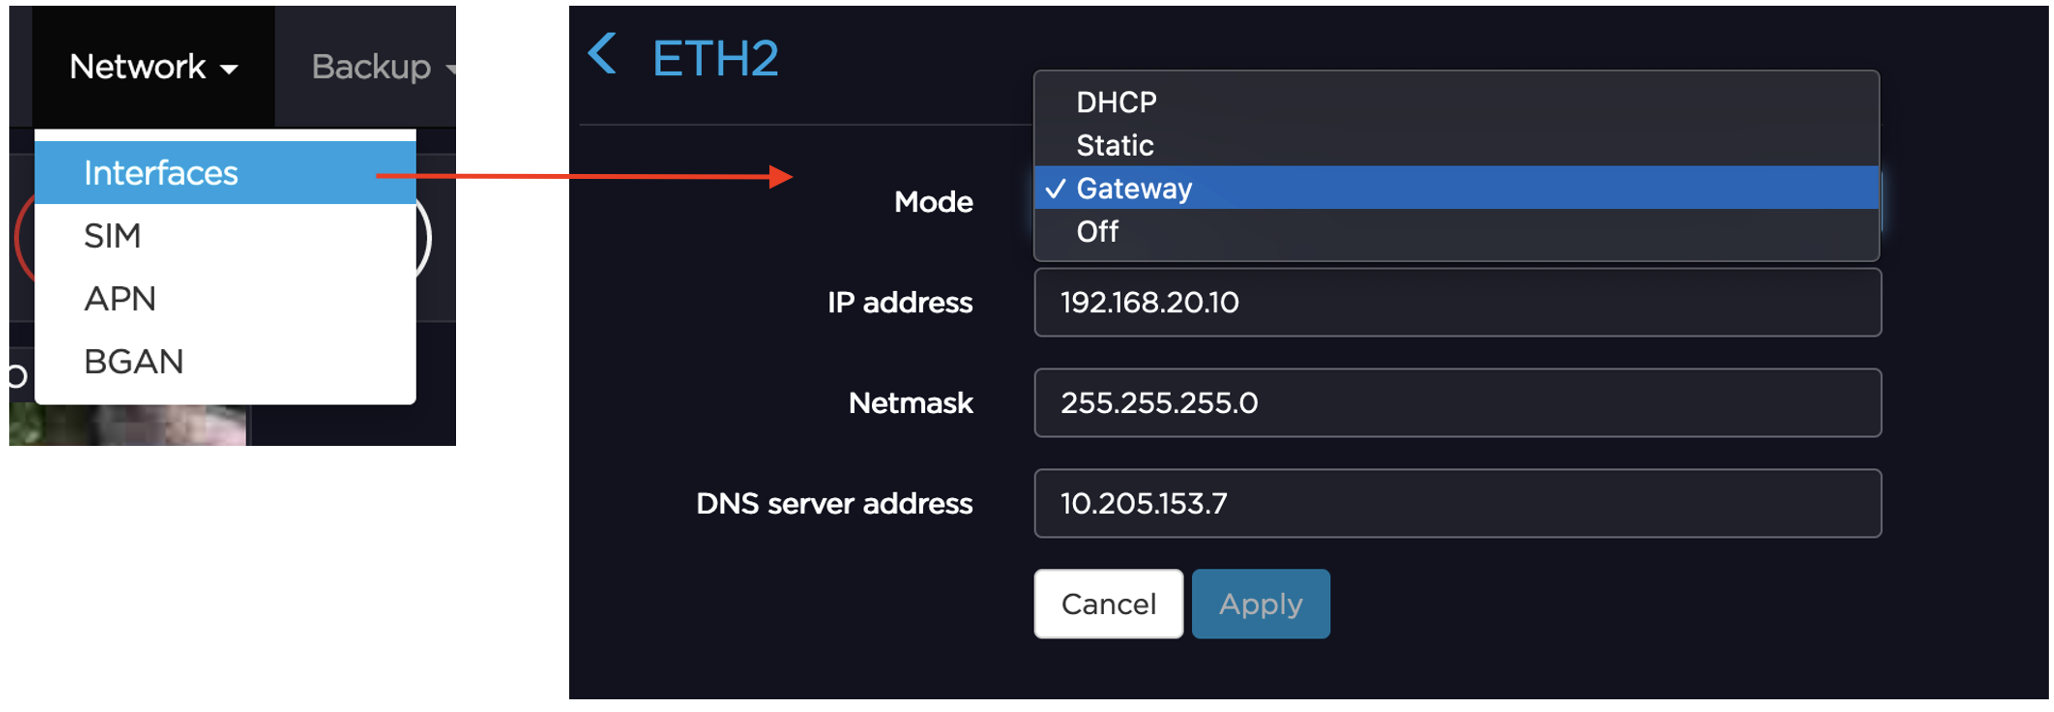
On Pro Series transmitters, set the ETH2 interface to Gateway mode and configure the IP address and subnet mask to match the camera network you have defined.
-
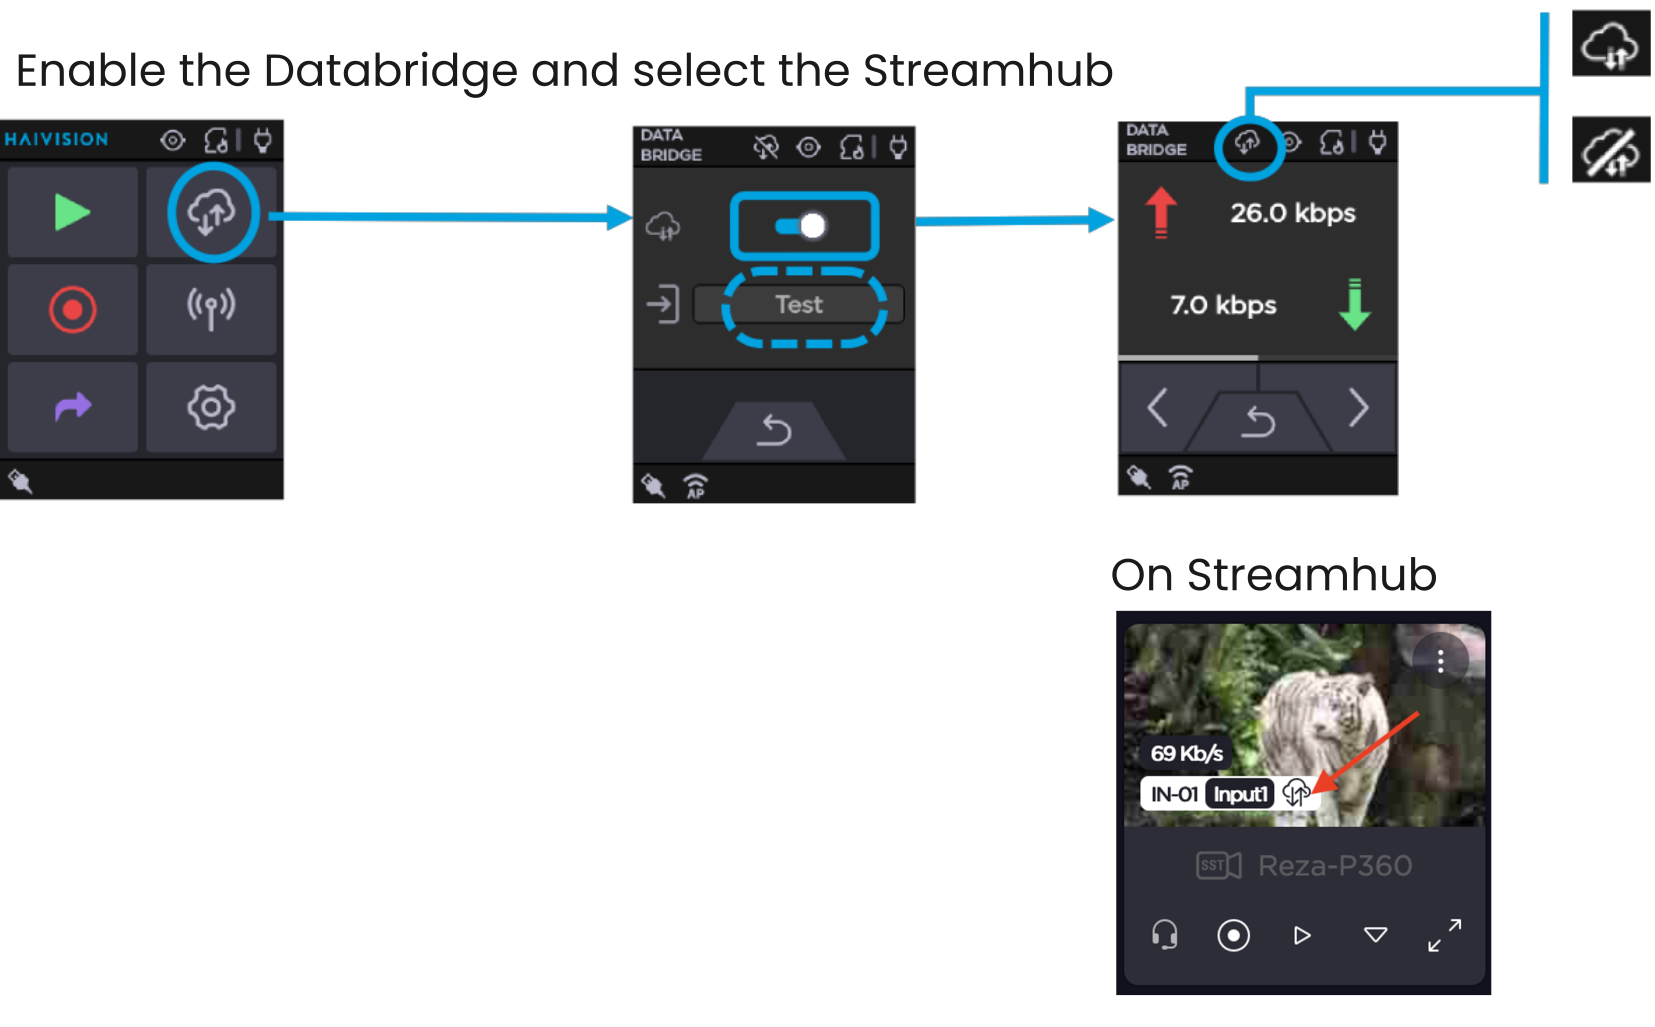
Enable the DataBridge function on the transmitter unit and select the destination StreamHub (in this example, labeled "Test"). Icons on both the transmitter and the streamhub show the status of the DataBridge, make sure it's showing an active connection.
You can refer to the Haivision documentation on using the DataBridge for further information and testing instructions.
Configuration of the RIO and RCP
To assign the required IP configuration, both the RCP and RIO should first be accessed and configured using their factory default IPs, which are in the 10.192.0.0/16 range. To do this, connect your computer to the same network and set its IP address to an unused value within the 10.192.x.x range. This allows you to reach the web interfaces of both devices for initial setup.
RCP Configuration
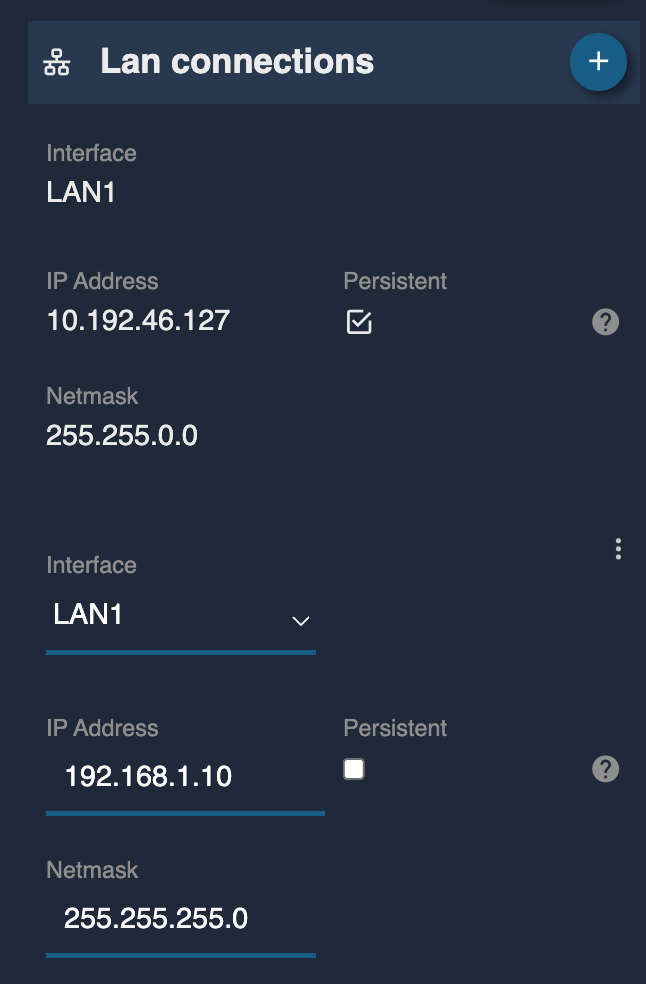
On the RCP, assign a new IP address in the LAN section as follows:
- IP:
192.168.1.10 - Mask:
255.255.255.0
Next, create a custom route to allow the RCP to communicate with the RIO network via the StreamHub. Use these settings for the route:
- Interface:
LAN1 - Destination network:
192.168.8.0 - Netmask:
255.255.248.0 - Gateway (GWY):
192.168.1.5
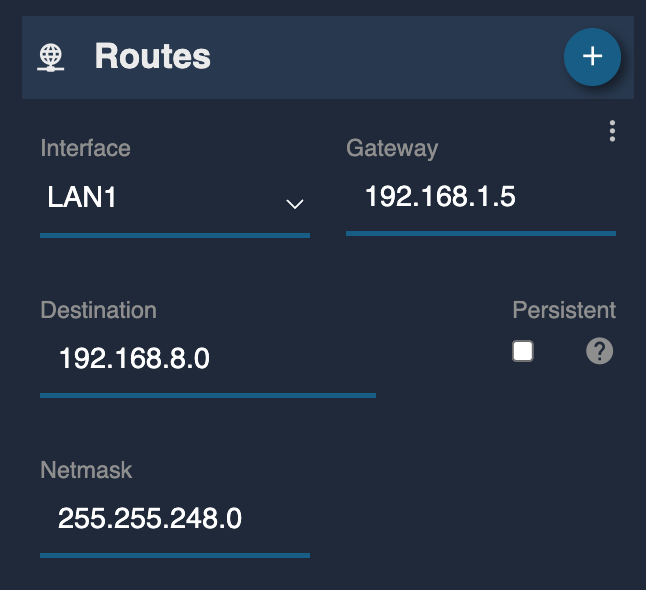
Here, the Gateway (192.168.1.5) is the IP address of the StreamHub, which acts as the gateway to route packets from the RCP to the transmitters and RIOs.
The netmask value of 255.255.248.0 (also written as /21) is important to understand. This mask covers the IP address range from 192.168.8.0 up to 192.168.15.254 (see this IP calculator). In other words, it combines 8 separate /24 networks (each with a mask of 255.255.255.0) into a single larger network.
This means the StreamHub can act as the gateway for up to 8 cameras or transmitters, each on its own /24 subnet. For example, your transmitters and RIOs could have addresses like 192.168.8.1/24, 192.168.9.1/24, ..., up to 192.168.15.1/24. The custom route on the RCP with the /21 netmask ensures that packets destined for any of these 8 subnets are sent to the StreamHub gateway.
Why use a LAN IP and custom route instead of the WAN entry?
If you need a separate internet connection, the WAN entry should be reserved for that purpose. Additionally, if your setup includes multiple StreamHubs, you may need to add multiple custom routes—something that is not possible with the single default route provided by the WAN entry.
RIO Configuration
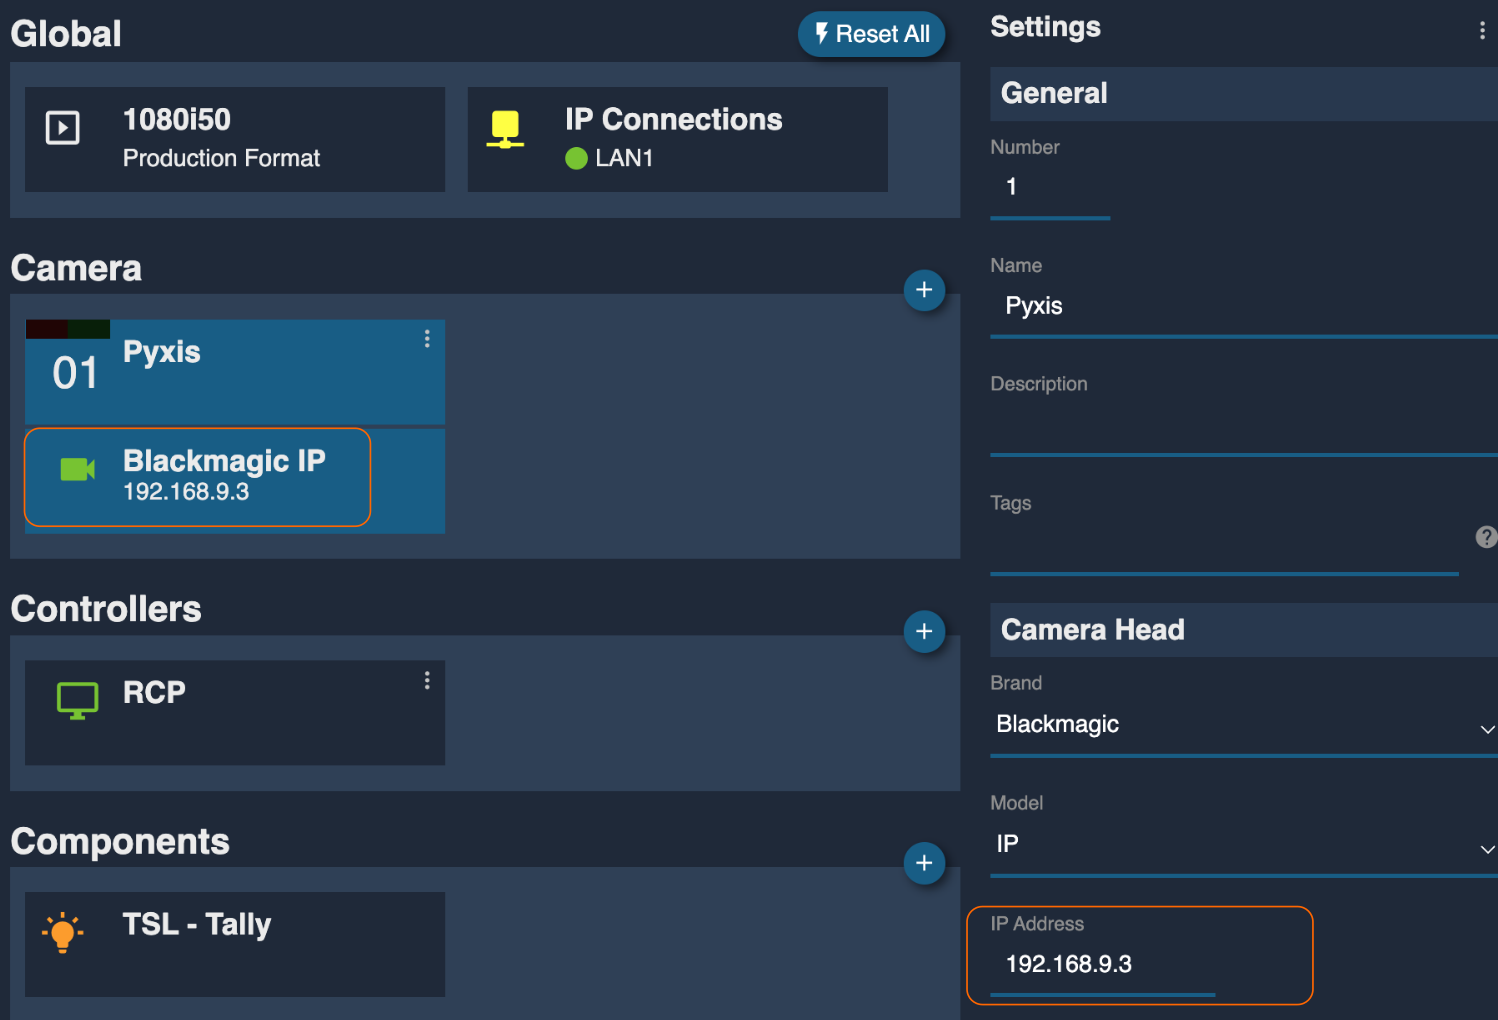
Assign a new IP address to the RIO in the WAN section as shown in the example with the IP camera:
- IP:
192.168.9.2 - Mask:
255.255.255.0 - Gateway (GWY):
192.168.9.1
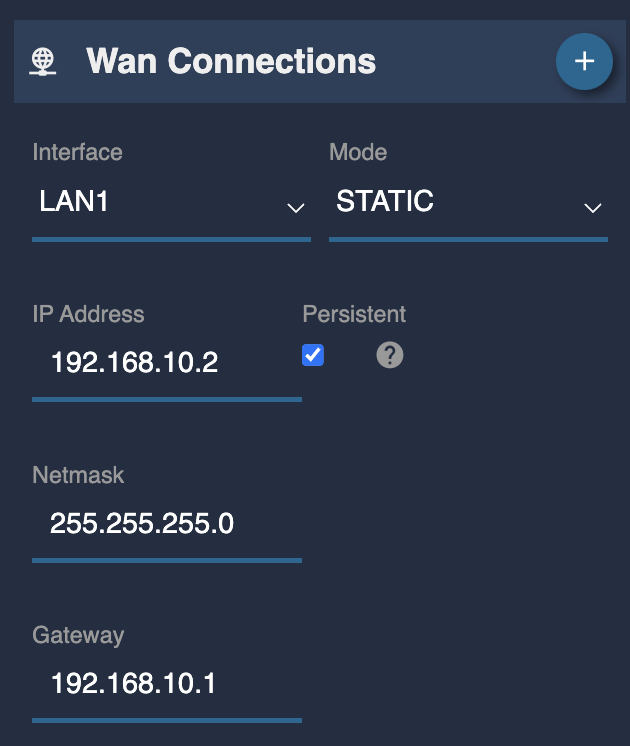
Since the RIO typically does not require a separate internet connection and only needs to connect to the transmitter, using the WAN section for its configuration is the simplest approach. While it is possible to use a LAN IP and custom route, the WAN configuration is generally sufficient and more straightforward for most workflows.
Bridging a USB ethernet interface on the RIO
If your camera connects over IP and you need a second network port on the RIO, the simplest solution is to add a USB Ethernet dongle to the RIO. You can then bridge this USB interface to the LAN1 port, allowing both ports to be on the same network. To do this, go to the IP configuration page on the RIO and tick the box in the "Bridge" section to enable bridging between the USB Ethernet and LAN1 interfaces.
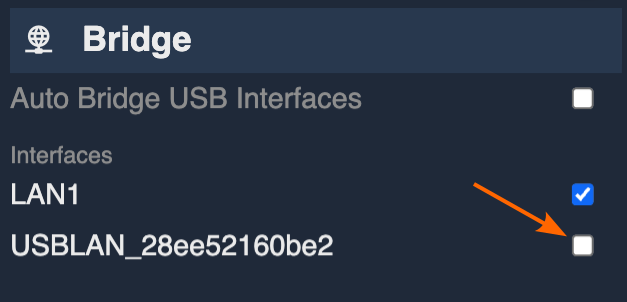
Note: When you enable bridging between the USB Ethernet and LAN1 interfaces on the RIO, the device works like a basic network switch. Both the USB and LAN1 ports are on the same network, just like two ports on a regular Ethernet switch. You do not need to assign a separate IP address or configure the USB interface—any device plugged into the USB Ethernet port will be on the same network as LAN1 and use the same settings.
After bridging, the USB interface will not show up as a separate entry in the LAN configuration page. This is normal: once bridged, the USB port is managed together with LAN1, and you do not need to configure it separately.
REMI configuration
While the RIO and RCP are connected on the same network using their factory default IP addresses, it is recommended to configure and test camera control at this stage. The factory IPs allow both devices to communicate and lets you verify the REMI link without modifying the new IP configuration required for the DataBridge.
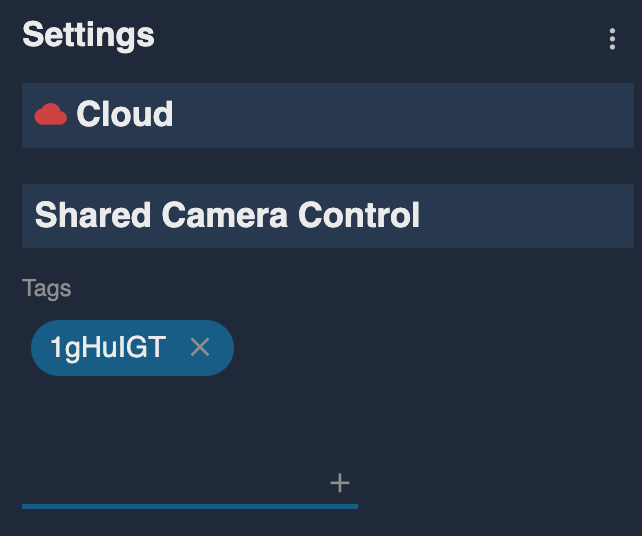
To enable communication between the RCP and RIO, you must add the same tag in both devices within the REMI tab of their configuration interfaces. Once the tag is set, you can add the camera in the RIO's configuration page. If camera control is working correctly, the new camera will appear green in the RIO configuration page. After this, the RIO should become visible from the RCP's REMI page. To add the camera to the RCP, simply tick the box on the right side of the listed camera. You can then verify camera control directly from the RCP panel.
-
Add the REMI tag to both the RCP and RIO.
-
Add the camera configuration in the RIO.
-
Check that communication works in the RIO: the camera icon should turn green.
-
The RIO should appear in the RCP interface; select (tick) the camera.
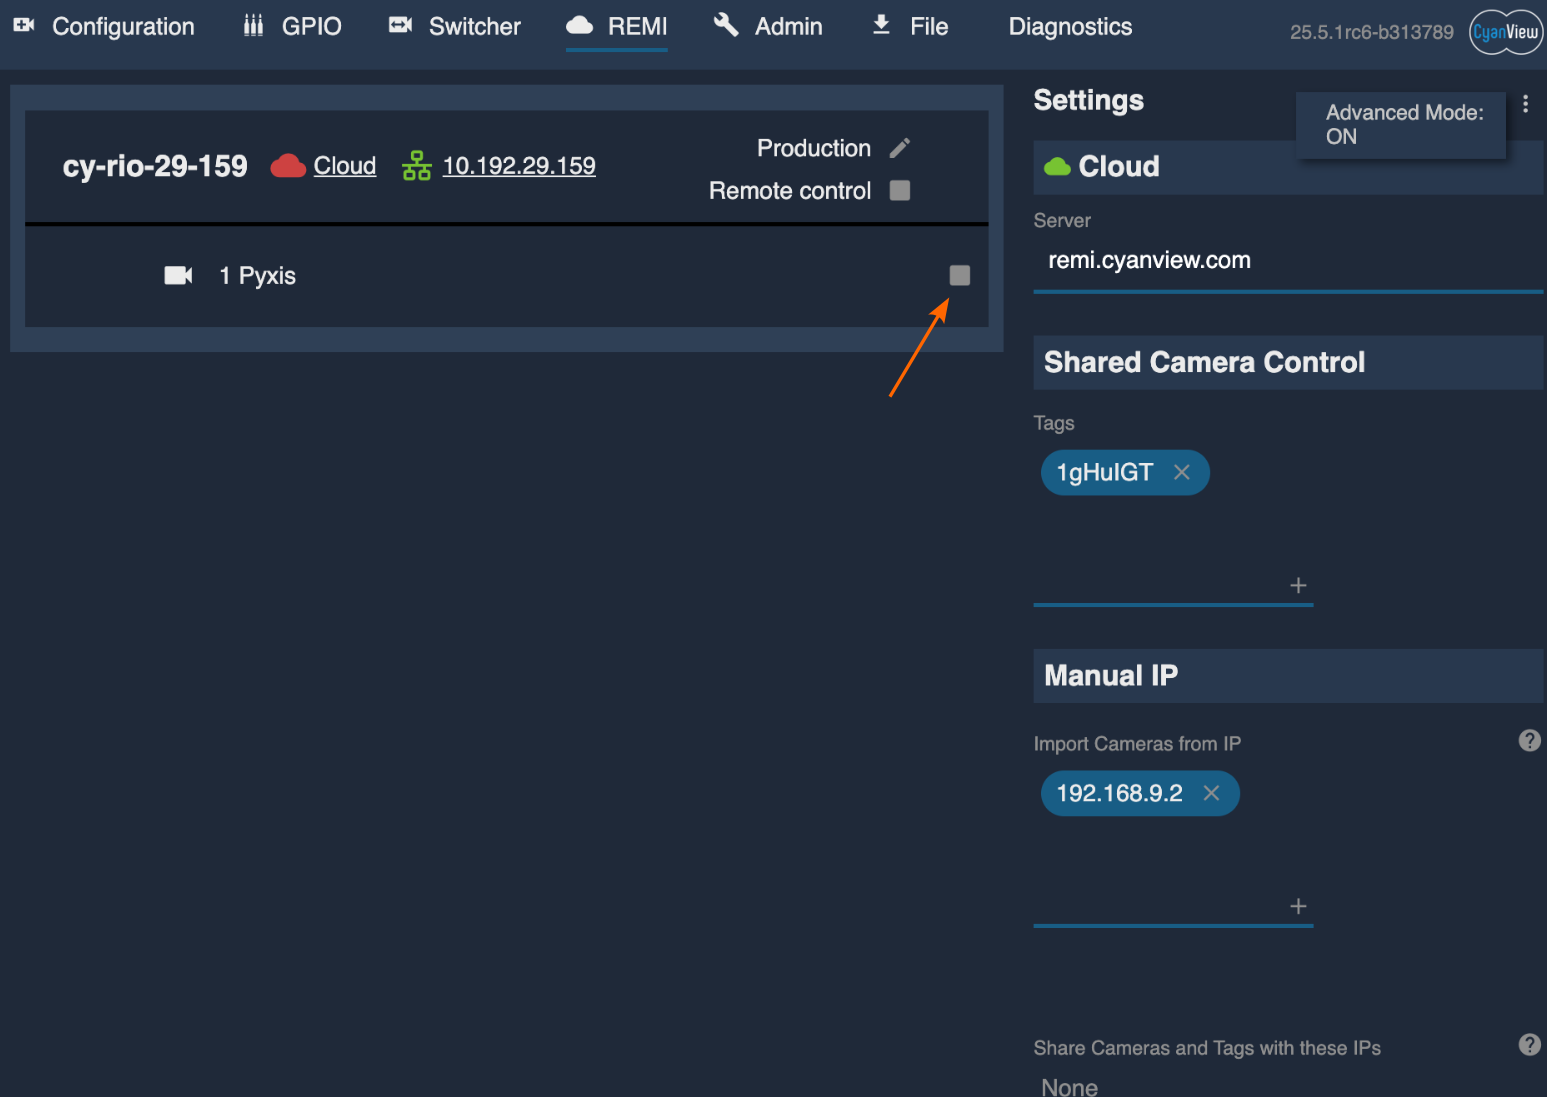
Once the RIO is moved to the transmitter side, local discovery packets will no longer be propagated between the RCP and the RIO, meaning the two units cannot automatically see each other. To allow the RCP to find the RIO, you must manually add the RIO's IP address to the RCP's REMI configuration page. To do this:
-
Open the RCP REMI page
-
First enable Advanced mode by clicking the 3-dot menu in the top right corner of the REMI page.
-
Then, in the "Manual IP - Import Cameras from IP" section, enter the RIO's IP address (
192.168.9.2) and click the "+" button. The IP address will appear above the input field.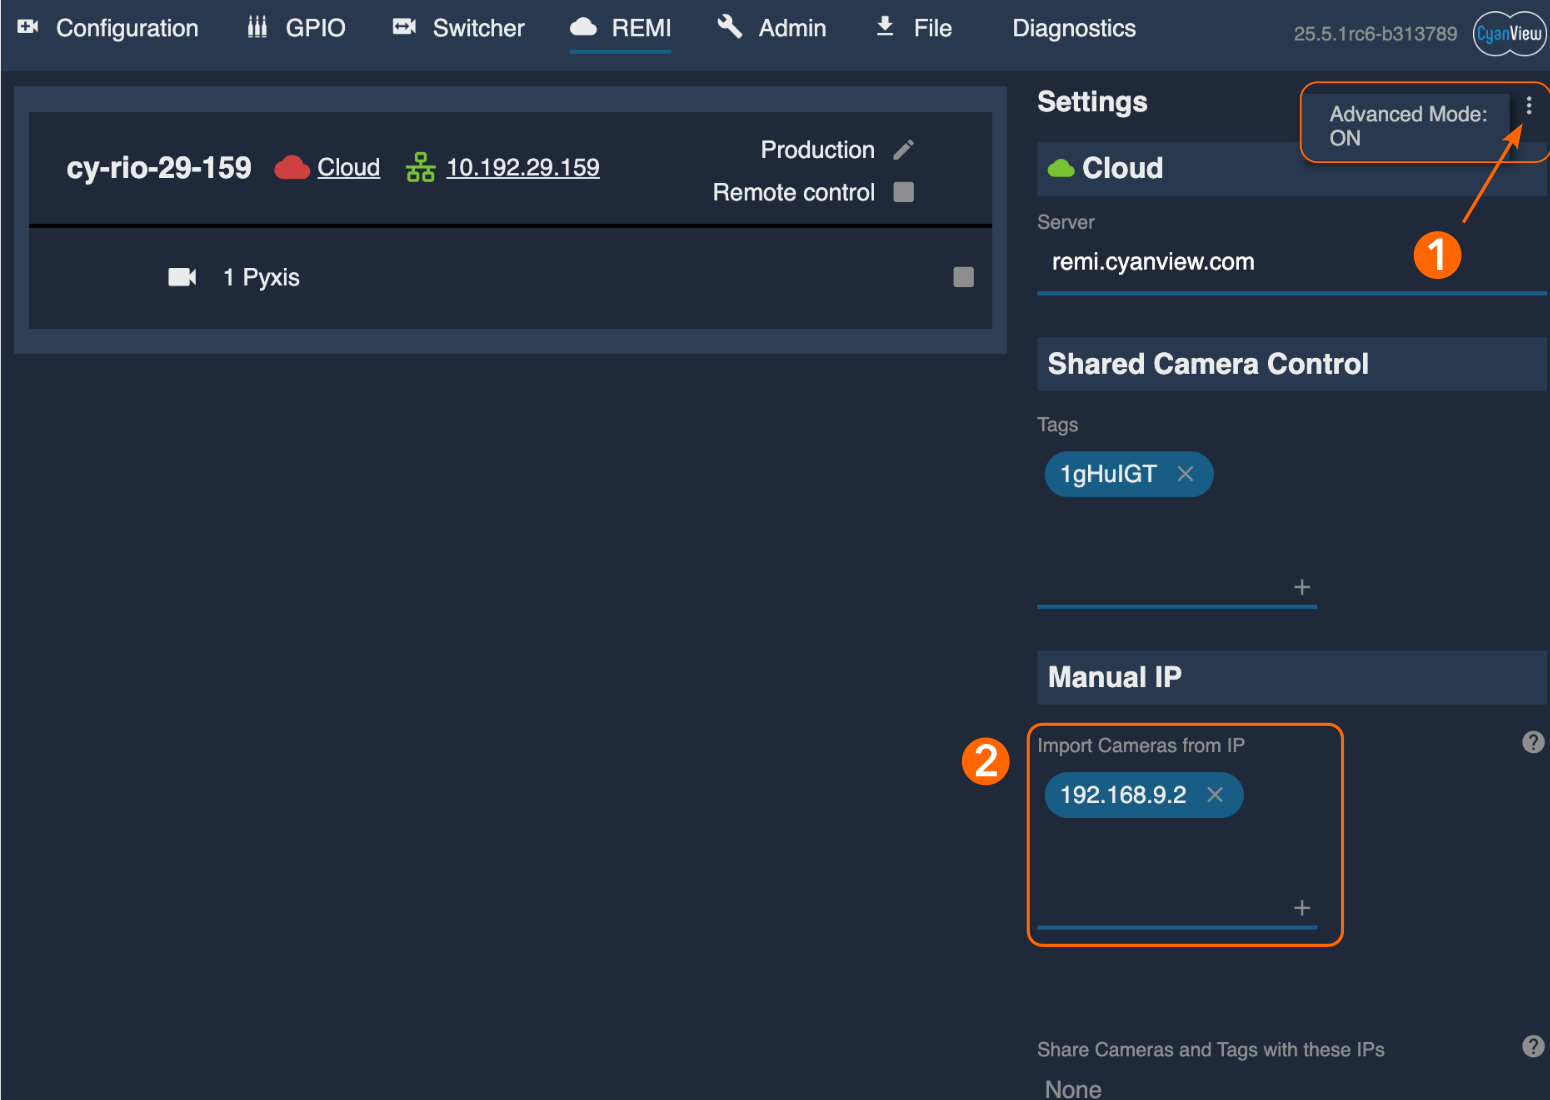
-
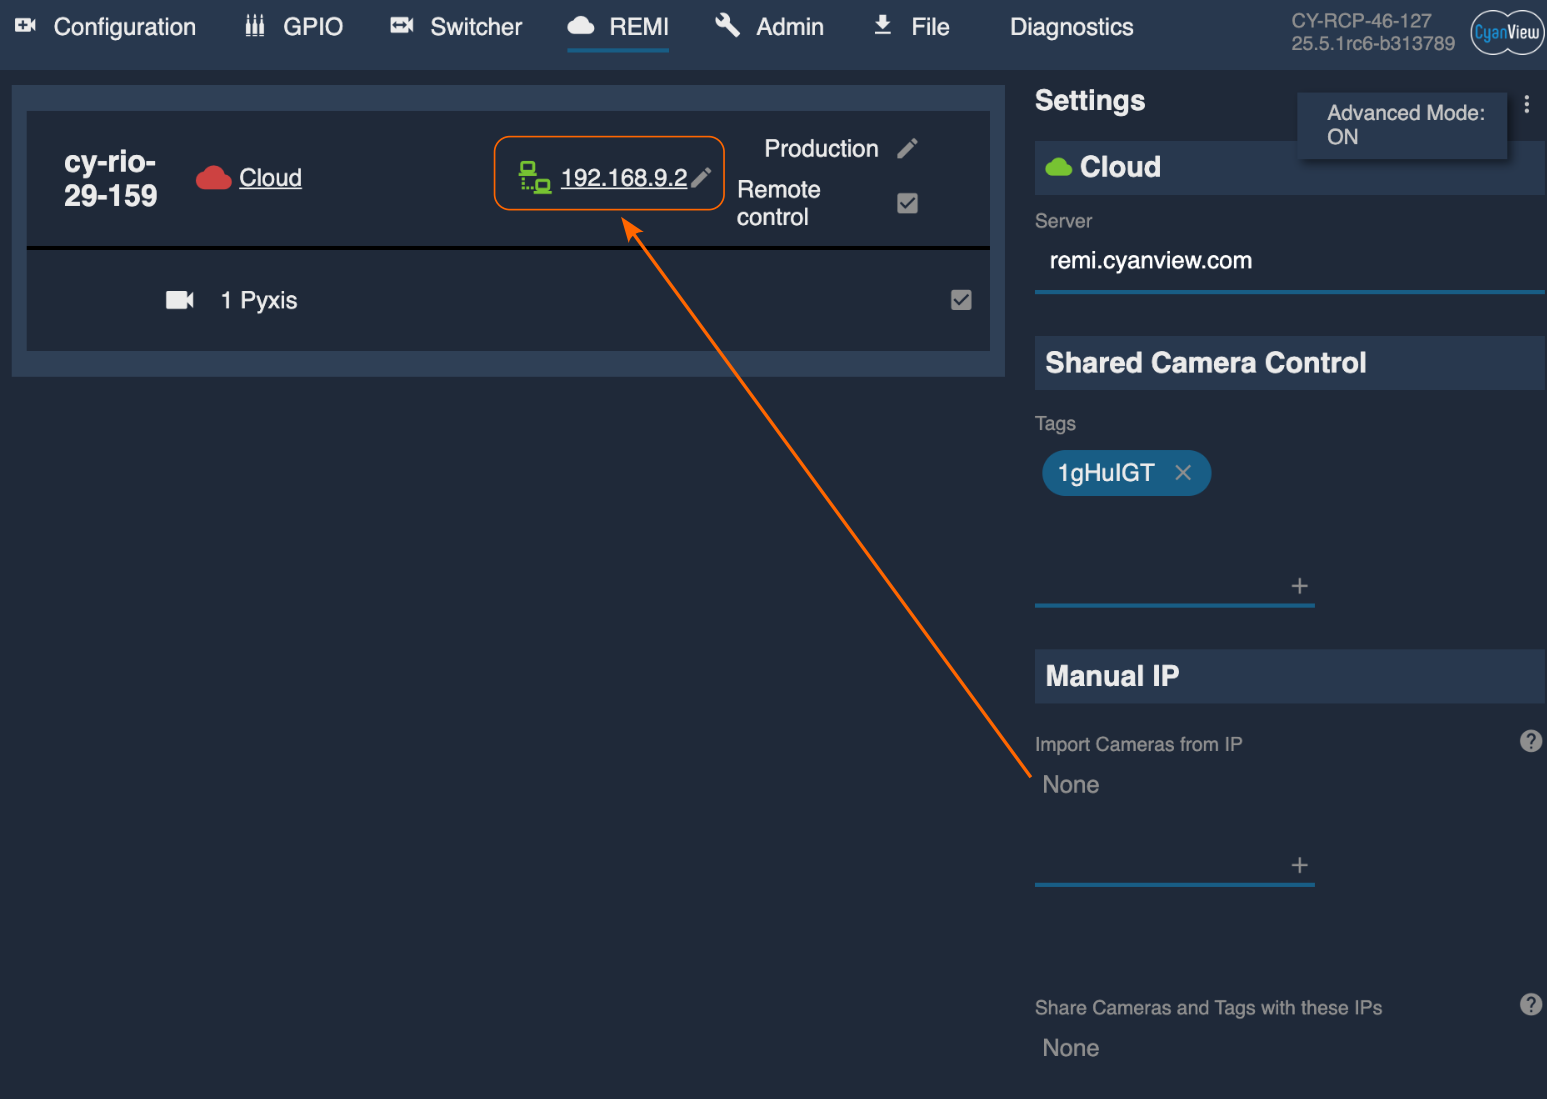
Move the RIO to the transmitter side, connecting it to the ETH2 of the Pro series. Make sure to power cycle the RIO to restart the IP configuration.
-
Once the RIO is discovered by the RCP, the IP address will move to the left column next to the RIO entry. This is the confirmation that the configuration was successful.
Troubleshooting
To check that everything is set up correctly, you should test the network connections between each device. You can do this by using a computer to "ping" each device, which is a simple way to see if they can talk to each other.
Step 1: Set up your computer's network settings
Set your computer's network settings to the following:
- IP address: 192.168.1.6
- Subnet Mask: 255.255.255.0
- Gateway: 192.168.1.5
These settings will let your computer connect directly to devices on the same network as the StreamHub and RCP. If you try to reach devices on other networks, your computer will send the traffic through the StreamHub (which is set as the gateway), so you don't need to add any extra routes.
Step 2: Test the connections
Help on using ping can be found in the IP Primer
-
Ping the StreamHub: Open a command prompt or terminal on your computer and type:
ping 192.168.1.5If you get a reply, the StreamHub is connected. If not, check the StreamHub's network settings. -
Ping the RCP: Type:
ping 192.168.1.10If you get a reply, the RCP is connected. If not, check the RCP's network settings. -
Ping the transmitter: Type:
ping 192.168.9.1If this does not work, there may be a problem with the DataBridge setup or your computer's gateway setting. -
Ping the RIO: Type:
ping 192.168.9.2If this does not work, check the RIO's WAN (network) settings.
If any of these steps fail, double-check the network settings for the device that did not reply. This process helps you find out where the connection problem is, even if you are not familiar with networking.