Haivision Data Bridge
Introduction
The goal of this guide is to show how to integrate a Haivision Data Bridge with a Cyanview RCP and RIO.
Wiring
The advantage of using a RIO on camera/encoder side is that the camera is controlled locally by the RIO. The camera protocols are not designed to work on latency networks.
The RIO allows you to connects serials cams through your data bridge.
But will also reduce latency of IP based cams (PTZ, etc.).
And make the link robust and avoid any glitch (due to timeouts, etc.)
Setup
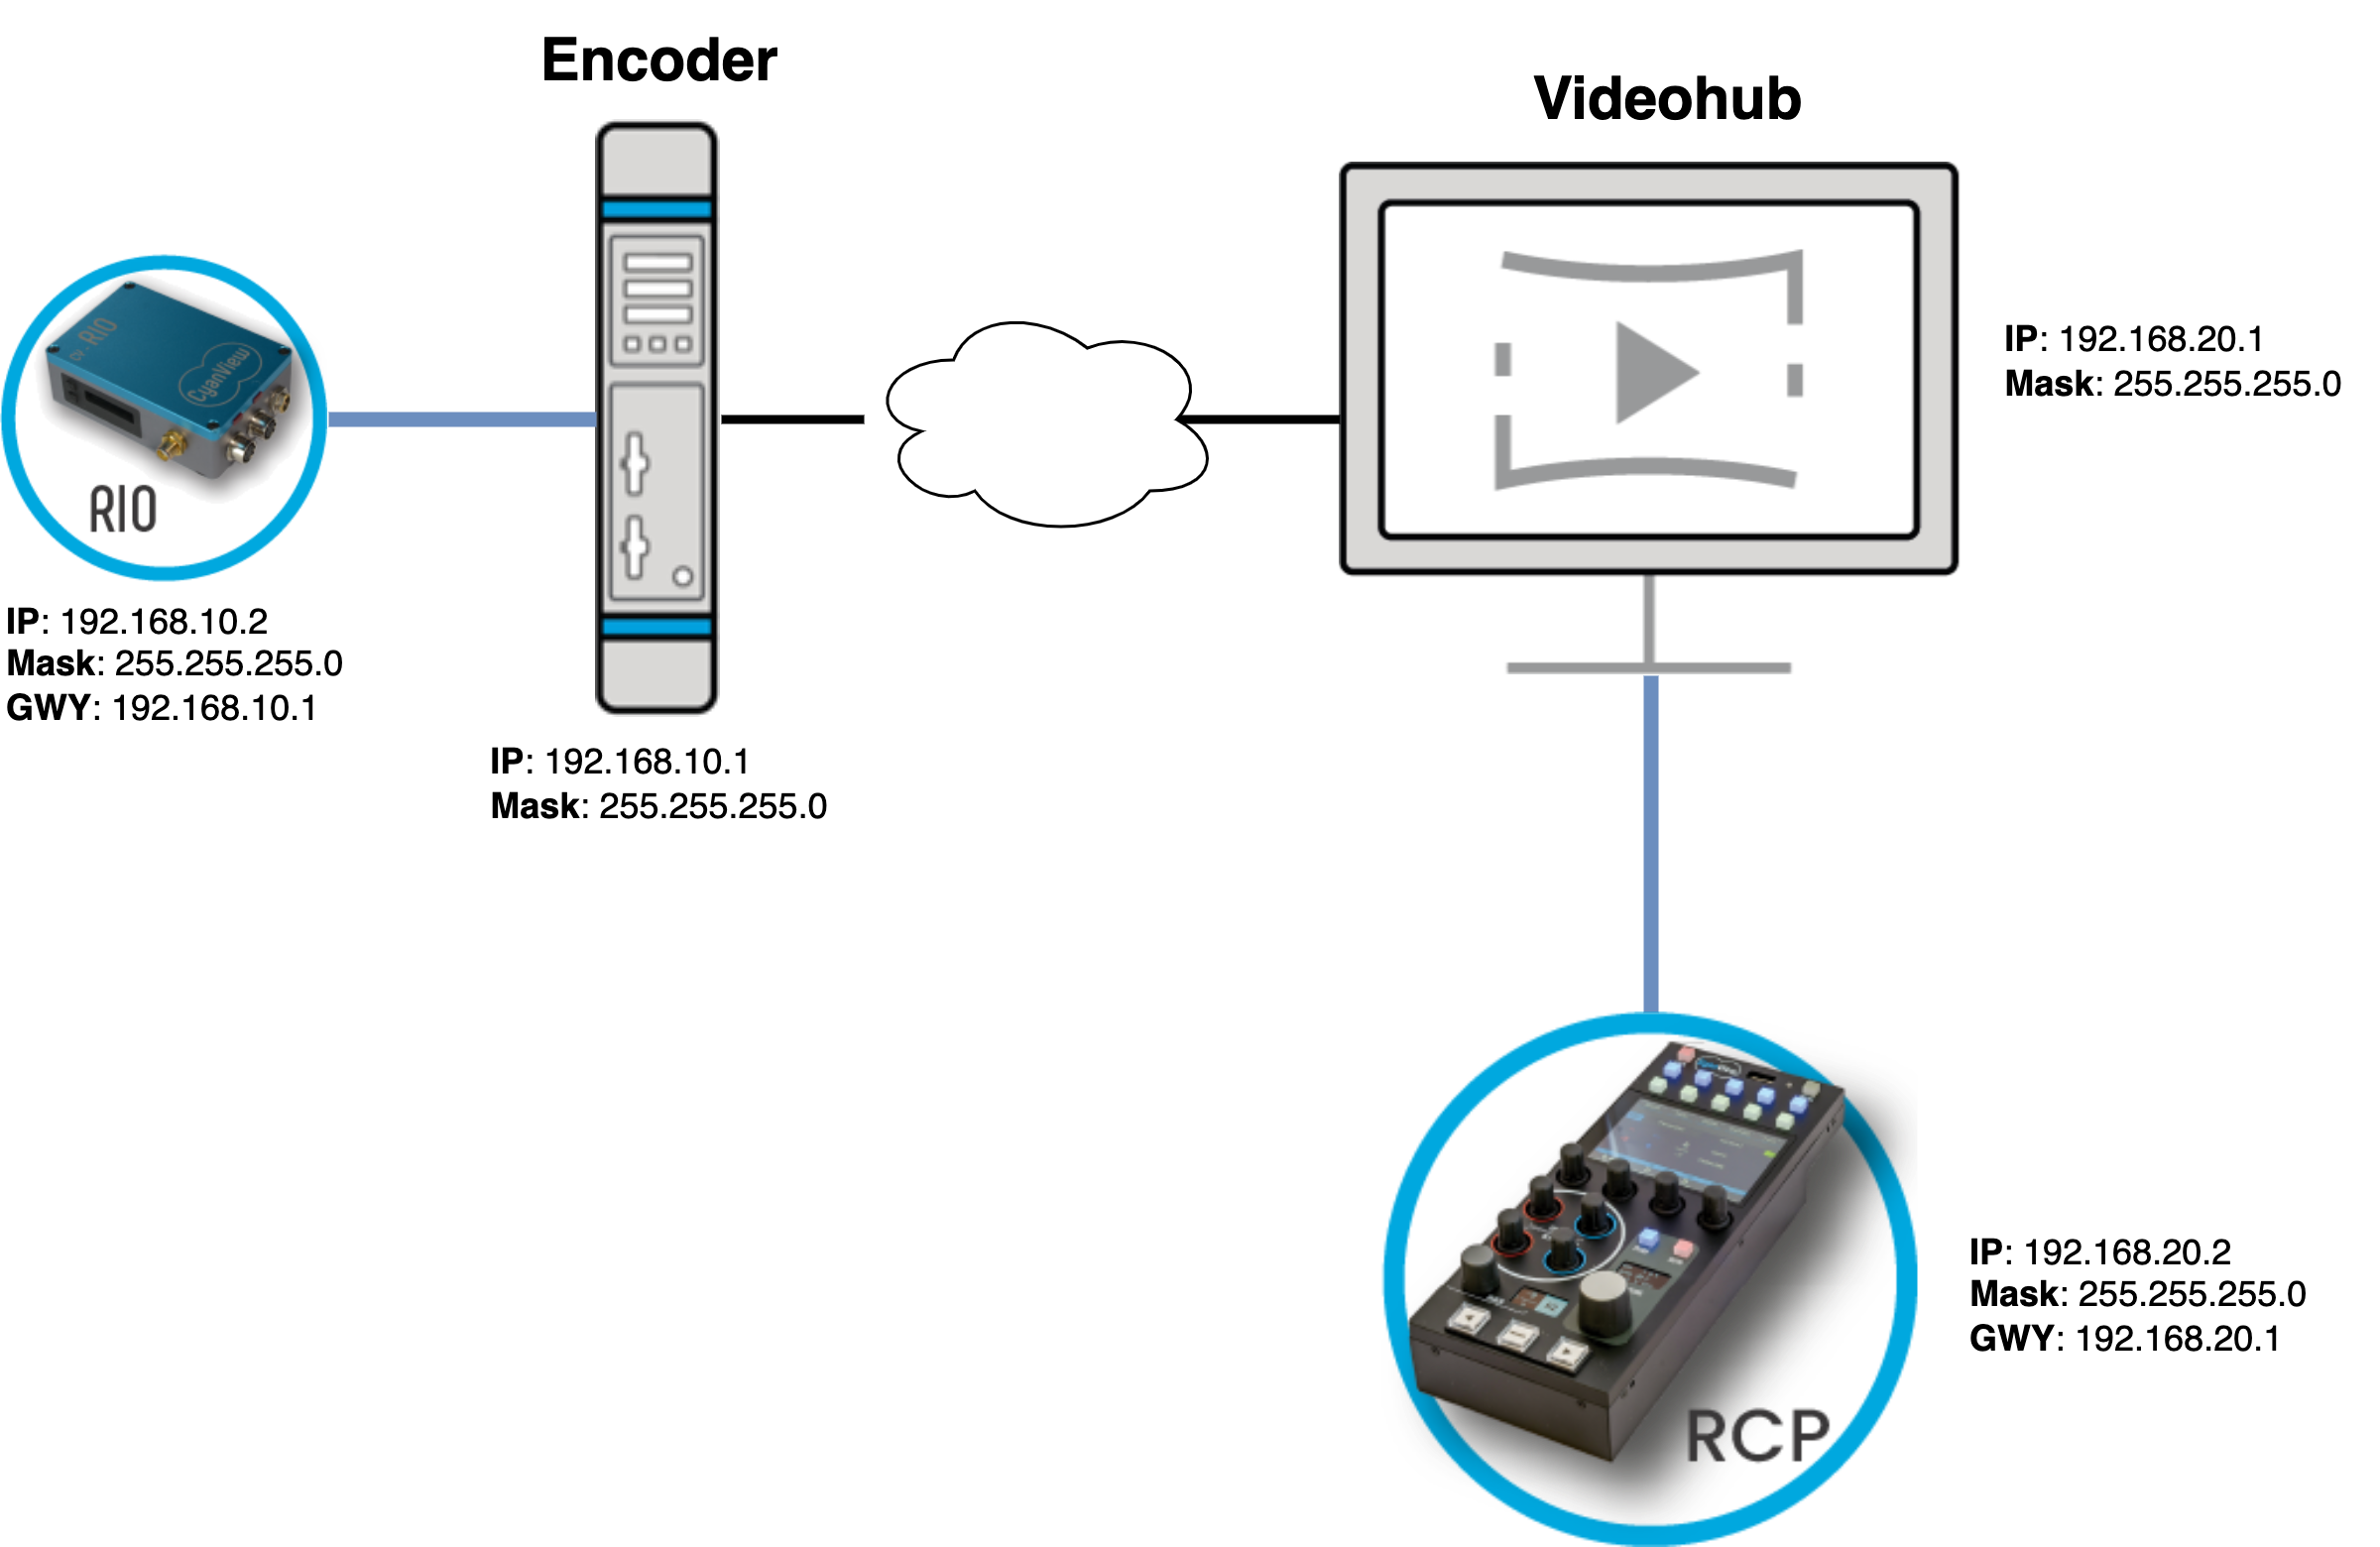
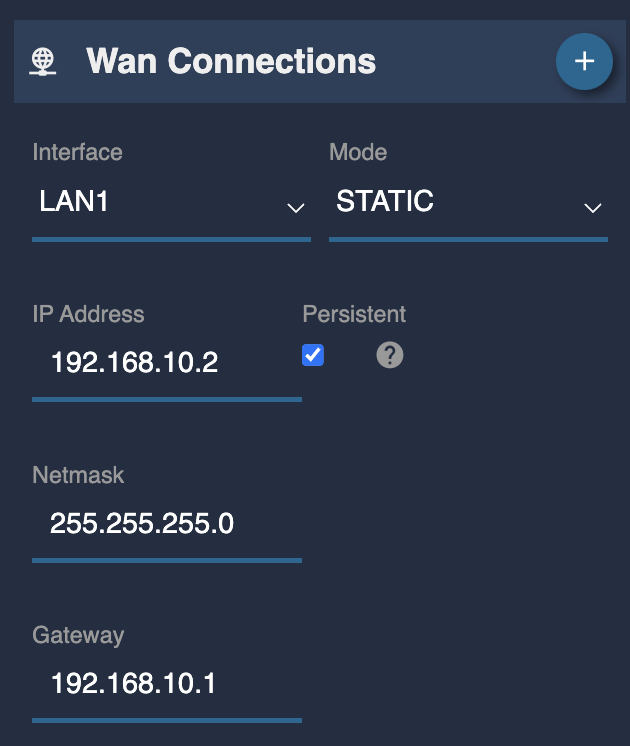
Encoder
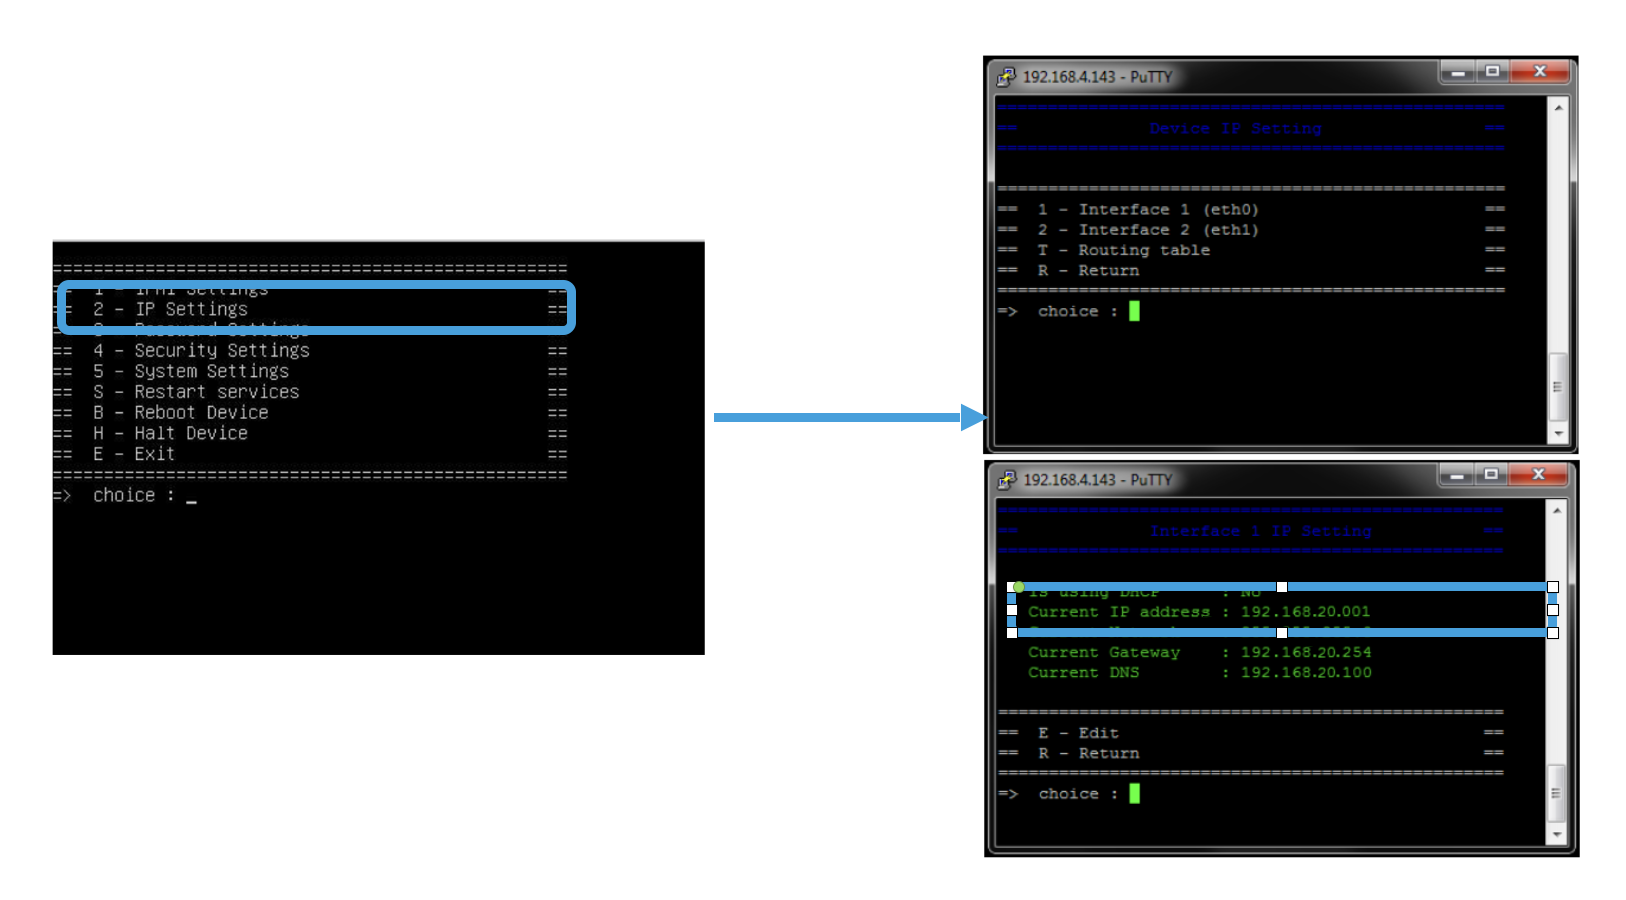
Here, we don't touch on the WAN cnx, only the LAN cnx. We setup:
- ETH2 (could've been ETH1 also if not used)
- Setup the mode in
DHCP - Setup the mode to
Gateway - Setup the encoder IP to
192.168.10.1with a netmask of255.255.255.0 - DNS is not used, so put it to whatever you want
What it means here:
- The encoder will acts as a "router"
- It will distribute IP address in DHCP on ETH2
- And all IP address will be in the range of
192.168.10.1/24
In our case, we will not use DHCP as we will setup the RIO in static IP, but this way it's easy to test right now:
- plug your laptop on the ETH2 port of your encoder
- you should automatically receive an IP address in the range of your encoder, probably
10.192.10.2/24 - you should be able to ping your encoder IP address :
19.192.10.1

If the previous test works, you can now activate the Data Bridge:
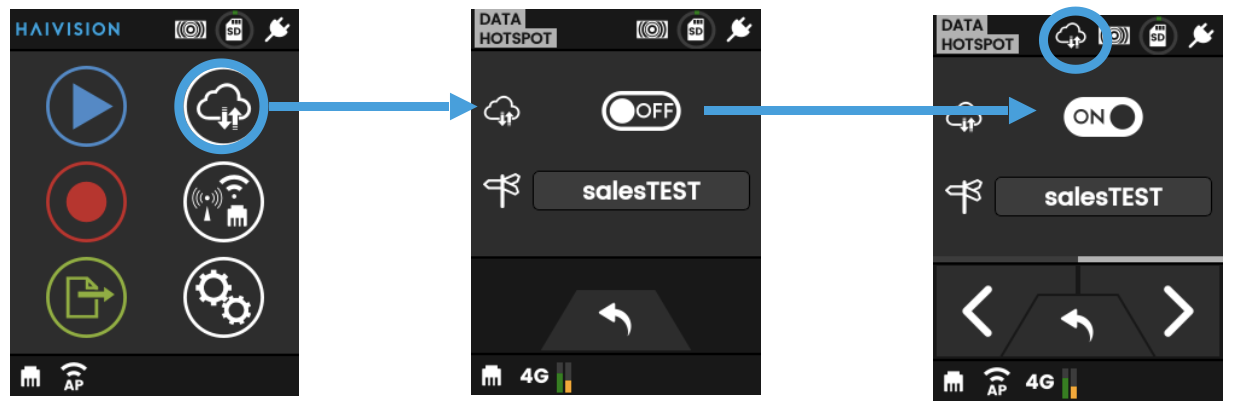
If properly activated, you see the new data bridge icon on the top left.
In my setup, the encoder ETH2 is my LAN interface. Used by my RIO. And the encoder is connected to internet using 4G.
Decoder
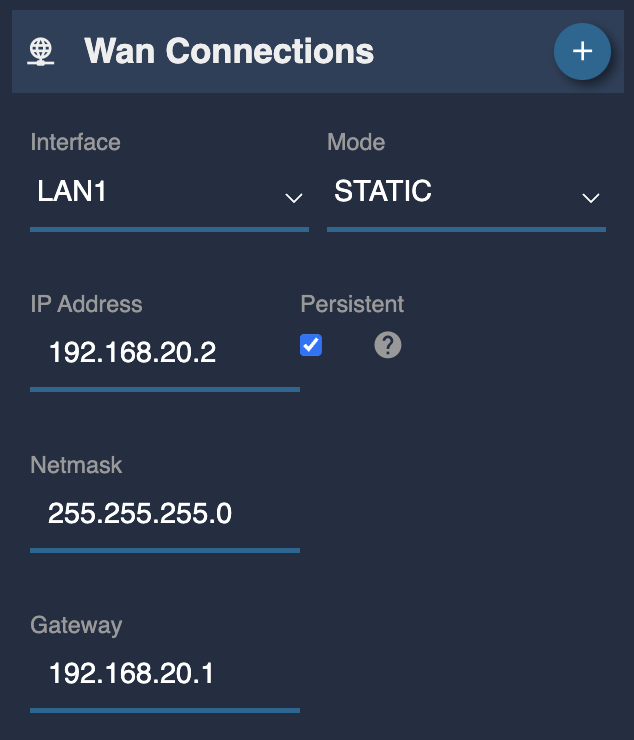
Here, we don't touch on the WAN cnx, only the LAN cnx (eth0 in our case).
We setup:
- eth0 IP
192.168.20.1with a netmask of255.255.255.0 - gateway and DNS are not used here (only LAN), so put whatever you want here.
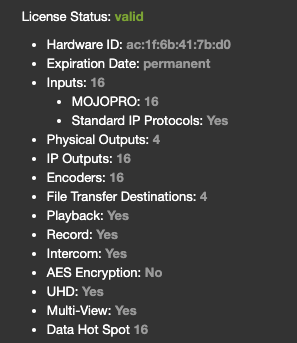
Ensure on the decoder side that the Data Bridge licence is available:
Check the line Data Hot Spot.
In my setup, the decoder eth0 is my LAN interface. Used by my RCP. And the decoder eth1 is the WAN interface to allow my decoder to access internet and exposed with a public IP
RIO
Ensure to have a REMI tag on your RIO.
On the rio, we will setup a static WAN IP:
Click on the IP block

In the WAN section:
- setup
Modeto static - setup
IP Adressto192.168.10.2 - setup
Netmaskto255.255.255.0 - setup
Gatewayto192.168.10.1(the encoder IP)
DHCP would work also, but if you have various devices there, at boot, they could have different IP's and it could be a pain to find the RIO IP address. So it's better here to get control and setup a static WAN IP.
You could indeed have DHCP + static IP, this way you keep it flexible in case you plug it in a different network.
RCP
Ensure to have a REMI tag on your RCP, at least one in common with your RIO.
On the RCP, we will setup a static WAN IP, but for the decoder side:
Click on the IP block
In the WAN section:
- setup
Modeto static - setup
IP Adressto192.168.20.2 - setup
Netmaskto255.255.255.0 - setup
Gatewayto192.168.20.1(the decoder IP)
From there, your RIO/RCP are linked using the REMI and communicate using the Haivision data bridge.
In your RCP REMI tab, you RIO should appear as green in the list and you should be able to click on it to access the RIO web page and setup your camera from decoder/RCP side.
Going further
Here we have a simple setup with:
- 1 RIO on 1 encoder
- 1 RCP on 1 decoder
1 RIO can control multiple cameras on its own, so you could have:
- multiple PTZ
- multiple serial cams
and control it from your RCP.
Multiple RIO on multiple encoders and a single decoder
If you have up to 4 encoders and a single decoder.
Ensure each encoder setup and RIO have different ranges of IP address, for example:
- Encoder 1:
- encoder IP :
192.168.10.1/24 - RIO IP :
192.168.10.2/24
- encoder IP :
- Encoder 2:
- encoder IP :
192.168.20.1/24 - RIO IP :
192.168.20.2/24
- encoder IP :
- Encoder 3:
- encoder IP:
192.168.30.1/24 - RIO IP :
192.168.30.2/24
- encoder IP:
- Encoder 4:
- encoder IP:
192.168.40.1/24 - RIO IP:
192.168.40.2/24
- encoder IP:
- Decoder 1:
- decoder IP:
192.168.50.1/24 - RCP IP:
192.168.50.2/24
- decoder IP:
This will work as they all have different networks, ip/mask/gateway is enough in this case as there is a single route for RIO (the encoder) and the RCP (the decoder).
Multiple RIO on multiple encoders and multiple decoders
If you have more than one decoder, you will need to setup your RIO as explained above.
On the RCP side, the gateway is not enough anymore as we have different path to different RIO's.
You will need to enter a static route on your RCP to tell it how to reach the RIO's through which encoder:
- Route 1:
- Interface :
LAN1 - Gateway :
192.168.50.1(IP of one of your decoder) - Destination :
192.168.40.1(IP of one of your RIO) - Netmask :
255.255.255.255(single IP netmask)
- Interface :
- Route 2, Route 3, etc.
This example here is more to give some hints than an actual smart network setup, in this case of multiple encoders/decoders, you will probably have a more complex network setup with multiple LAN, VLAN, etc. and you will have finer control of masking, etc.
From the field
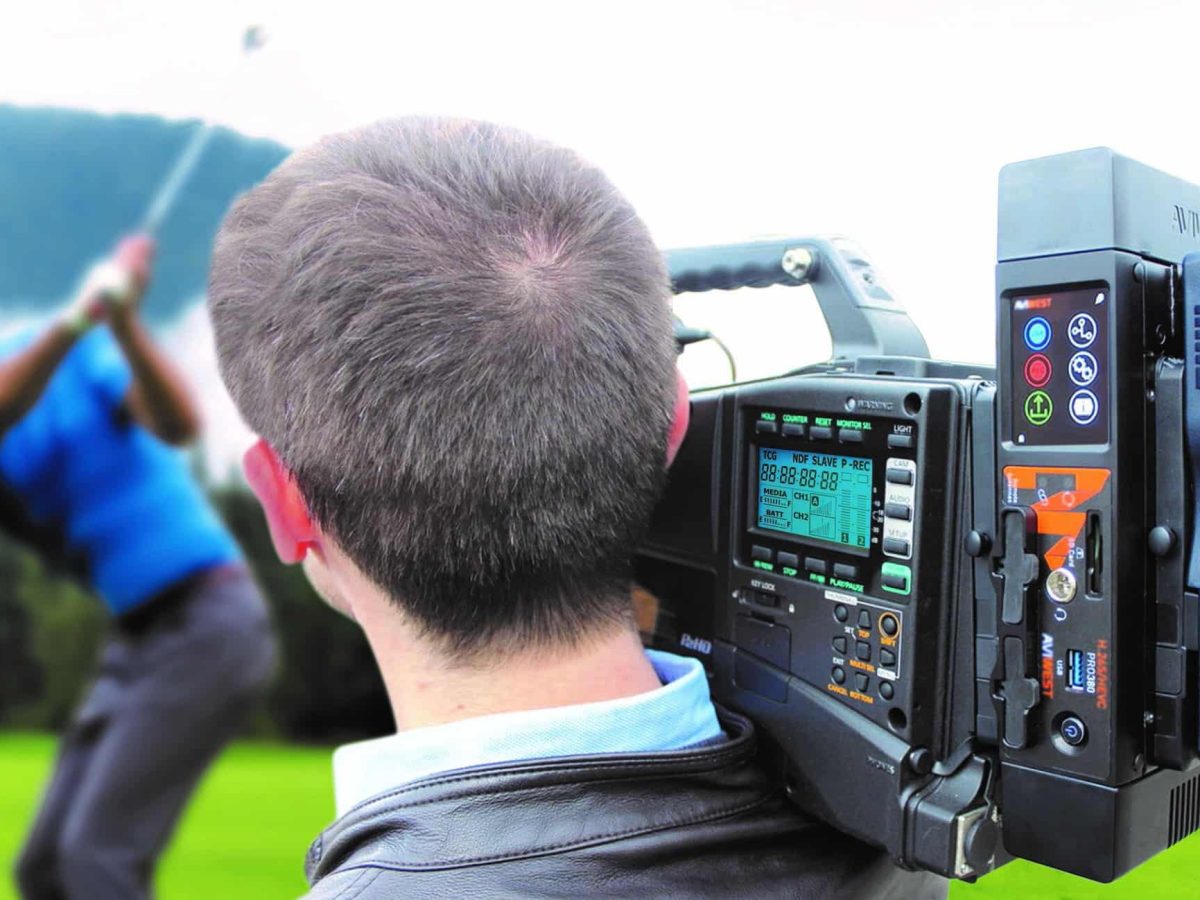
Remote production golf with Sony camcorder
Video transmission using a Haivision encoder/decoder.
They have a central CCU room with multiple RCP's.
Each camera is equiped with a RIO to control the Sony camcorder using 8P remote port.
And RCP/RIO link is through the Haivision data bridge.
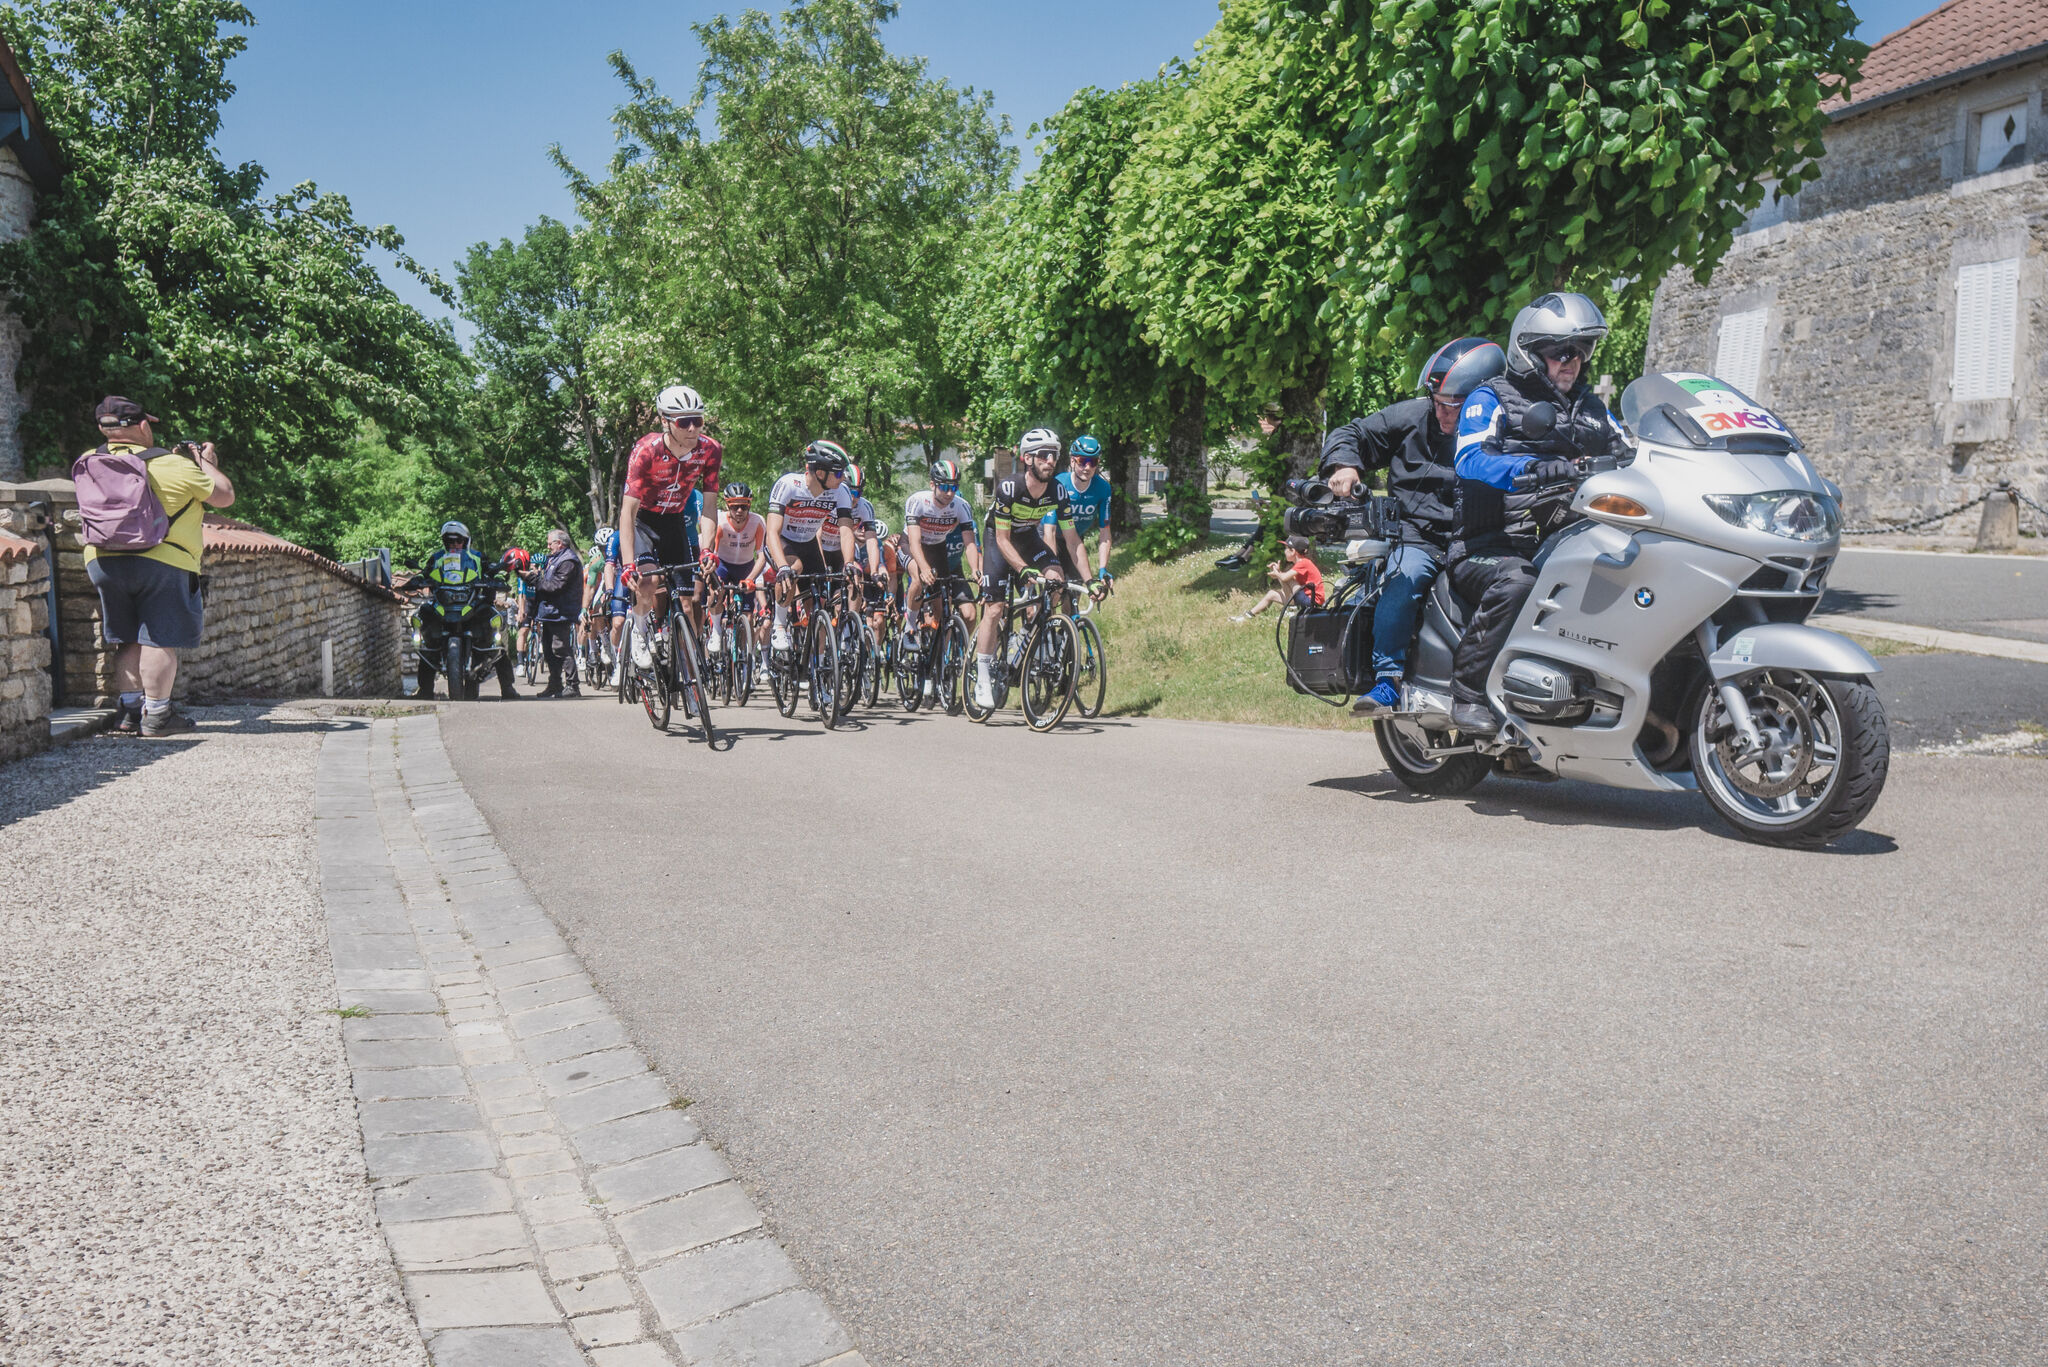
Remote control of JVC cameras on motorbike for cyclism
Video transmission using a Haivision encoder/decoder.
On each camera they have a RIO to control the camera. They use a mix of JVC (serial controlled), Blackmagic URSA G2 (SDI controlled) and FX9 (IP controlled). So they just need to change the cable between the RIO and the camera.
They have multiple RCP in the CCU room in their OB van.
And they use also our VP4 to have advance shading capabilities and "hack" the latence:
- The control of the cameras is fast and responsive
- But the video transmission induce some delays (due to encoding)
- The VP4 on the incomming video signal allows you to combine:
- camera control of exposure with some latency (due to video encoding)
- VP4 shading the camera without any latency
In this type of events, the RIO are installed:
- on motorbike
- on helicopters
- on remote location like start/end line
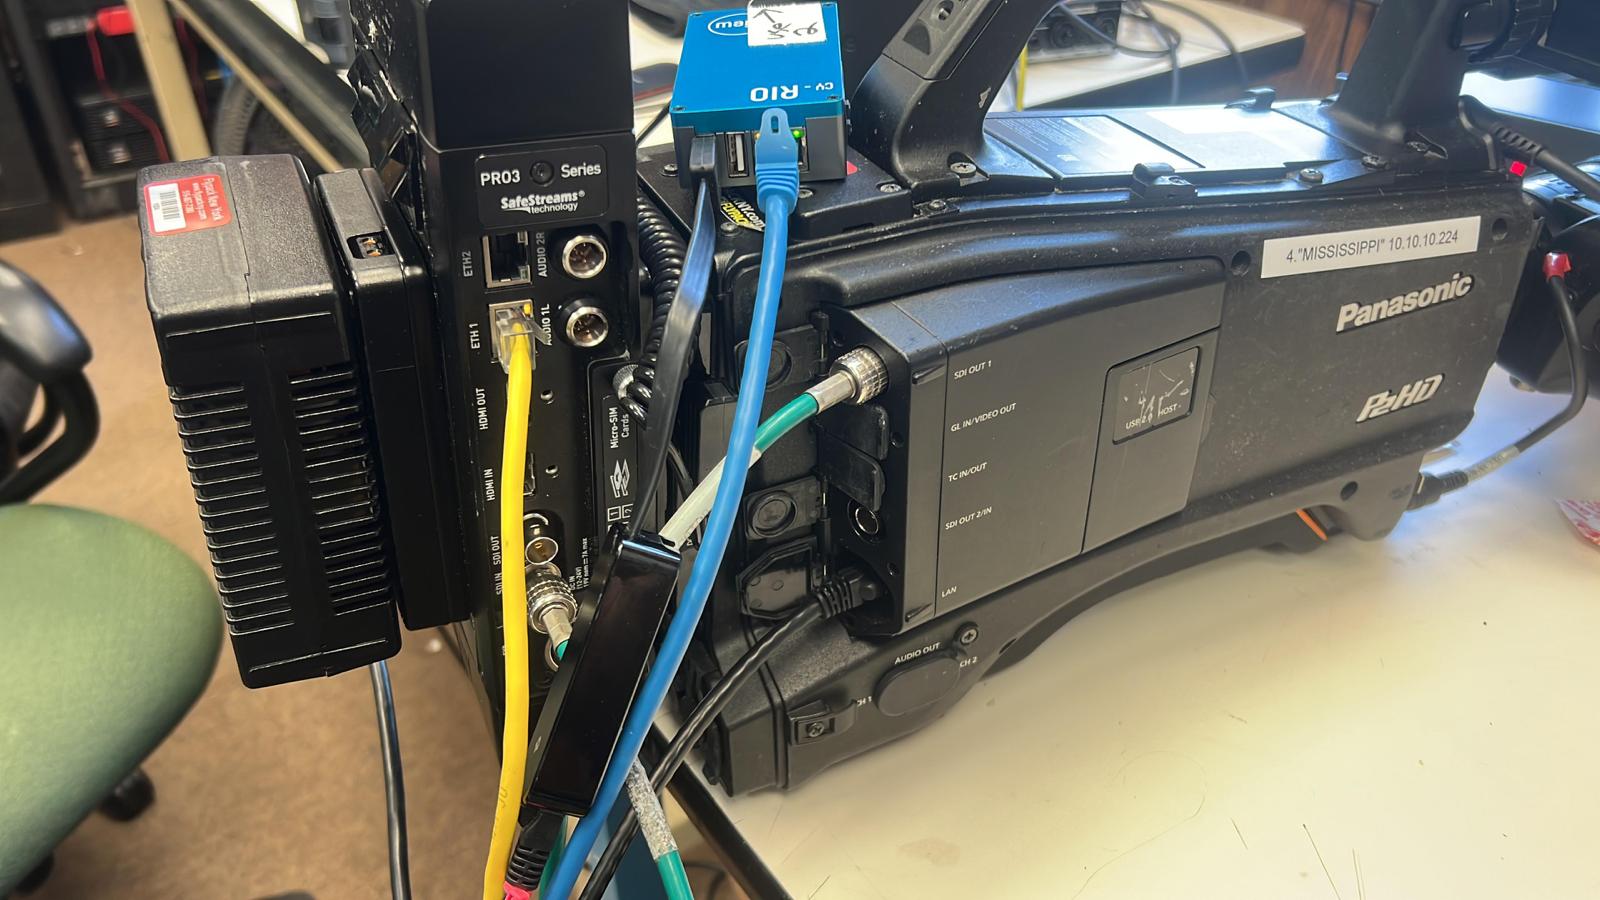
Beauty shot using Panasonic Varicam
Video transmission using a Haivision encoder/decoder.
Here the camera is a Panasonic Varicam, so it's controlled through IP. You could simply use the data bridge alone, but in this case, adding a RIO:
- improve the connection robustness (in case of packet drops, high latency, no timeout or anything on camera control side as the camera is controlled by RIO locally)
- improve latency as the packets in the data bridge are Cyanview REMI packets between RCP and RIO. Not the actual protocol and it's optimise to minimize the latency and packet size.
It also give you more flexibility:
- because the RIO controls the camera
- you can control it from your RCP on decoder side
- but you could have also other RCP's in other locations worldwide controlling the same camera without any conflict.