Getting Started with the RCP UI
Introduction
The RCP’s UI (Remote Control Panel User Interface) has been designed to be as intuitive and user-friendly as possible. As a result, many features are self-explanatory and do not require additional documentation.
However, certain functionalities involve more complex mechanisms or interactions that may not be clear to a user. This document aims to provide clear explanations for those specific areas, to help users fully understand and utilize the capabilities of the RCP.
Navigation
Entering the Menus
There are two main ways to access the menu system:
-
MENU Button: Located at the top right corner of the device, this button opens the main menu.
-
Blue and White Buttons: Positioned just above the screen, these buttons act as shortcuts to specific menu sections. These shortcuts can be customized by the user to suit their workflow. (see RCP UI - Assignables)

Navigating Within Menus
Once a menu is open, navigation is done directly via the touchscreen. The touchscreen allows a user to tap on options, scroll through lists, and access submenus easily.
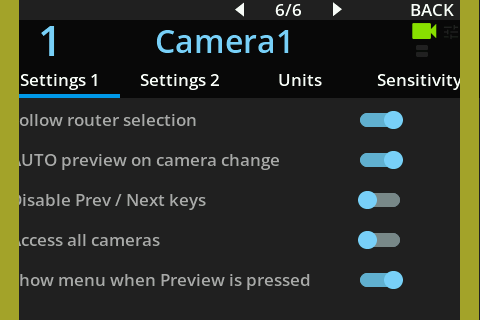
Switching Between Views
In the configuration screens, there are two methods to switching views,
Method 1 is to use the left and right edges of the touchscreen. These are touch-sensitive and allows the user to tap these areas to move between different views or pages.
Method 2 is to press the two white navigation buttons with the left / right arrows, located above the screen.
The tactile zone are shown in the image here after in yellow.
Main Screen
The main screen of the RCP can be customized to suit different usage preferences. It provides flexible control over how assignable button functions are displayed.
Assignable buttons
At the top of the screen, the white button functions are displayed.
Assignable buttons configuration
The default display mode for assignable buttons can be configured permanently via the Settings menu:
- Navigate to SETTINGS > RCP Settings.
- For more details, see the RCP Settings documentation.
Temporary Display Toggle
You can also temporarily change which assignable buttons are displayed by tapping directly on the button label areas on the touchscreen.
- By default, only the white buttons' assigned functions are shown.
- Tapping on the white button area will temporarily switch the display to show the blue buttons' functions shown.
- After 2 seconds, the display will automatically return to showing only the white buttons.
Simultaneous Display Mode
If you tap the area again within those 2 seconds, the RCP will enter a simultaneous display mode, showing both white and blue buttons' assigned functions at the same time.
This feature is designed to provide quick access to more functions while keeping the main screen clean and focused by default.
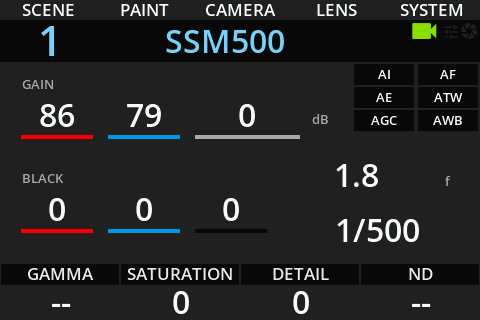
Green Channel Display and Control
 |  |
|---|
By default, the RCP interface displays only the red and blue channel controls for both gain and black levels. These can be adjusted directly using the corresponding encoders.
Enabling Green Channel Display
The green channel controls can be enabled via the settings menu:
- Navigate to SETTINGS > RCP Settings.
- For more information, see the RCP Settings documentation.
Once enabled, the green gain and black levels will be displayed alongside red and blue on the main screen.
Manual Access to Green Control
To control the green channel from the main view :
- Press and hold either the red or blue encoder.
- While holding, rotate the encoder to adjust the green channel instead.
This allows quick access to green adjustments without changing the display configuration.
Easier Access via Menus
For more precise or visual adjustments, green controls are also available in:
- Paint > White
- Paint > Black
These menus provide a more detailed view and are ideal for fine-tuning all three channels simultaneously.
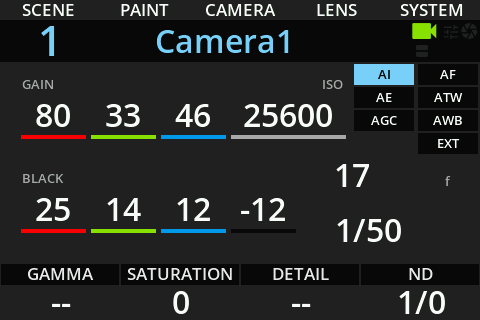
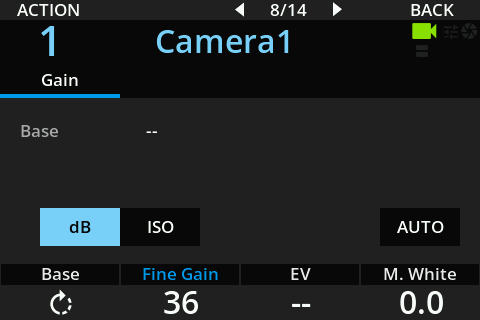
Encoder Colors and Dual Functions
On certain pages of the RCP interface, you may notice that some encoder labels are displayed in blue instead of white. This color indicates that the encoder has a dual function.
Activating the Secondary Function
To access the secondary function of an encoder:
- Press the encoder directly.
- The label will change to reflect the secondary function.
Example: Gain / Fine Gain
In the example below, the encoder is labelled "Gain" in blue:
- Turning the encoder adjusts the main Gain value.
- Pressing the encoder switches it to "Fine Gain" mode.
- In this mode, the encoder provides more precise control, allowing finer adjustments to the gain level.
This color-based system ensures that additional functionality is always accessible, while keeping the interface clean and easy to read.
 |  |
|---|
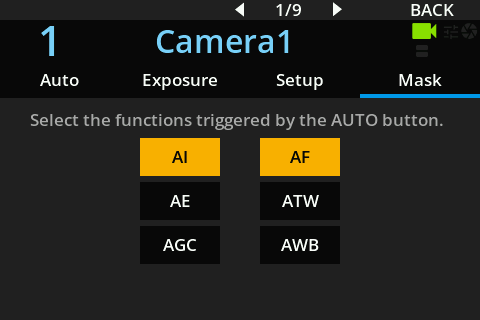
AUTO Button
The AUTO button activates the camera's automatic functions. These automatic features are displayed on the main screen as follows:
- AI (Automatic Iris)
- AE (Automatic Exposure)
- AGC (Automatic Gain Control)
- AF (Autofocus)
- ATW (Automatic Tracking White balance)
- AWB (Automatic White Balance)
Indications When AUTO Is Active
- When an automatic function is enabled, its label is shown in yellow on the main screen.
- The AUTO button itself lights up in red to indicate that automatic mode is active.
Configuring AUTO Functions
Which automatic functions are toggled when the AUTO button is pressed can be customized:
- Go to Camera Menu -> AUTO. Under the Mask tab you can customize
Accessing the AUTO Menu
You can access the AUTO menu directly by pressing and holding the AUTO button for a few seconds.
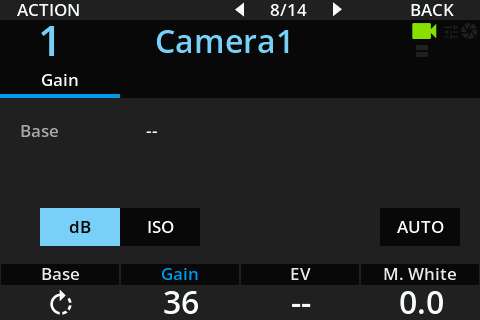
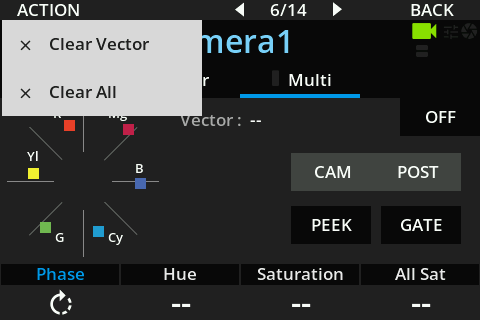
Actions
On certain pages of the RCP interface, you will see a label named "ACTION" at the top left corner of the screen. This indicates that the current page includes specific actions that can be triggered by the user.
Accessing the Action Menu
To open the action menu:
- Press the leftmost white button, located just below the "ACTION" label.
- A menu will appear on the screen, showing the available actions for that page.
Selecting an Action
Once the action menu is open, you can select an action by tapping directly on the touchscreen. Each action is clearly labeled and designed to respond immediately to your selection.
Closing the Menu
If you want to close the action menu without executing any action:
- Simply press the same white button again.
- The menu will disappear, and the screen will return to its normal state.
This feature allows quick access to context-specific functions while keeping the interface clean and responsive.
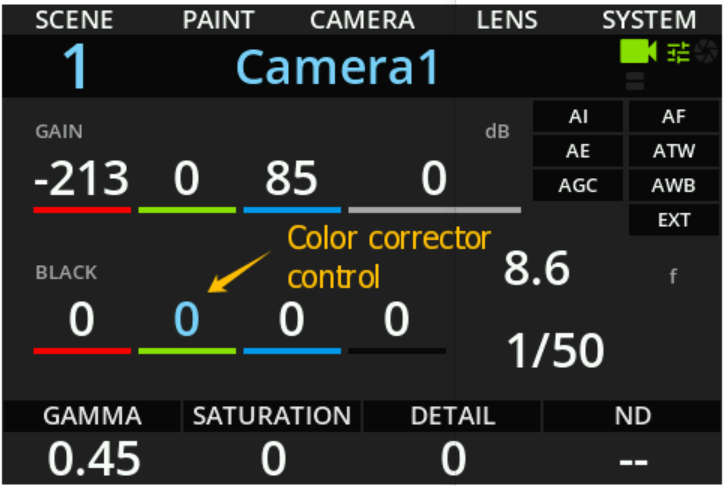
Camera and Color Corrector Control Display
When a color corrector is used in combination with a camera, control values on the RCP may appear in two different colors:
- White: The parameter is controlled by the camera.
- Cyan: The parameter is controlled by the color corrector.
This distinction allows operators to easily identify the source of control at a glance.
Example
In the example below:
- All parameters are controlled by the camera (white),
- Except for Green Black, which is controlled by the color corrector (cyan).
Managing Control Priority
When both the camera and the color corrector offer the same control, you can define which one takes priority via:
MENU > PROC/VP4 > PRIO
This menu provides several options:
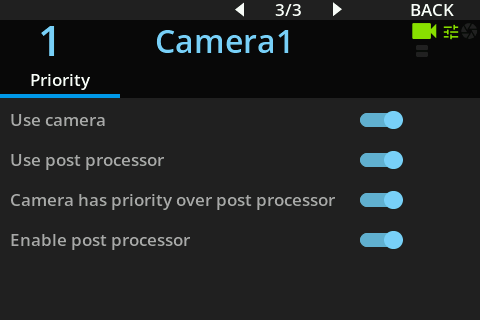
| Setting | Description |
|---|---|
| Use camera | Enable the camera controls. |
| Use post processor | Enable the post processor controls. |
| Camera has priority over post processor | Uses the camera's controls when both are available. Falls back to the color corrector if not. |
| Enable post processor | Disables the color corrector entirely. On supported devices like VP4, the output simply copies the input signal with all processing disabled. |
This priority system allows you to adapt control behavior to your specific workflow and equipment setup.