Studio LiveLab
Overview
LiveLab is the color grading workspace of CyanView Studio. You build a look as a flow of nodes. You check it on a reference still or on live video. LiveLab bakes the look into a 3D LUT and sends it to a LUT box. Each change goes out as you make it.
LiveLab needs a license. The license pill in the header (a status dot and your plan name) shows the license state. The Dashboard works without a license.
On first launch, Studio asks you to choose a workspace. Pick LiveLab. You can switch at any time with the Dashboard link in the LiveLab header.
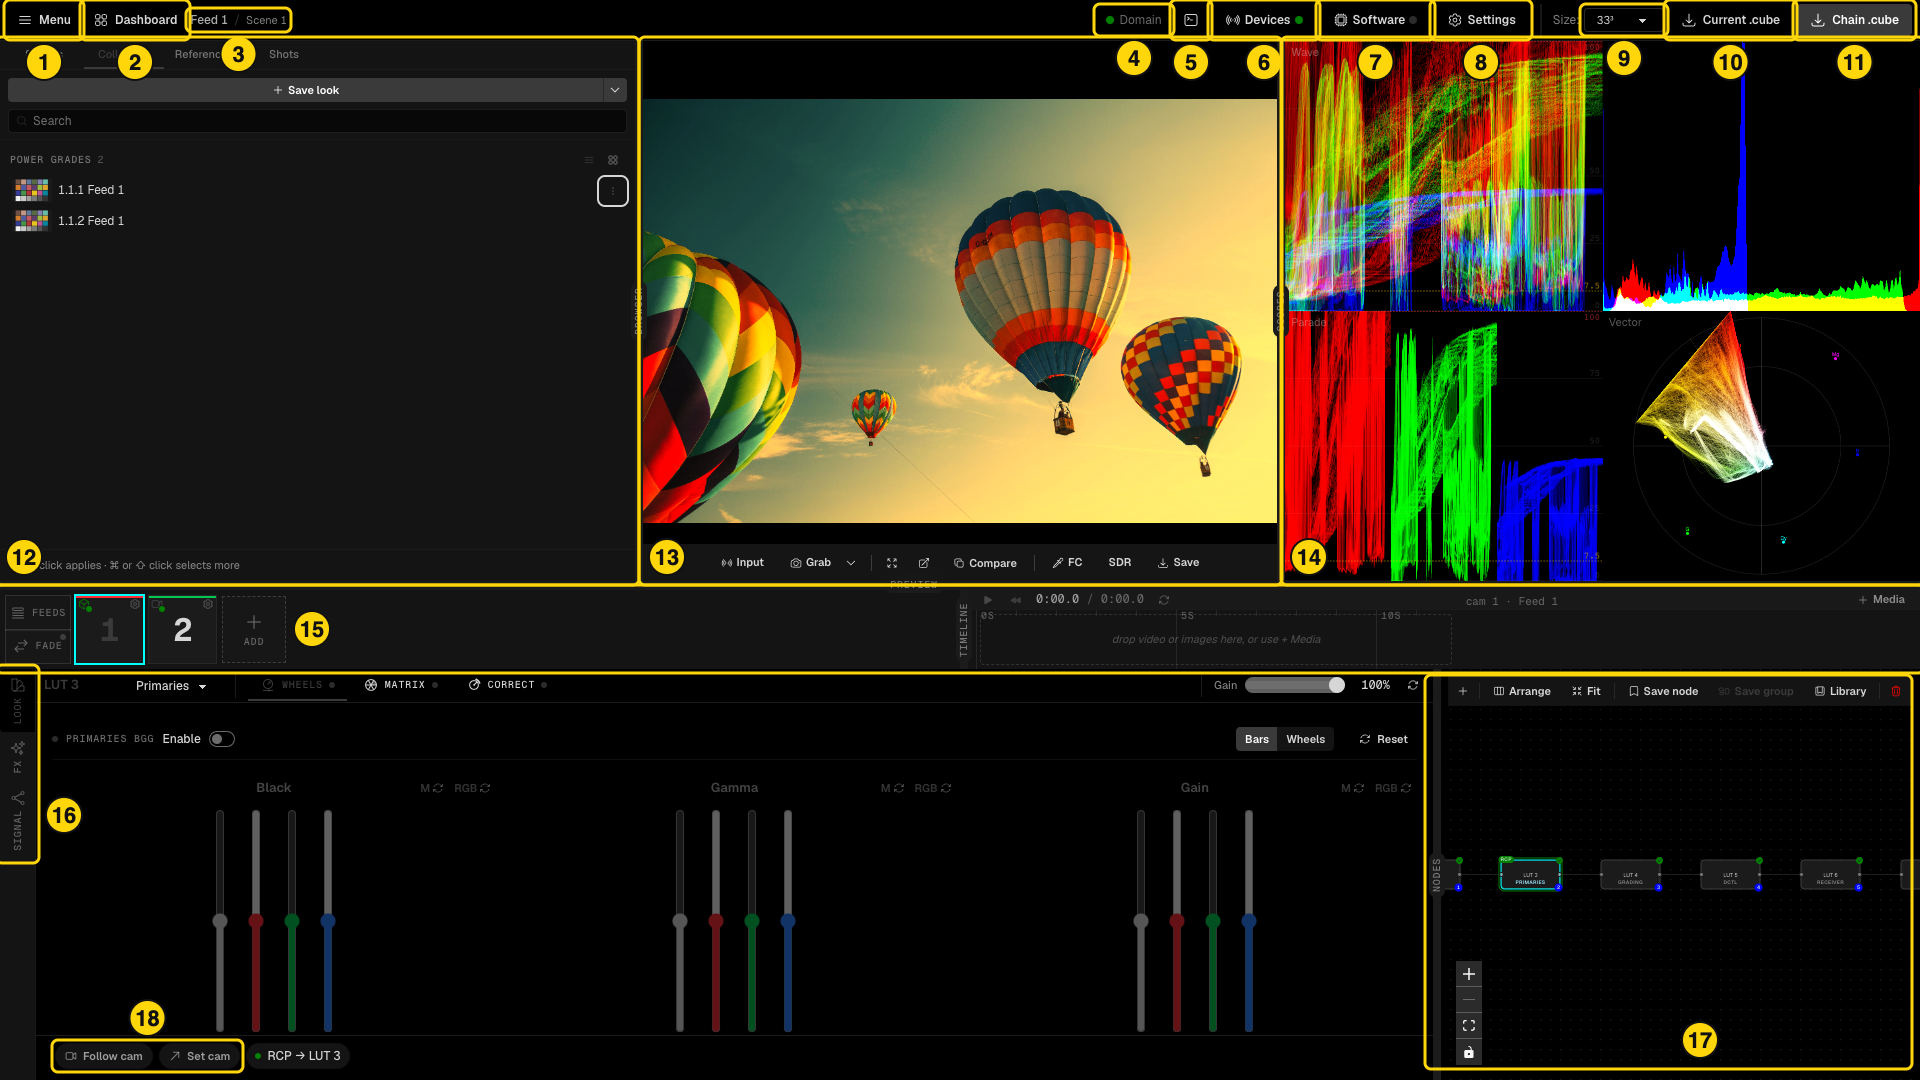
- Menu - Projects, Rename project and Rename feed.
- Dashboard - switches to the Dashboard workspace.
- The open feed and the active scene.
- License pill - license state. Click it to open the license page.
- Command palette - search every command and its shortcut (see step 10).
- Devices - the LUT boxes and the feed assignments.
- Software - NDI output, DaVinci Resolve and LUT Receiver.
- Settings - general, export and storage settings.
- Size - LUT size (17, 33 or 65 points).
- Current .cube - downloads the LUT of the selected node.
- Chain .cube - downloads the LUT of the full chain.
- BROWSER - the Scenes, Collection, References and Shots tabs.
- PREVIEW - the graded reference or live feed, with its toolbar and the Input drawer.
- SCOPES - waveform, histogram, parade and vectorscope of the graded preview.
- FEEDS row - the FEEDS and FADE buttons, one tile per feed and ADD. The TIMELINE of clips sits on its right.
- LOOK, FX and SIGNAL - the bottom panel. Switch with the vertical tabs on the left (Alt+L, Alt+F, Alt+M).
- NODES - the node graph of the selected grade.
- Follow cam and Set cam - link LiveLab to the active camera of the RCP (see step 8).
Click the label on a divider (BROWSER, SCOPES, PREVIEW, TIMELINE, NODES) to show or hide that panel. Drag the divider to resize it.
Key concepts
- Project - the top level. It holds your scenes, grades and feeds. Menu > Projects lists them; New project creates one.
- Scene - a set of looks for one situation, for example day and night. Switching scene re-applies the grade of every feed and pushes it to the devices.
- Grade - a look, stored as a node flow. Each feed has its own grade in each scene. You do not pick grades by hand: open a feed and you edit its grade for the active scene.
- Power Grade - a saved look in the Collection. Apply it to any feed in any scene.
- Feed - one video signal, normally one camera. A feed links a Dashboard camera (for metadata) and a LUT device (which receives the LUT).
- Device - a LUT box: VP4, AJA ColorBox, AJA FS-HDR, BoxIO, the CyanCamera phone app or an FXVP server.
- Node - one step of a grade: IDT, Primaries, Grading, DCTL, 3D LUT, LUT Gallery, Receiver or ODT.
- Reference - a still image used to preview the grade when no live video is attached.
- Shot - a grabbed frame of a feed (raw and graded) with its look and the camera values.
1. Add a LUT device
- Click Devices in the header.
- In the empty row at the top of the DEVICES tab, fill in the fields.
- Click Add.
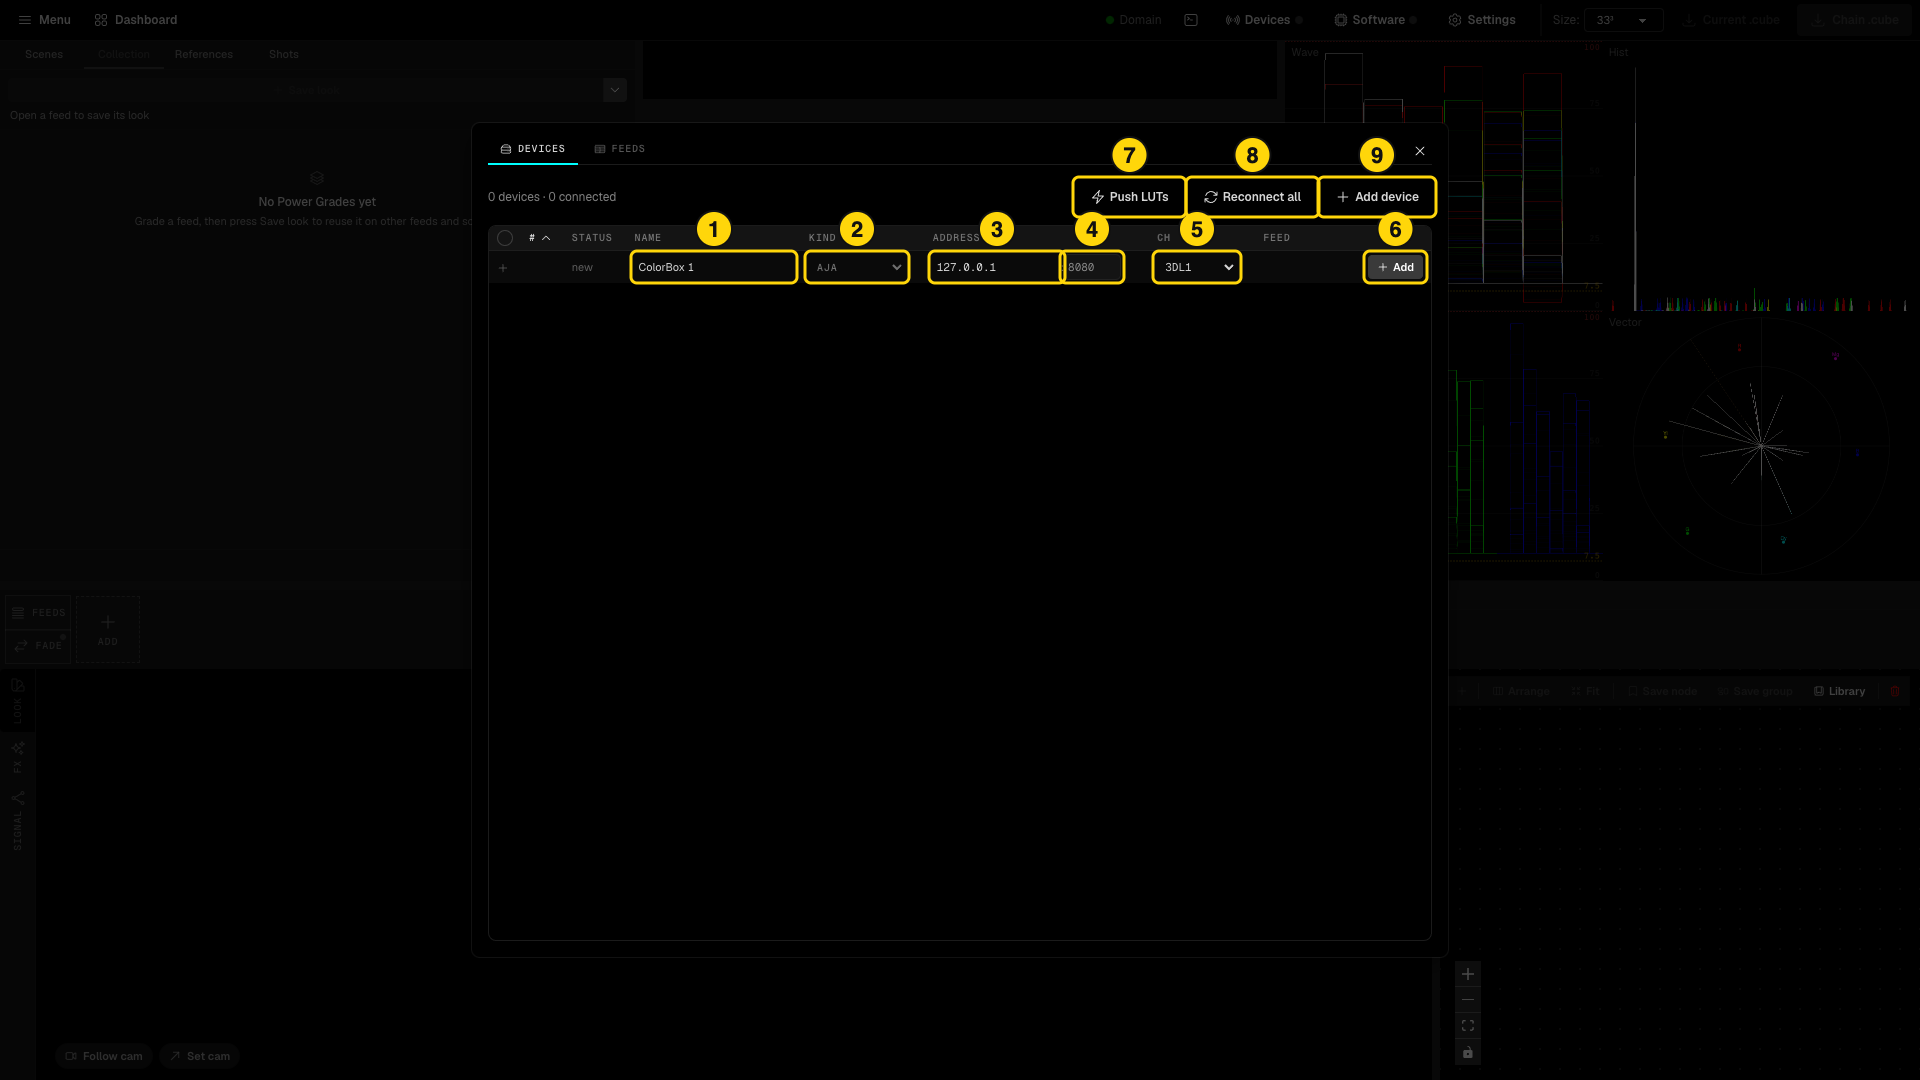
- Name of the device.
- Kind: VP4, AJA ColorBox, AJA FS-HDR, BoxIO, CyanCamera or FXVP server.
- IP address of the device.
- Port. The default depends on the kind, for example 4567 for a VP4, 80 for an AJA ColorBox and 8080 for CyanCamera.
- Channel, slot or target. A VP4 has channels 1 to 4. An AJA ColorBox has targets such as 1DL1, 1DL2 or 3DL1. A BoxIO has a slot.
- Add - creates the device.
- Push LUTs - sends the LUT of every feed again.
- Reconnect all - reconnects every device.
- Add device - opens a new empty row.
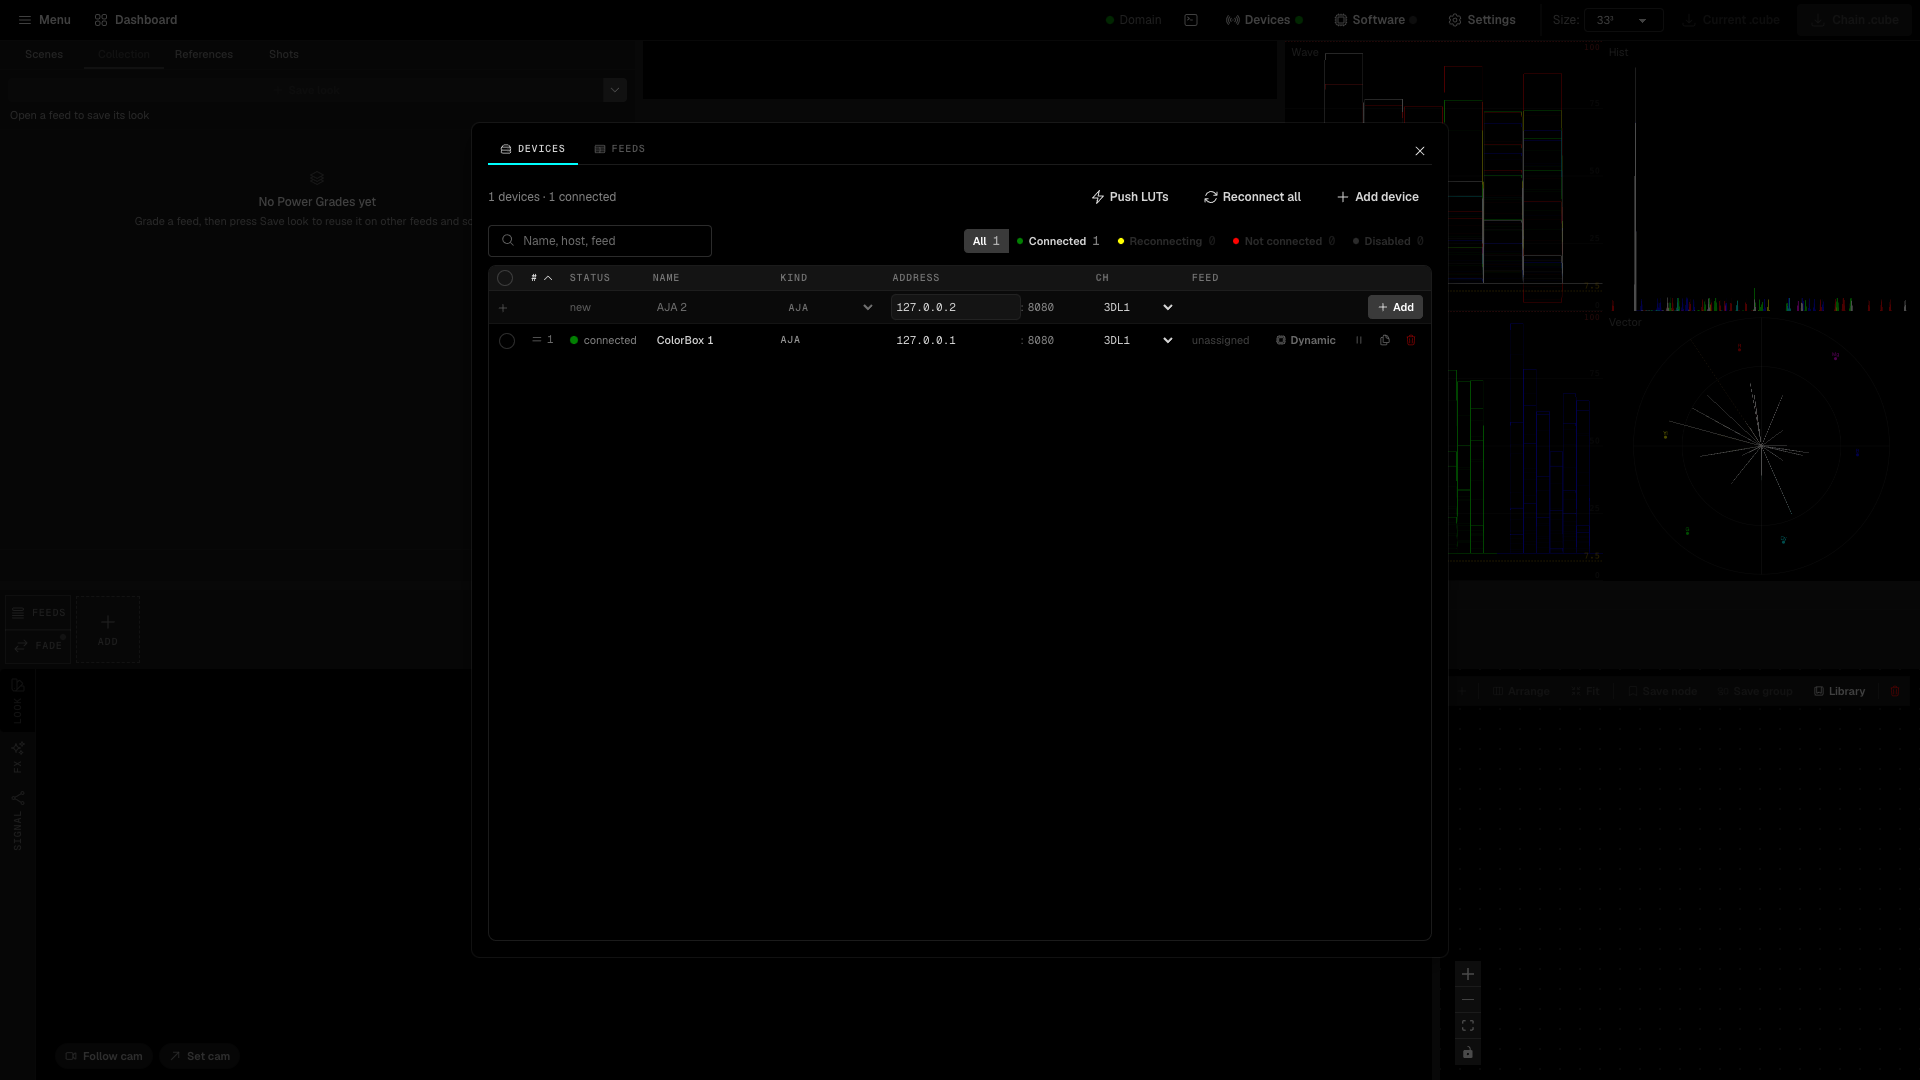
The new device appears as a row with a status dot. A green dot and the word connected mean that LiveLab reaches the box. The header shows "N devices · M connected". Use the filters All, Connected, Reconnecting, Not connected and Disabled, the kind filter, or the search box, to find a device. Drag a row by its number to change the order. An FXVP server row has an Auth token field.
For the VP4 itself, see the VP4 manual.
2. Add a feed and link it
-
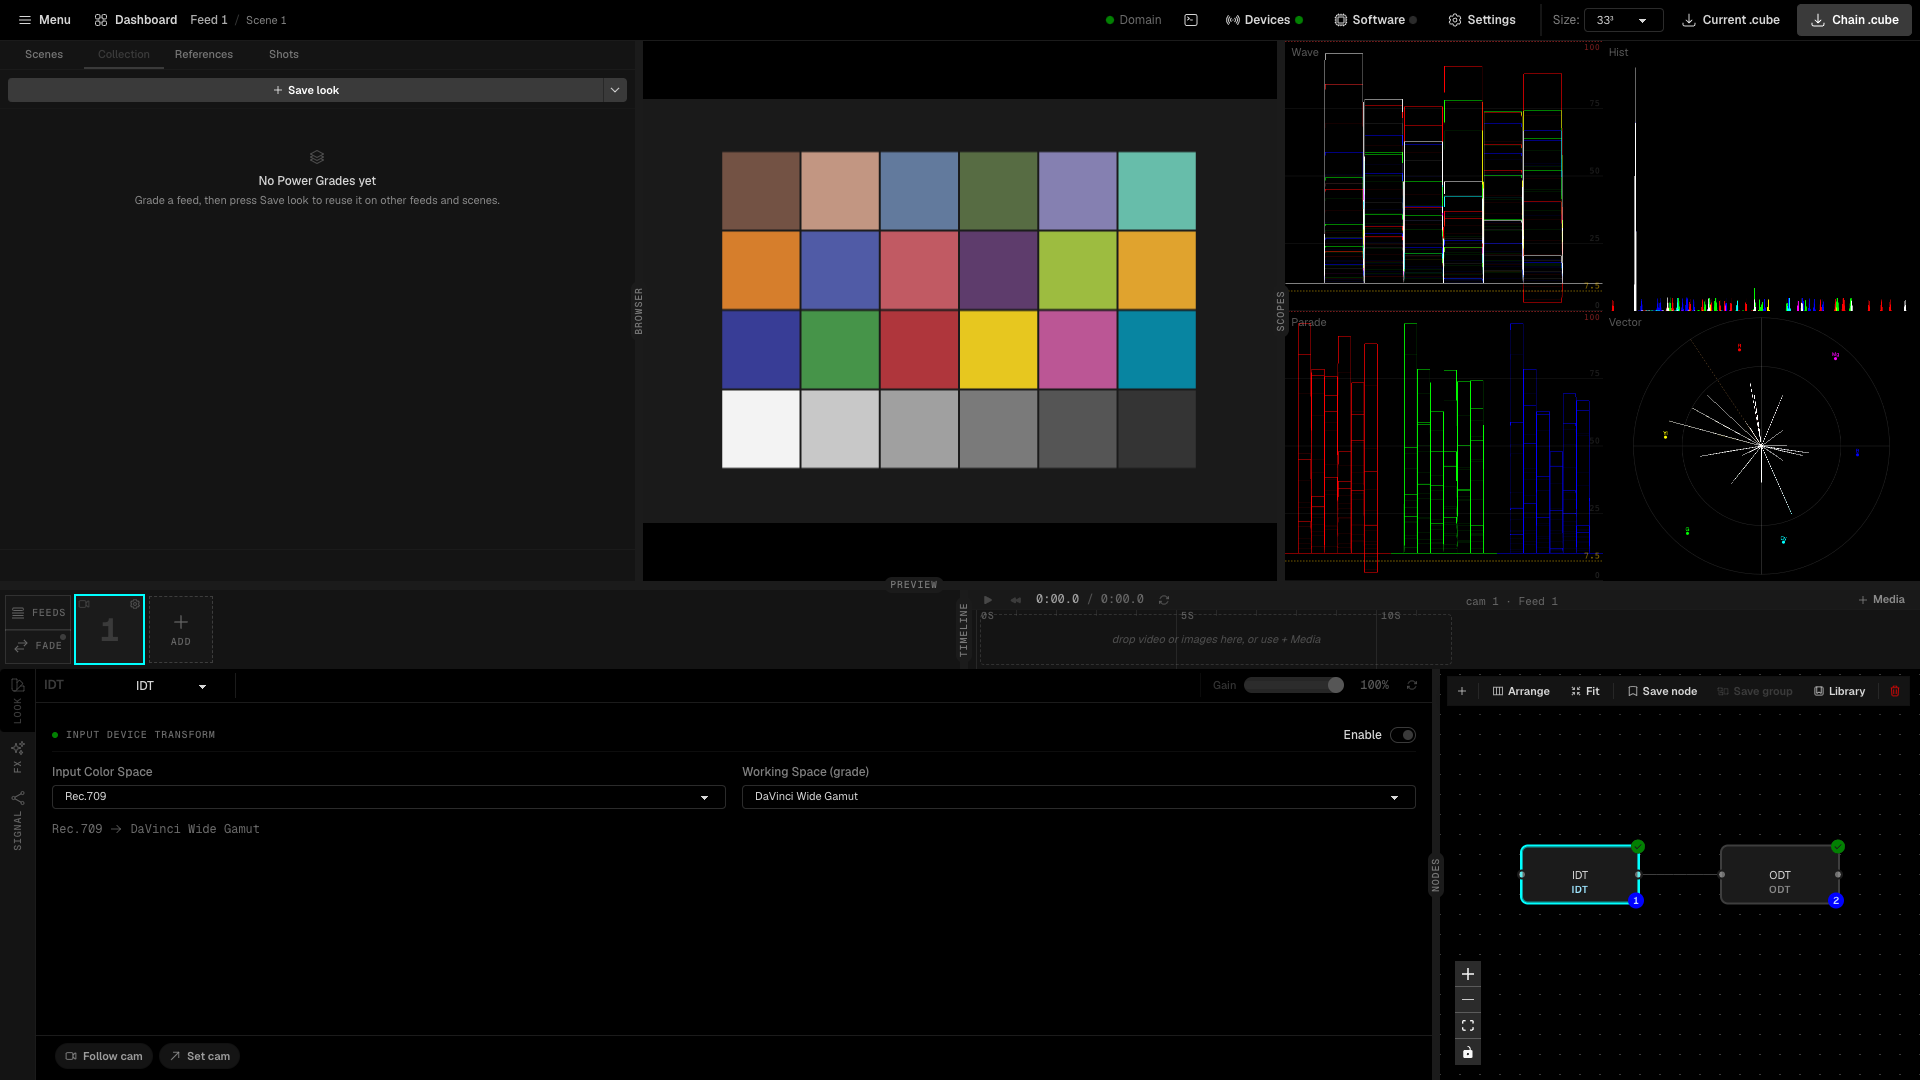
Click ADD in the FEEDS strip. A numbered tile appears, and LiveLab creates a grade for it.
-
Click the gear on the tile. The Feed 1 - Settings window opens.
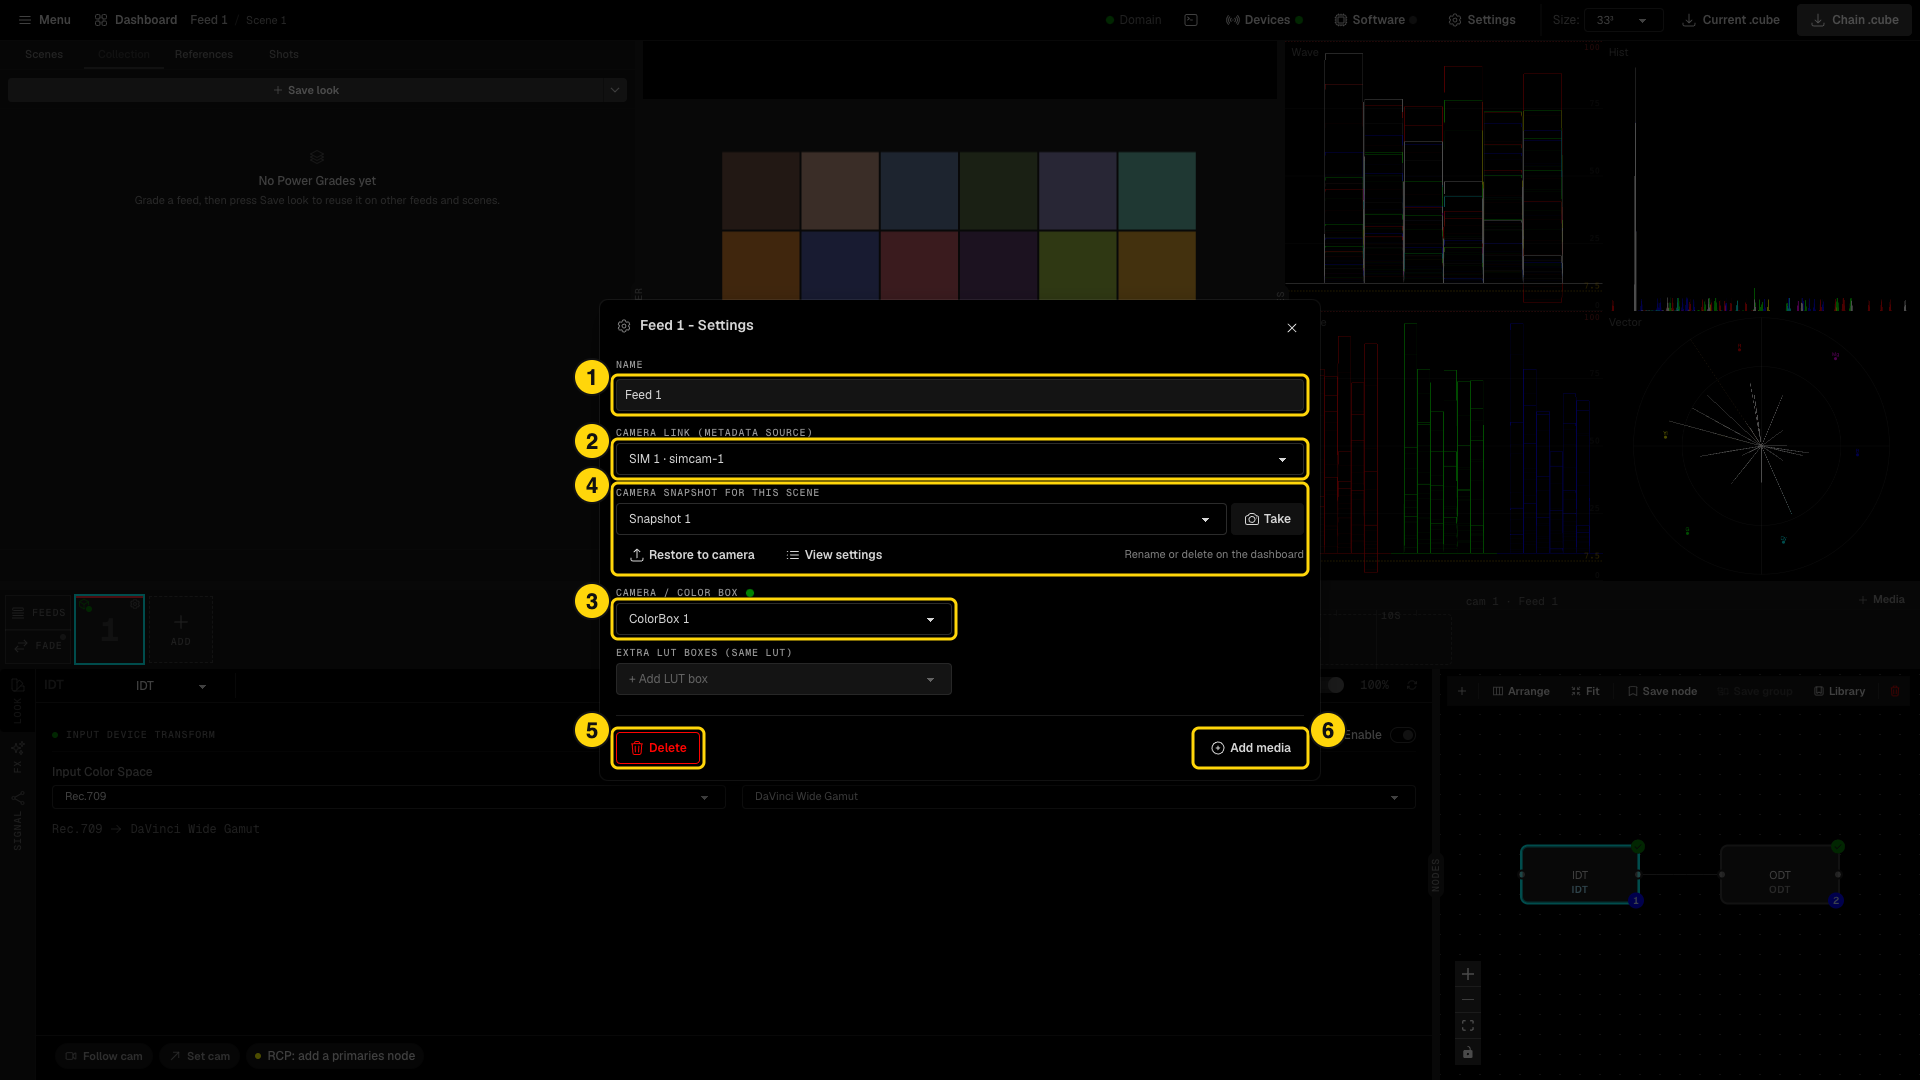
- NAME - the name of the feed.
- CAMERA LINK (METADATA SOURCE) - the Dashboard camera of this feed. The link gives the primaries node its RCP control (see step 3).
- CAMERA / COLOR BOX - the LUT device that receives the LUT.
- CAMERA SNAPSHOT FOR THIS SCENE - the camera settings that belong with this feed's grade in the active scene (see below).
- Delete - removes the feed.
- Add media - adds a video or image clip (JPG, PNG, MP4 or MOV) to the feed.
EXTRA LUT BOXES (SAME LUT) sends the same LUT to more boxes. The Feeds tab of the Devices modal shows the same assignments as a table. The FEEDS button opens a list where you can rename, reorder and delete feeds.
Camera snapshot. Pick a snapshot of the linked camera, or click Take to save the current camera values as a new one. Restore to camera sends the snapshot values to the camera, and Undo restore puts the previous values back. View settings shows the stored values. The Dashboard shares the same snapshots; rename or delete them there.
Click a tile to open the feed. Its grade for the active scene loads in the LOOK panel and in the preview. Cmd+1 to Cmd+0 (Ctrl on Windows) open feeds 1 to 10.
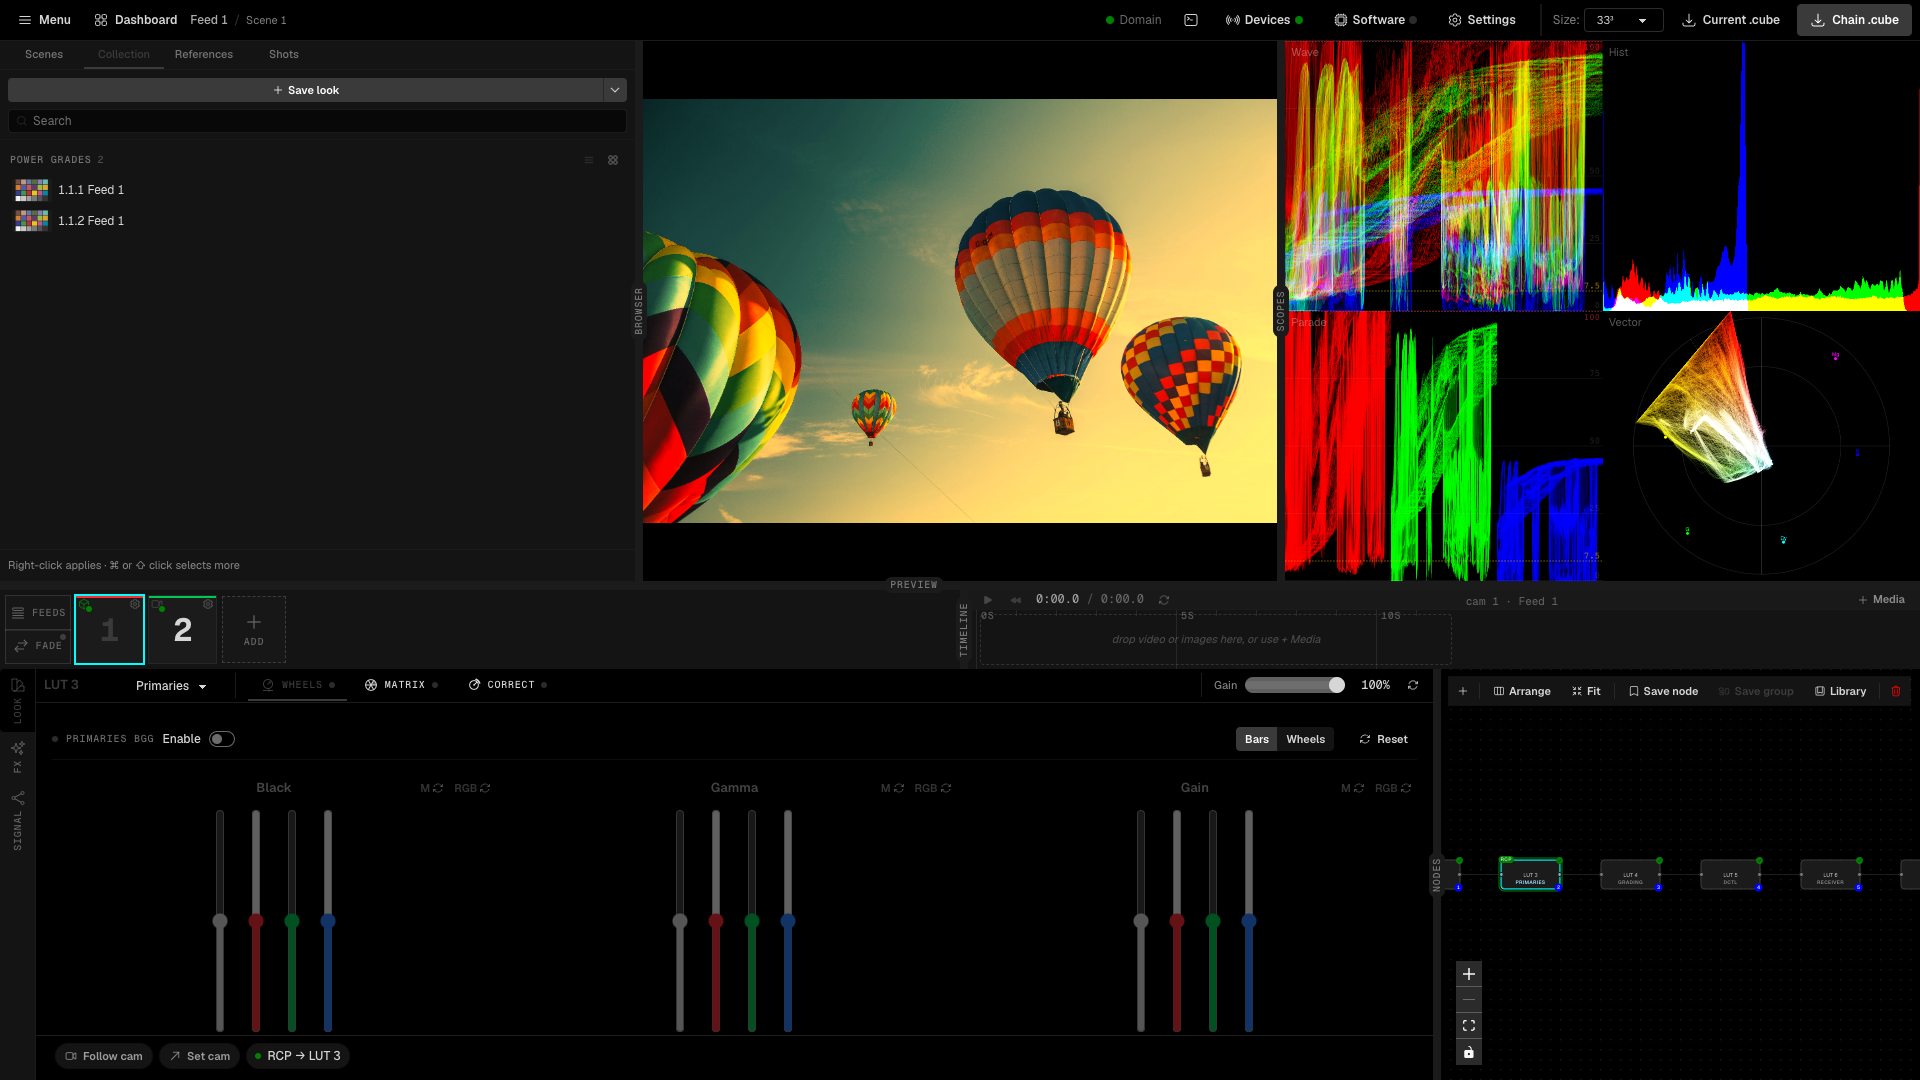
3. Build a look
A grade is a chain of nodes. The signal enters through the IDT, passes through the nodes you add, and leaves through the ODT. Each node has one job, and the LOOK panel shows the controls of the selected node.
- Click a feed tile in the FEEDS row. LiveLab opens the grade of that feed for the active scene. A new grade starts as an IDT followed by an ODT, or as the Power Grade you set for new grades (see step 7).
- In the NODES graph, click the IDT node. Its controls open in the LOOK panel.
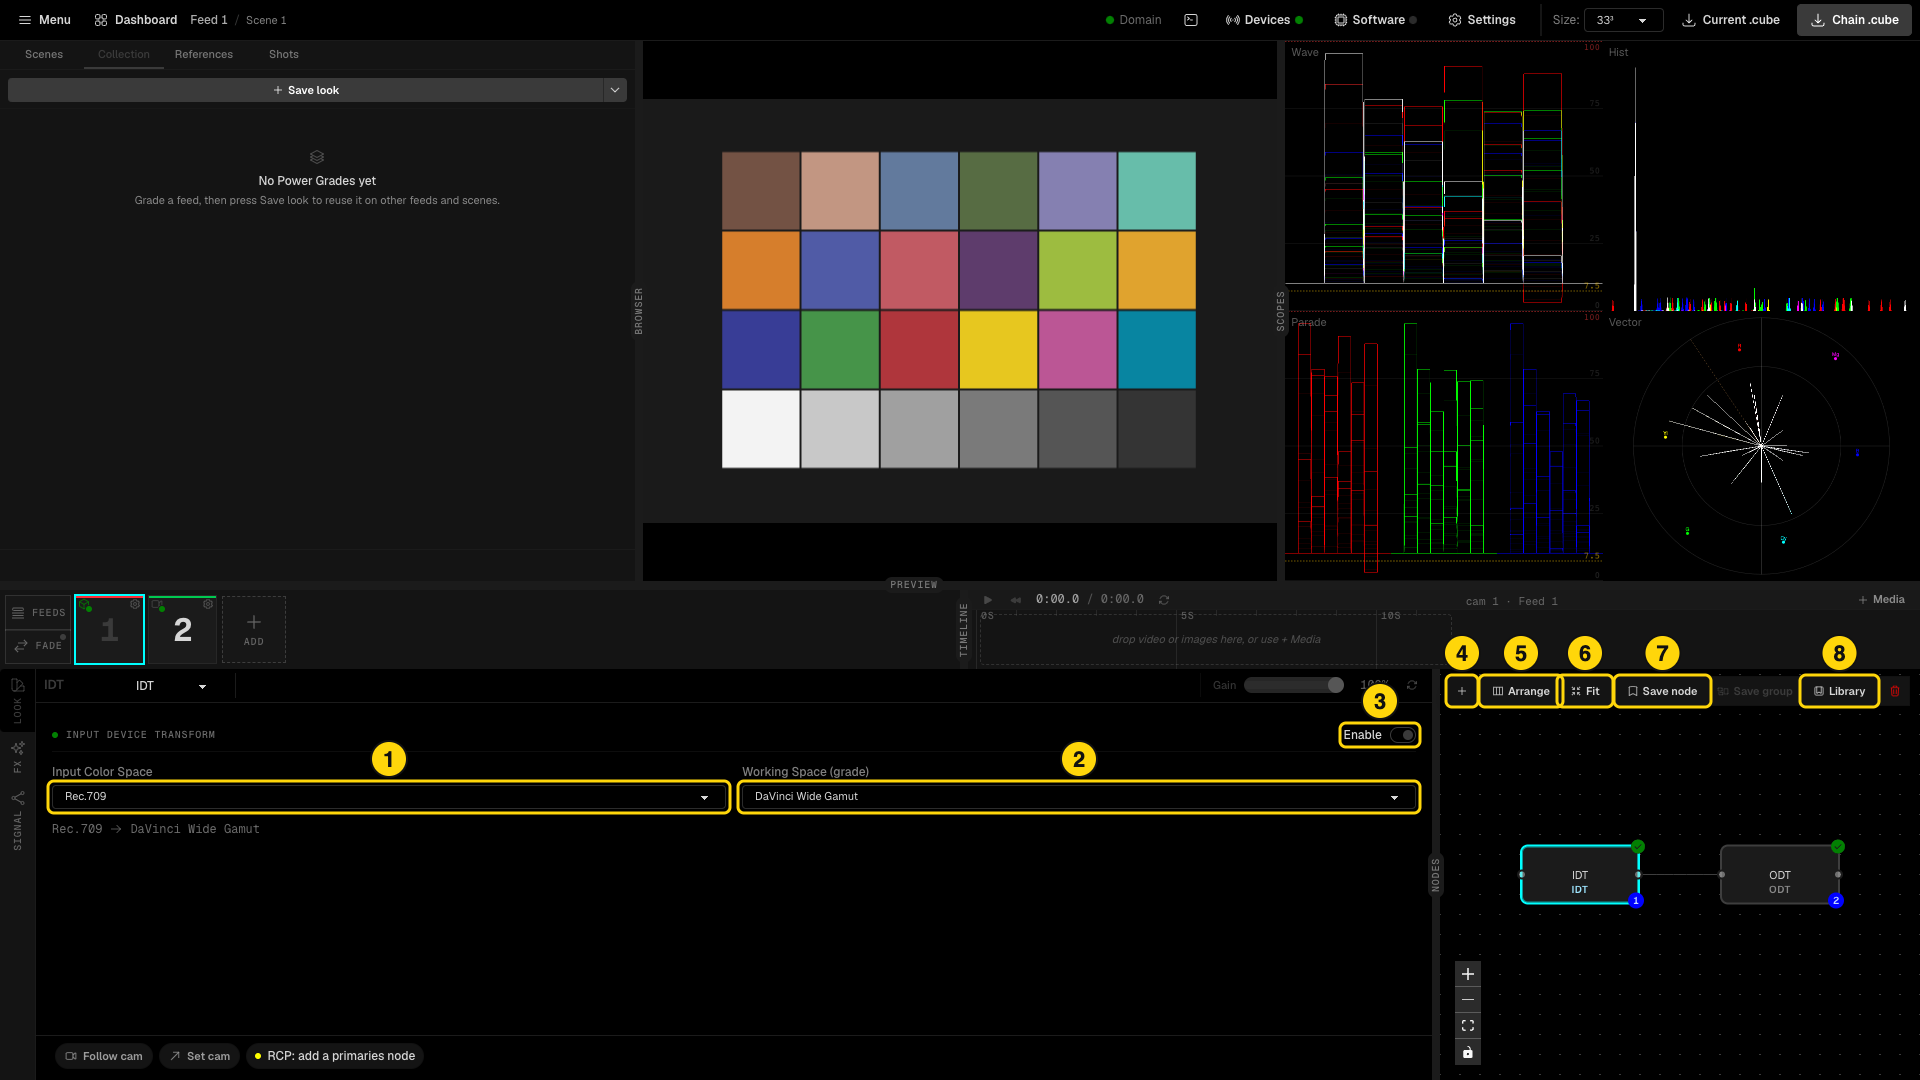
- Input Color Space - the color space of your camera, for example a camera log curve, Rec.709 or HLG.
- Working Space (grade) - the space in which the grade runs, for example DaVinci Wide Gamut or ACEScct.
- Enable - turns the node on or off (Cmd+D).
- + - adds a node after the selected one (Alt+S). Shift+S adds it before. The default type is Primaries.
- Arrange - lines the nodes up in one row.
- Fit - folds the nodes into rows that fit the frame.
- Save node - stores the selected node in the Library.
- Library - opens the saved nodes. Save group stores two or more selected nodes. The + in the Library makes a global node.
Add nodes and set their type
- Select the node after which the new node must go.
- Click + (Alt+S). The new node appears in the graph and is selected.
- Open the node type list at the top left of the LOOK panel and pick a type: IDT, Primaries, Grading, DCTL, 3D LUT, LUT Gallery, Receiver or ODT.
- Repeat for every node you need. Click Arrange and Fit to tidy the graph.
The chain below is a typical live setup: camera log in, RCP paint controls, a creative grade, a DCTL, a LUT received from DaVinci Resolve, and the display transform out.
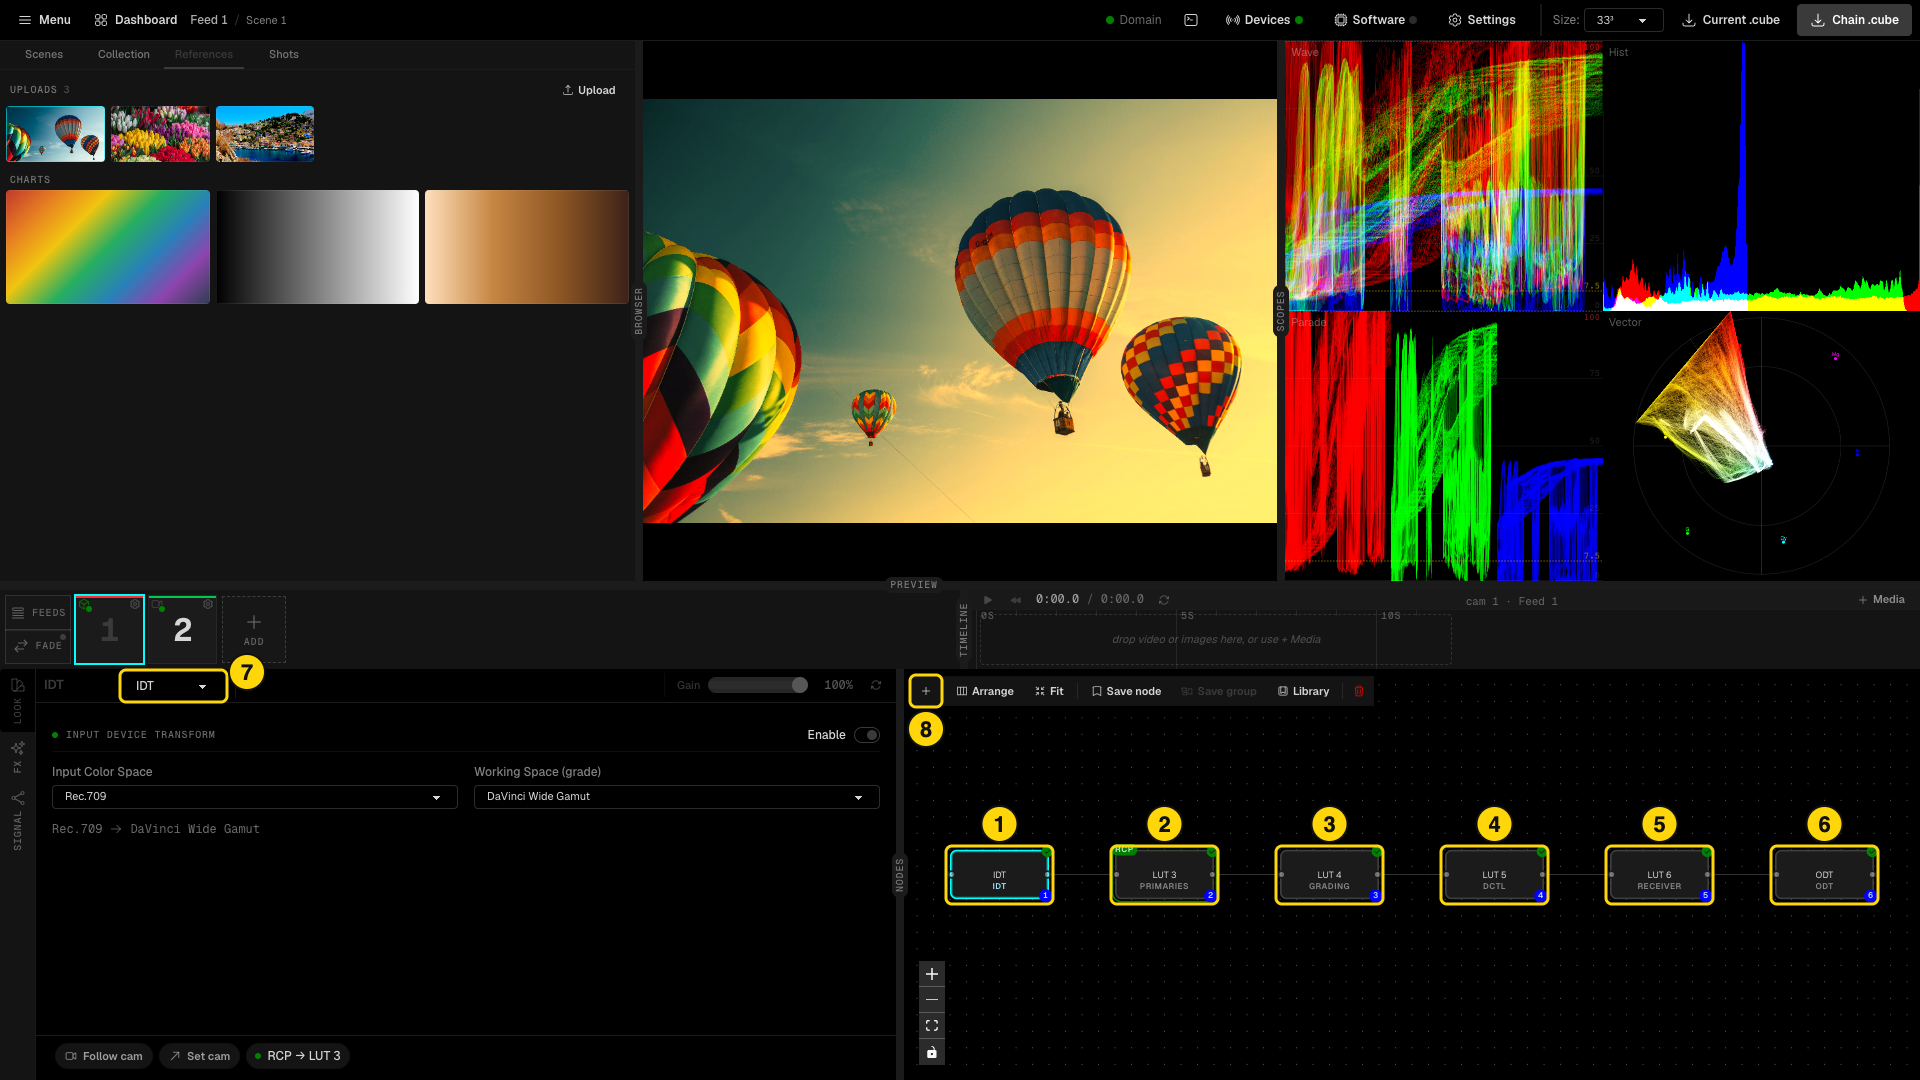
- IDT - input transform.
- Primaries - black, gamma and gain. The RCP badge shows that the linked camera's RCP paint controls drive this node live.
- Grading - creative grade with wheels, matrix, correctors and curves.
- DCTL - a DCTL file from your own tools.
- Receiver - a LUT received live from external software, for example DaVinci Resolve.
- ODT - output transform.
- Node type list of the selected node.
- + - adds a node after the selected one.
Drag the divider between the LOOK panel and the graph to give the graph more room. Click a node in the graph to edit it, or press Ctrl+1 to Ctrl+9 to select node 1 to 9. Select a node and press Backspace (or click the trash icon) to delete it; Cmd+Z brings it back. Cmd+C copies the selected nodes, Cmd+V pastes them in place of the selection and Cmd+Alt+V pastes them after it.
The Gain slider at the top right of the LOOK panel mixes the node with no change, from 0 to 100 %. A node below 100 % shows a gain badge in the graph. Gain does not apply to the IDT and the ODT.
Primaries
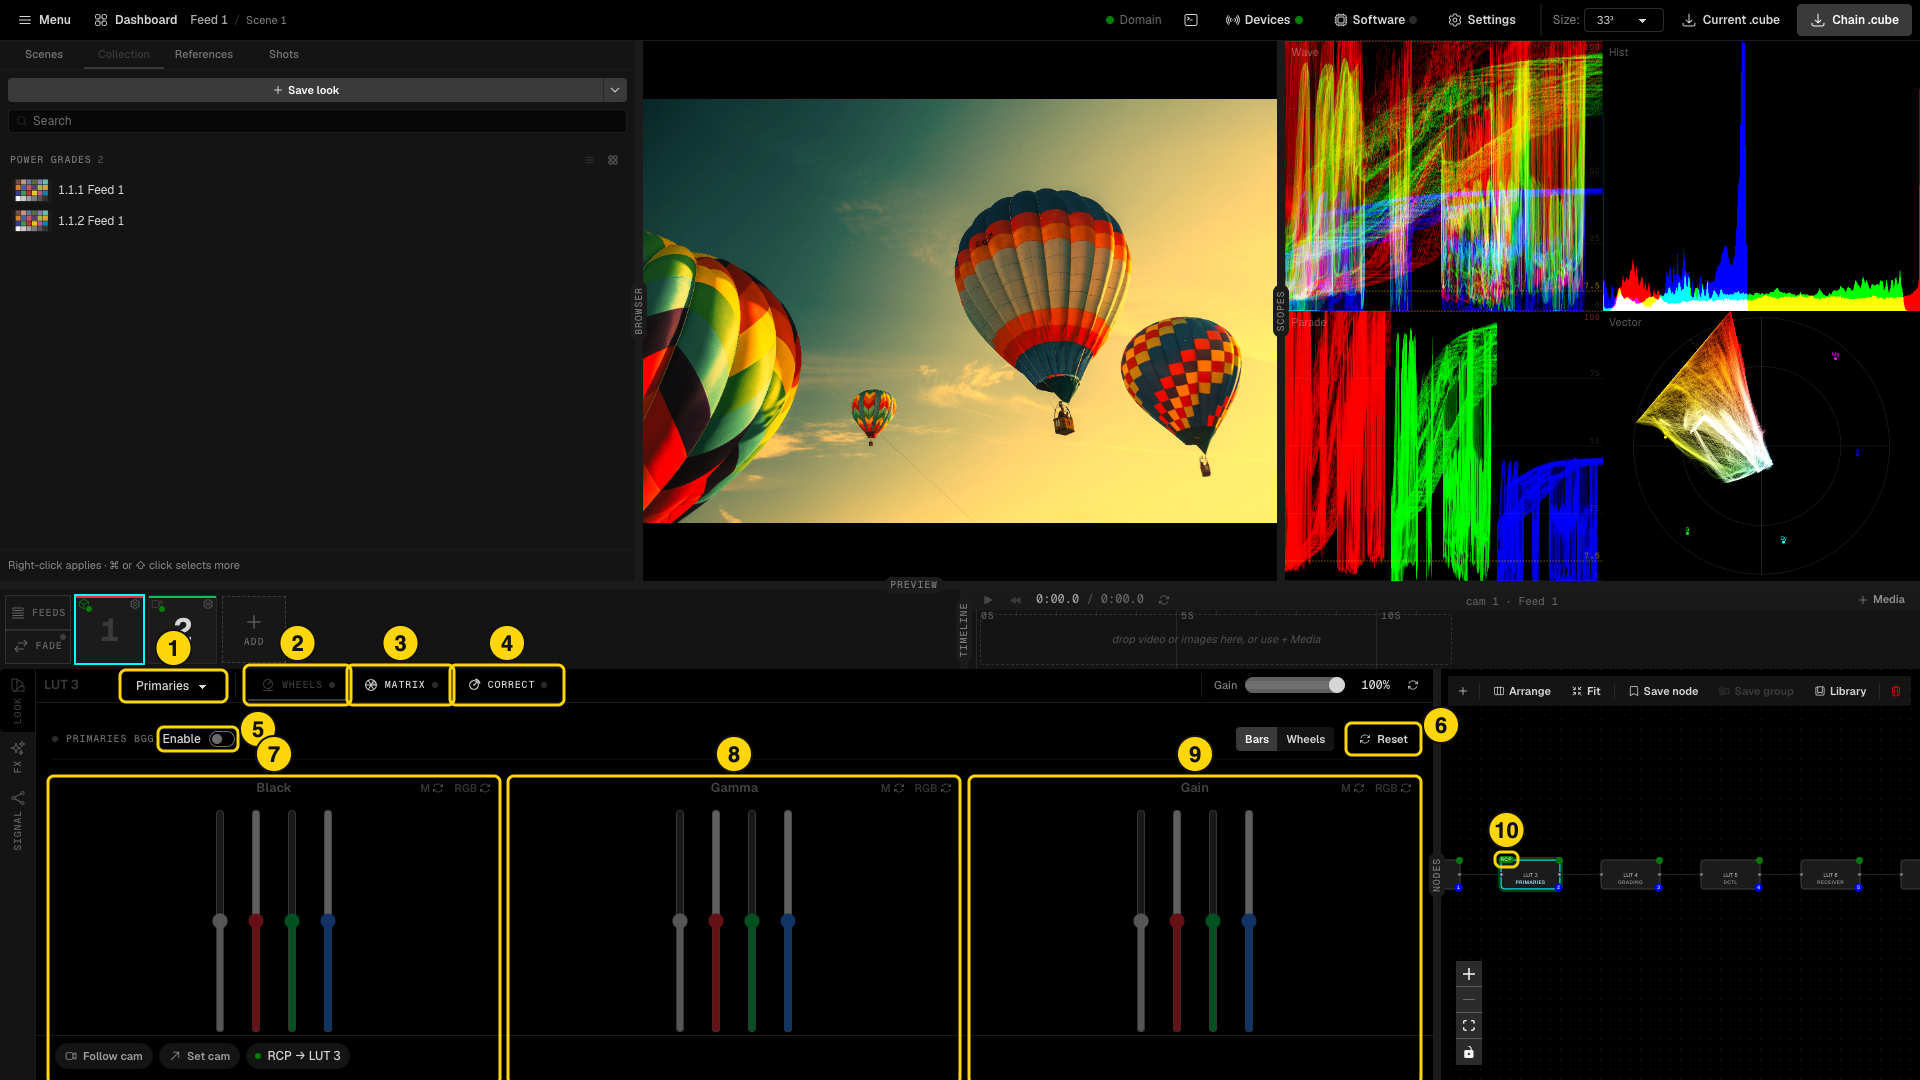
- Node type list.
- WHEELS tab.
- MATRIX tab (multimatrix).
- CORRECT tab (color correctors).
- Enable toggle.
- Reset.
- Black - master and RGB.
- Gamma - master and RGB.
- Gain - master and RGB.
- RCP badge - shows on the node in the graph when an external RCP drives it. The black, gamma and gain paint controls of the RCP of the linked camera then drive this node live.
Below the three groups you find Saturation, Hue, Saturation Model, Contrast and Pivot, Shadows and Highlights tools, and White Balance. Bars and Wheels switch the view of the controls. A dot on each tab shows whether that part of the node is on.
Grading
The Grading node is the creative node. It has four tabs. Hover a tab to see its full name.
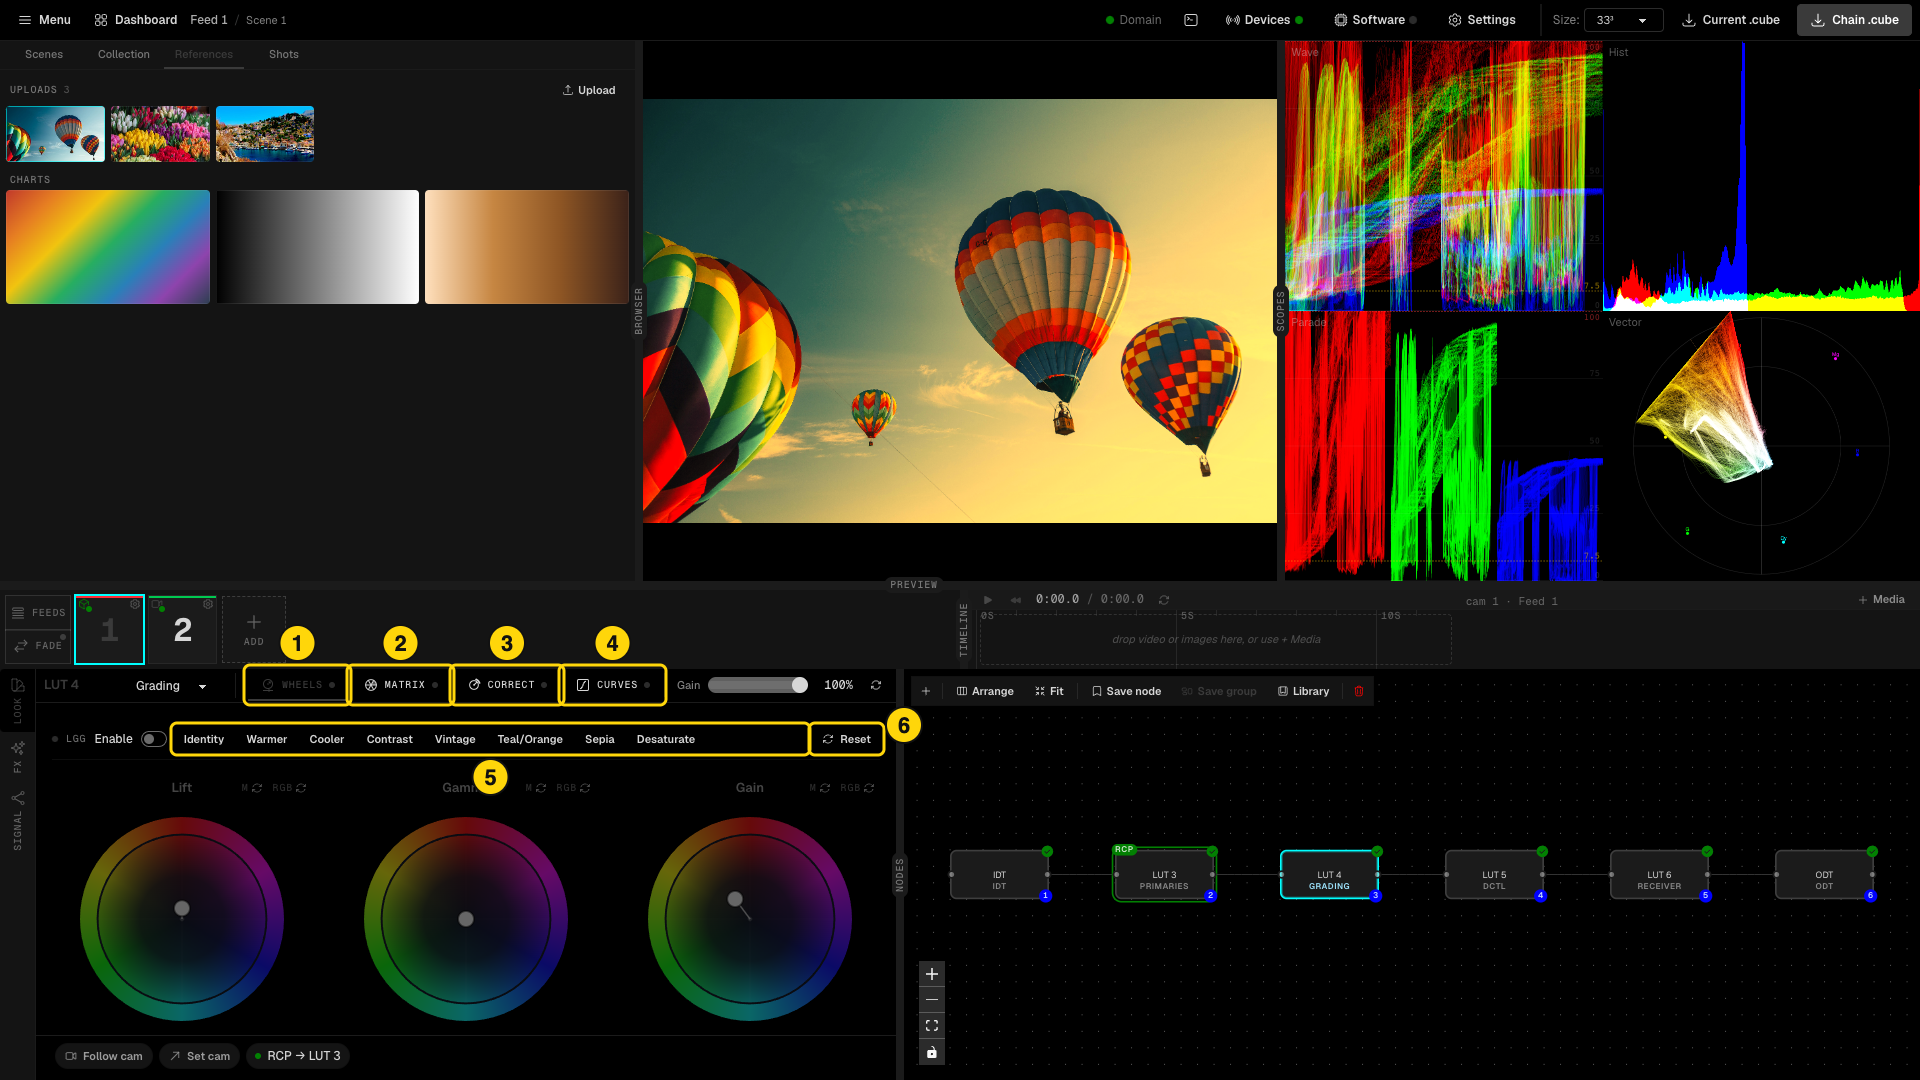
- WHEELS (Color Wheels) - Lift, Gamma and Gain wheels with master and RGB reset, plus Saturation, Contrast and Pivot and a White Balance block.
- MATRIX (Multimatrix) - hue by hue adjustments.
- CORRECT (Color Correctors) - secondary corrections.
- CURVES (RGB Curves) - curves per channel.
- Presets - Identity, Warmer, Cooler, Contrast, Vintage, Teal/Orange, Sepia and Desaturate give you a starting point.
- Reset - returns the node to identity.
DCTL
The DCTL node runs a DaVinci Color Transform Language file inside the chain, so a transform you already use in Resolve can live in the LUT box.
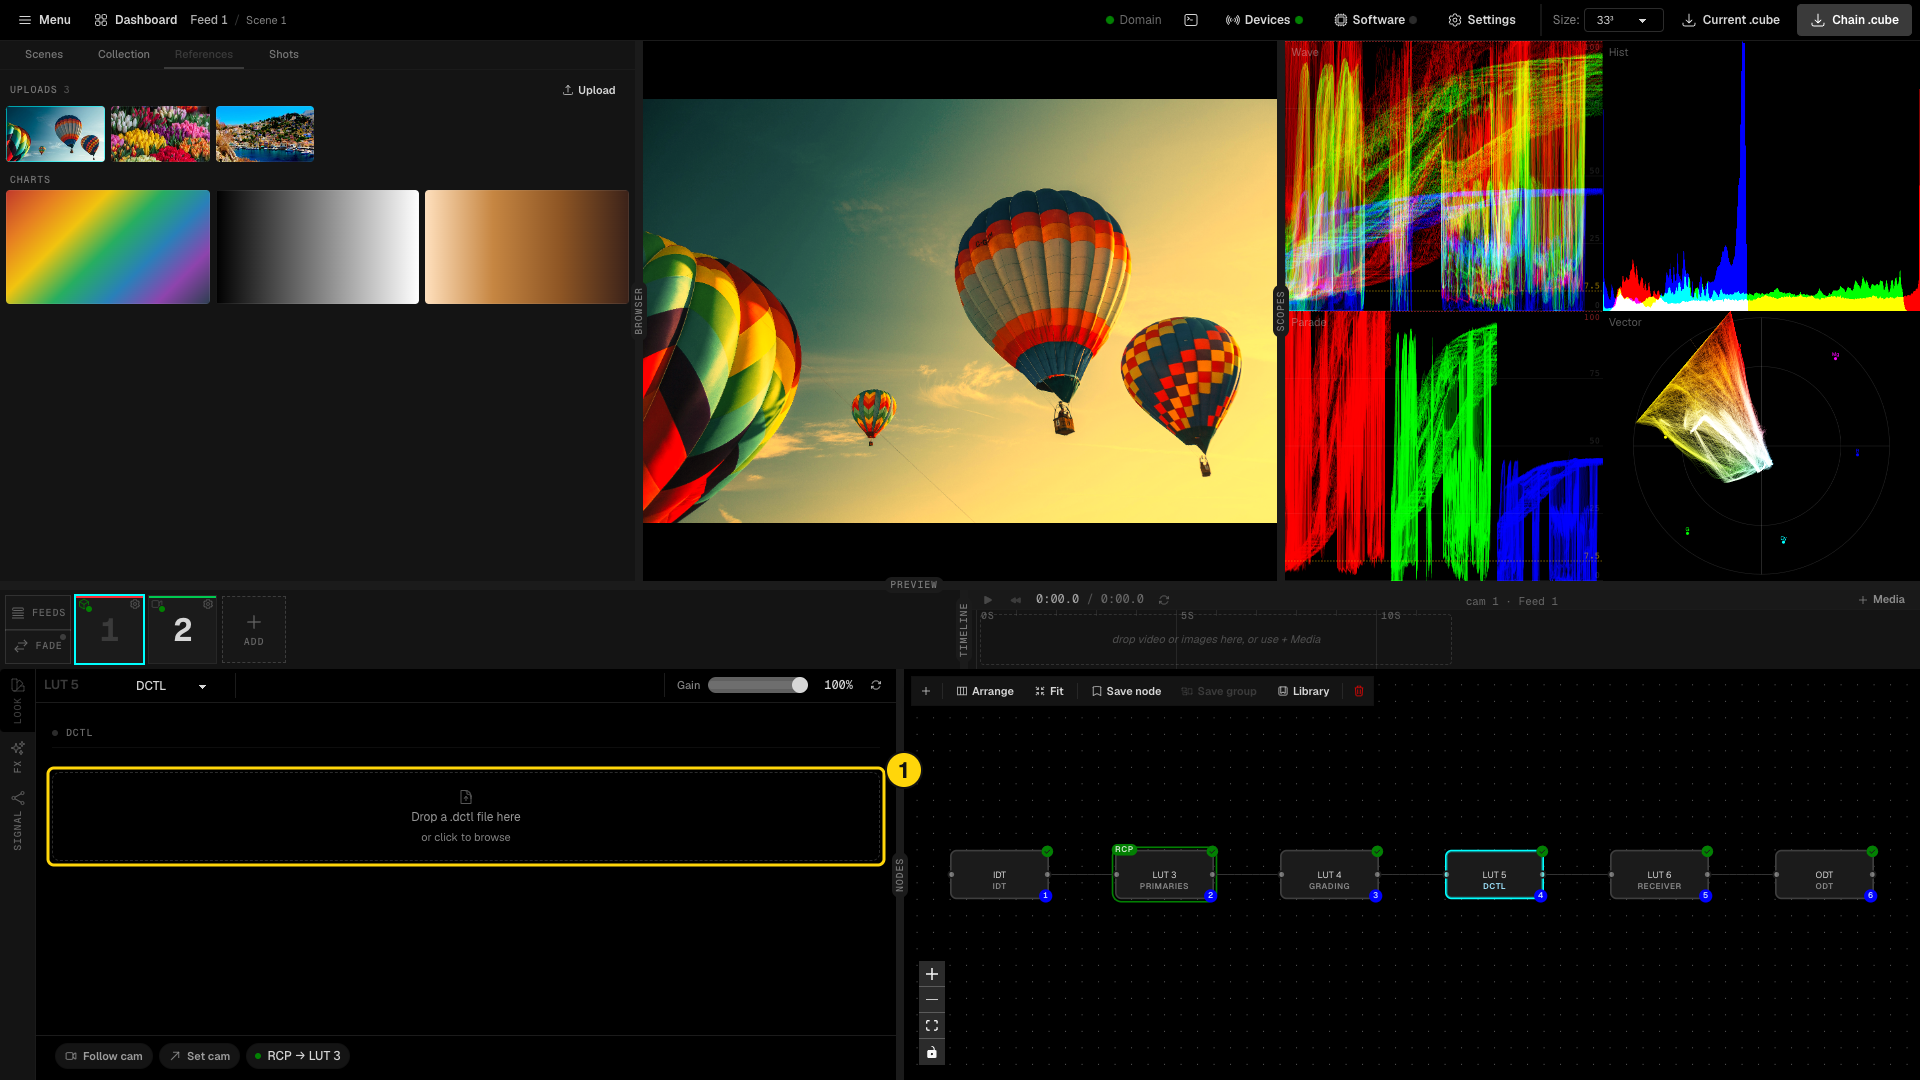
- Drop a
.dctlfile here, or click to browse. The node compiles it and shows its parameters.
The DCTL node needs a C++ compiler. On macOS, install the Xcode command line tools.
3D LUT and LUT Gallery
A 3D LUT node loads one .cube file into the chain. A LUT Gallery node uses the LUT gallery: LUTs you received or imported (drop .cube files on the gallery). It has two modes:
- Chain - applies several LUTs in order. Add LUTs from the gallery below and move them up or down.
- Look - applies one LUT picked from the gallery, or None to pass the image through. The number next to each LUT selects it from OSC (
/look) and the HTTP API.
Each gallery entry can be renamed, saved as .cube or deleted. The folder icon shows the gallery folder in the file browser.
Receiver: a LUT from DaVinci Resolve
The Receiver node takes a LUT that another program sends to Studio over WebSocket and puts it into the chain. This is how a colorist in DaVinci Resolve can drive a live LUT box: Resolve sends its grade as a LUT, the Receiver node picks it up, and Studio pushes the chain to the box.
First start the server in Studio:
- Click Software in the header and open the LUT Receiver tab.
- Keep the port (4568) or set your own, then click Start. The status turns to Listening.
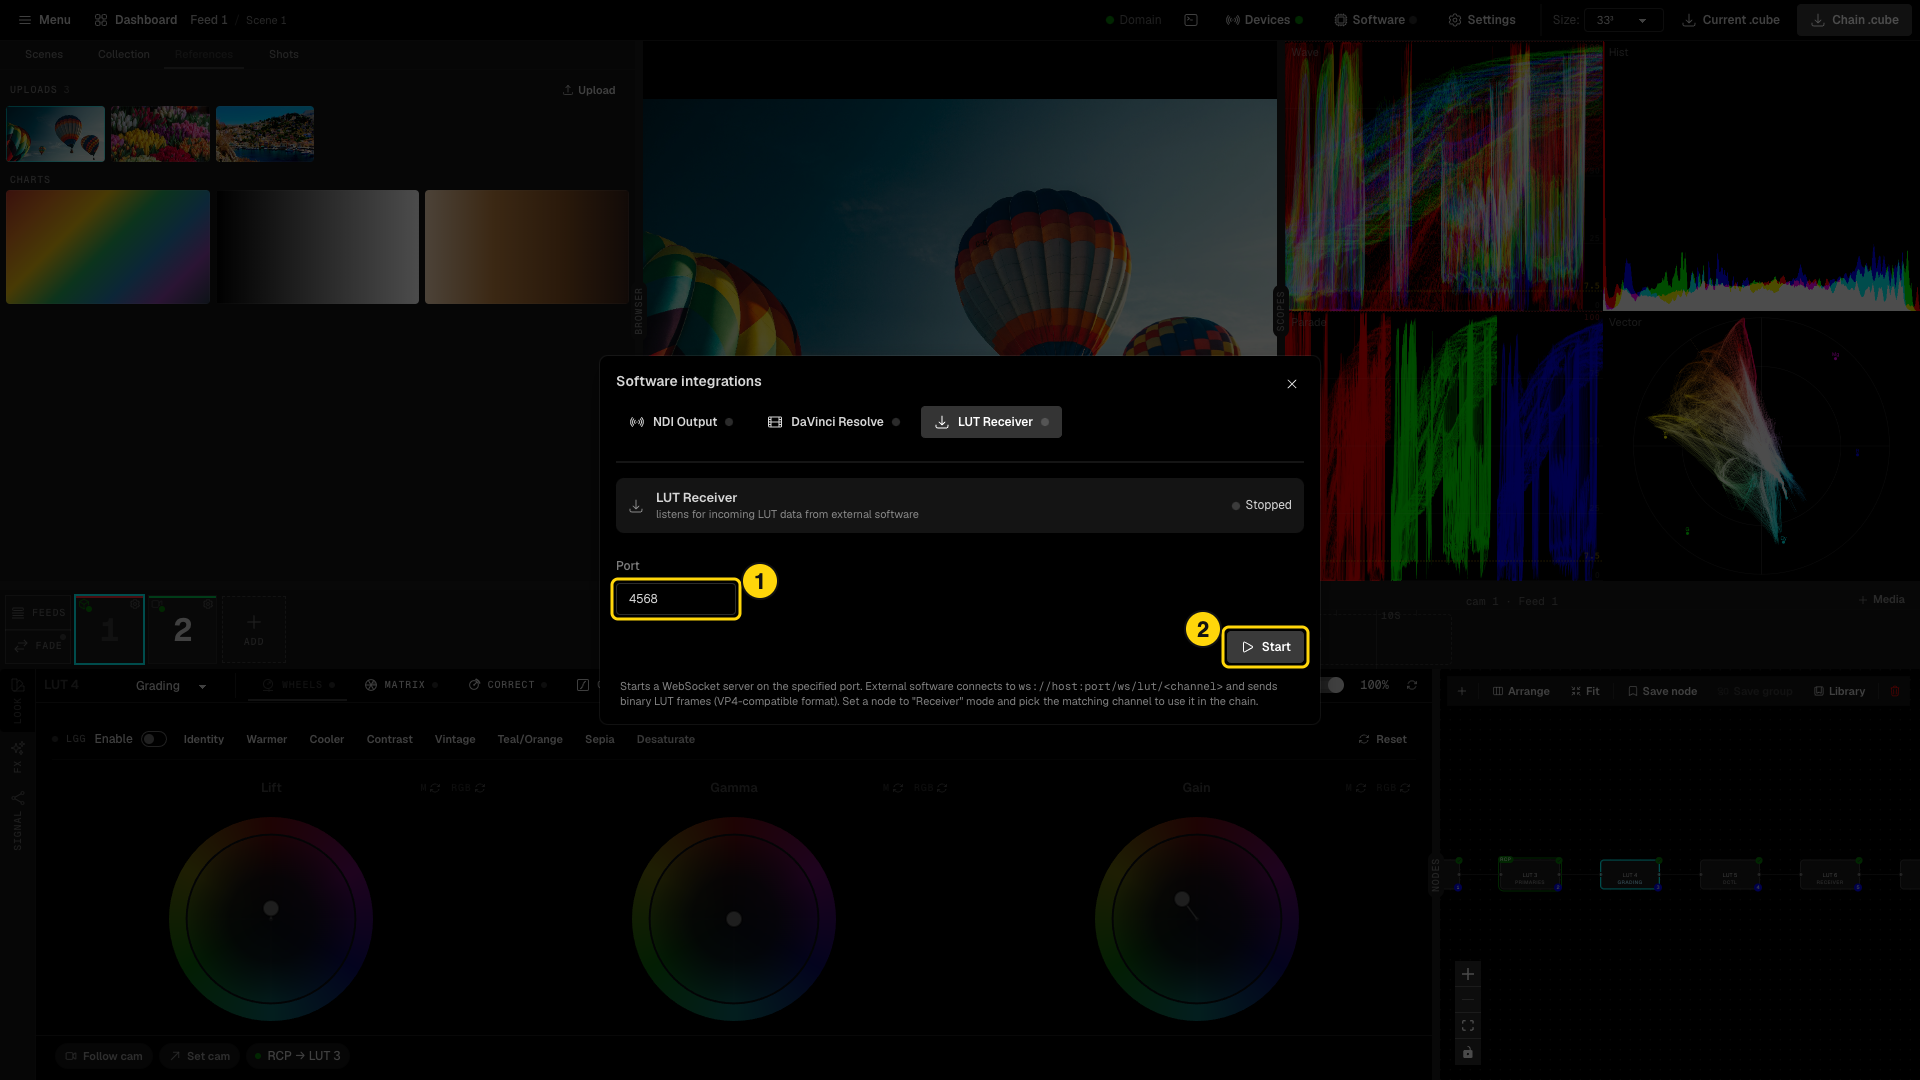
- Port of the WebSocket server.
- Start - starts the server. The button becomes Stop while it runs.
Then add the node:
- Add a node and set its type to Receiver.
- Pick a Channel (1 to 8). The panel shows the address the sender must use:
ws://<studio ip>:4568/ws/lut/<channel>. - In DaVinci Resolve, add two CyanView OFX nodes around your grade:
- LutGenerator is the first node. It writes a test pattern into the image.
- Your grade nodes come next.
- LutAnalyzer is the last node. It reads the pattern back, rebuilds the LUT of the nodes between, and sends it to Studio.
- Give both nodes the same LUT Size (33 by default).
- On the LutAnalyzer, set WebSocket Host to the Studio computer, WebSocket Port to the receiver port (4568), and Channel to the channel of the Receiver node. The default port of the plugin is 4888, so change it.
- Play the clip in Resolve. Resolve renders only during playback or a change, so a paused frame does not send. The panel shows Receiving LUT data on channel N, and the preview, the scopes and the LUT box follow the incoming LUT.
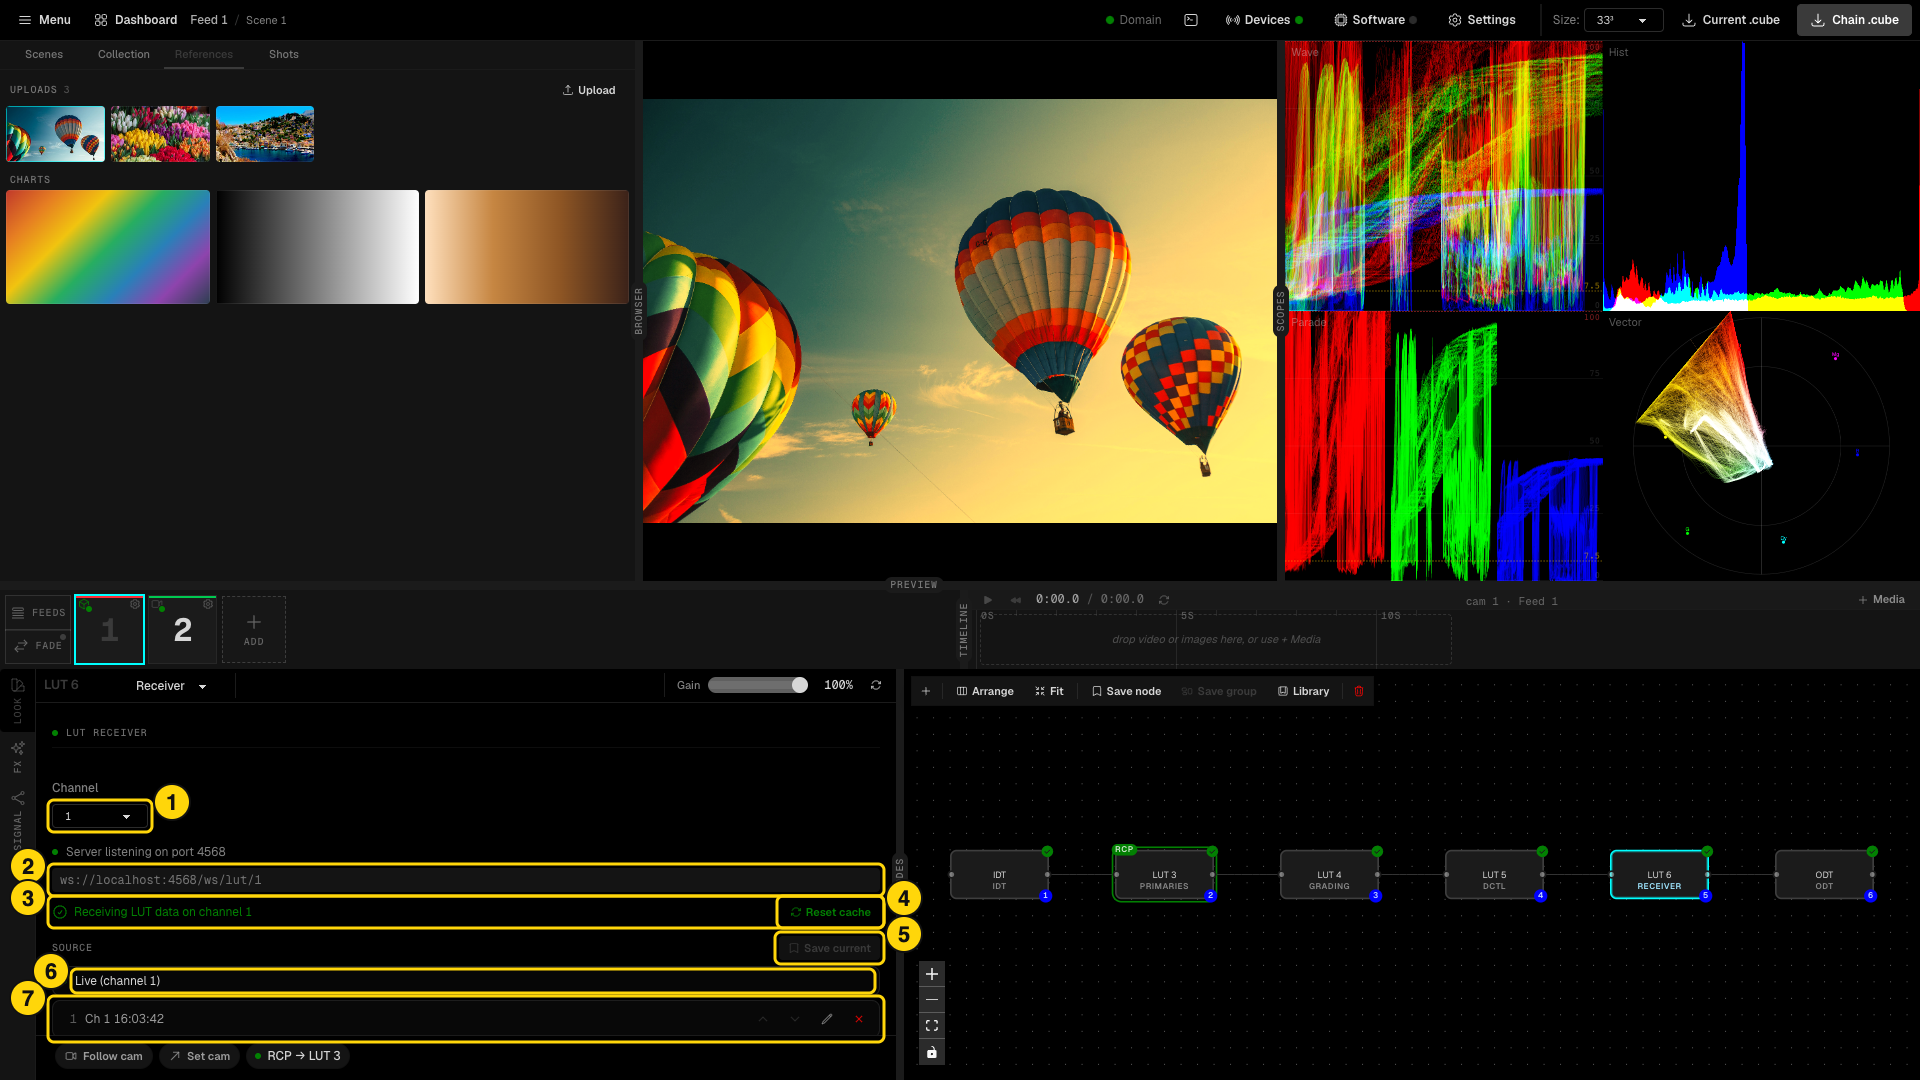
- Channel - one Receiver node per channel, so several senders can feed different feeds.
- The WebSocket address for the sender.
- Status - Receiving LUT data on channel N, or Waiting for data until the first frame arrives.
- Reset cache - forgets the cached LUT for this channel.
- Save current - keeps a copy of the last LUT received as a snapshot.
- Live (channel N) - the node follows the incoming LUT.
- Saved snapshots - click one to use it instead of the live LUT. Each row has move up, move down, rename and delete. The number on the row selects it from OSC (
/receiver) and the HTTP API.
When the server is off or the sender disconnects, the node keeps the last LUT it received, so the look on air does not change. Snapshots let you lock a delivered look and keep it after the colorist leaves.
The other direction also exists: the DaVinci Resolve tab of Software pushes the Studio chain LUT into Resolve. In Resolve, add the CyanView WS LUT OFX node. It receives the LUT and applies it to the image.
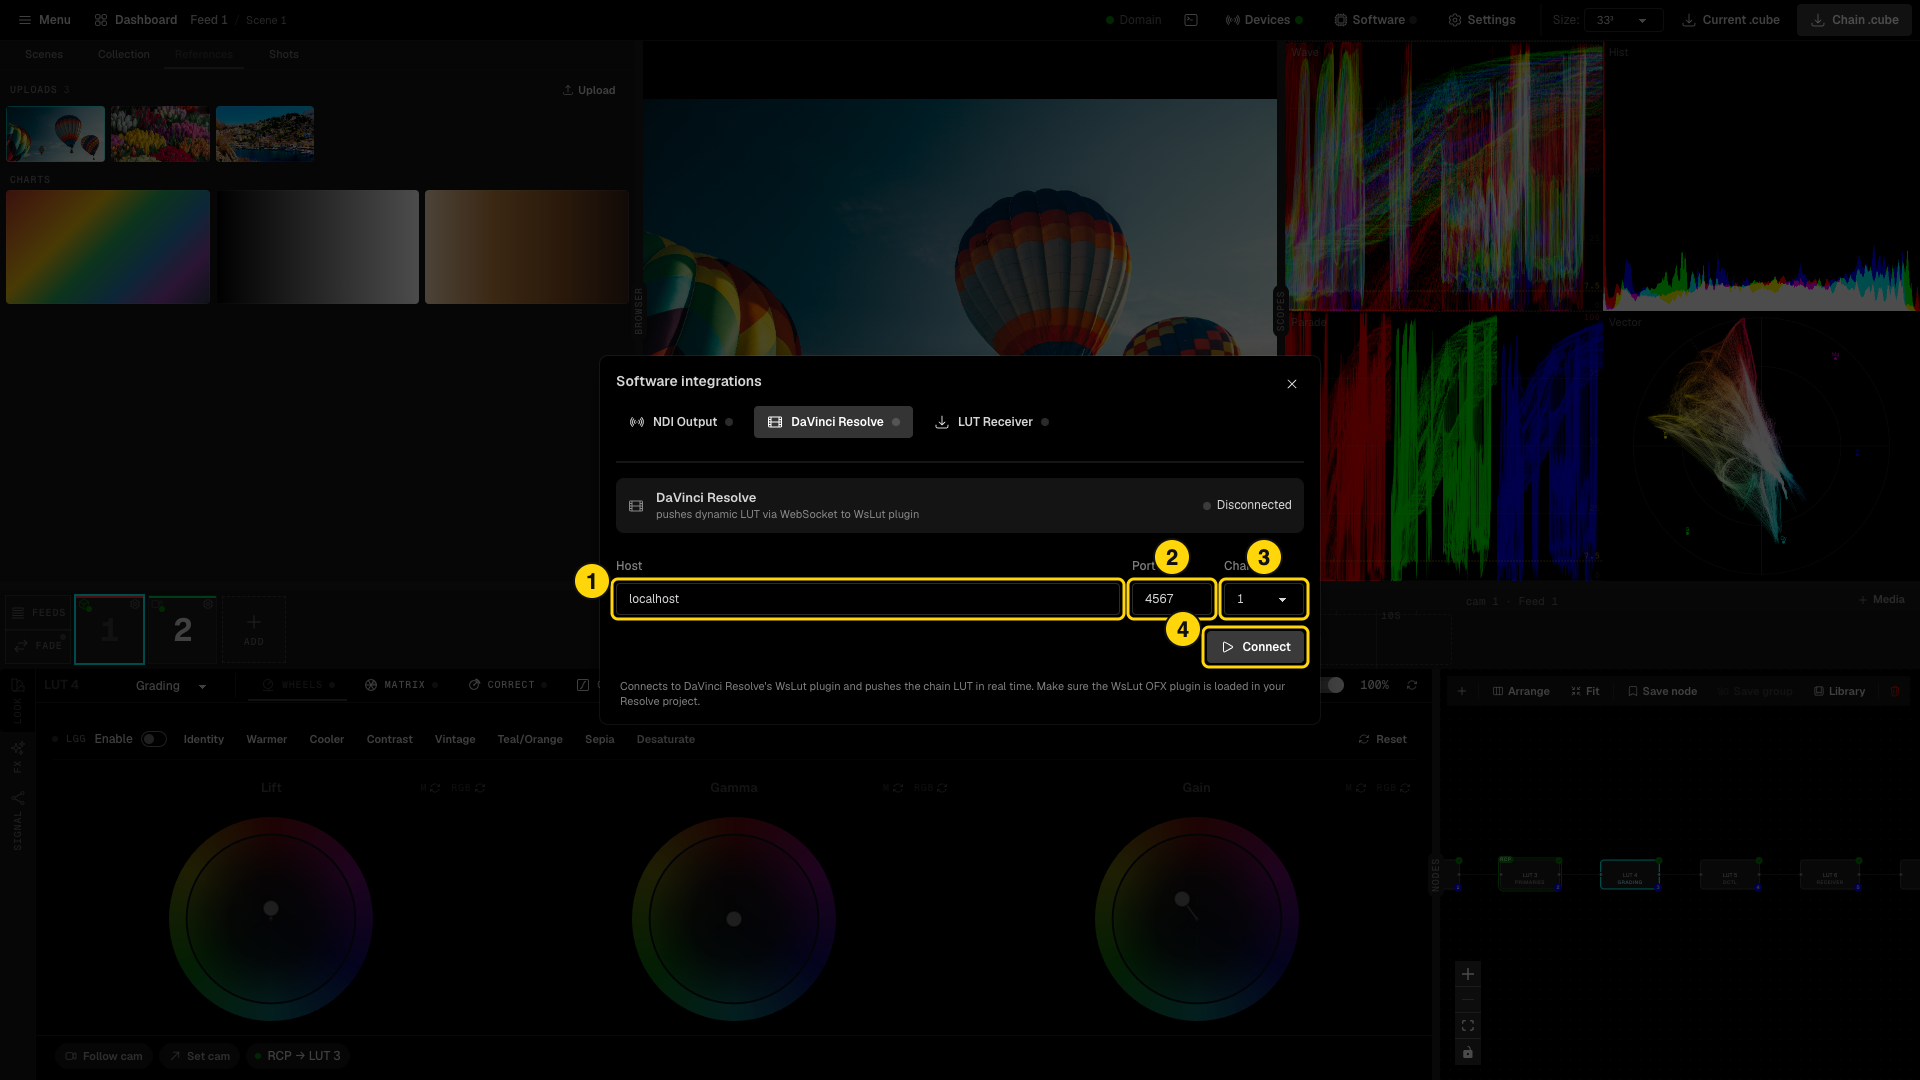
- Host - the computer running Resolve.
- Port of the WsLut plugin (4567).
- Channel.
- Connect - Studio connects to the WS LUT node in Resolve and pushes the chain LUT in real time.
ODT
The ODT closes the chain. It converts the working space back to the output space of the LUT box, normally Rec.709.
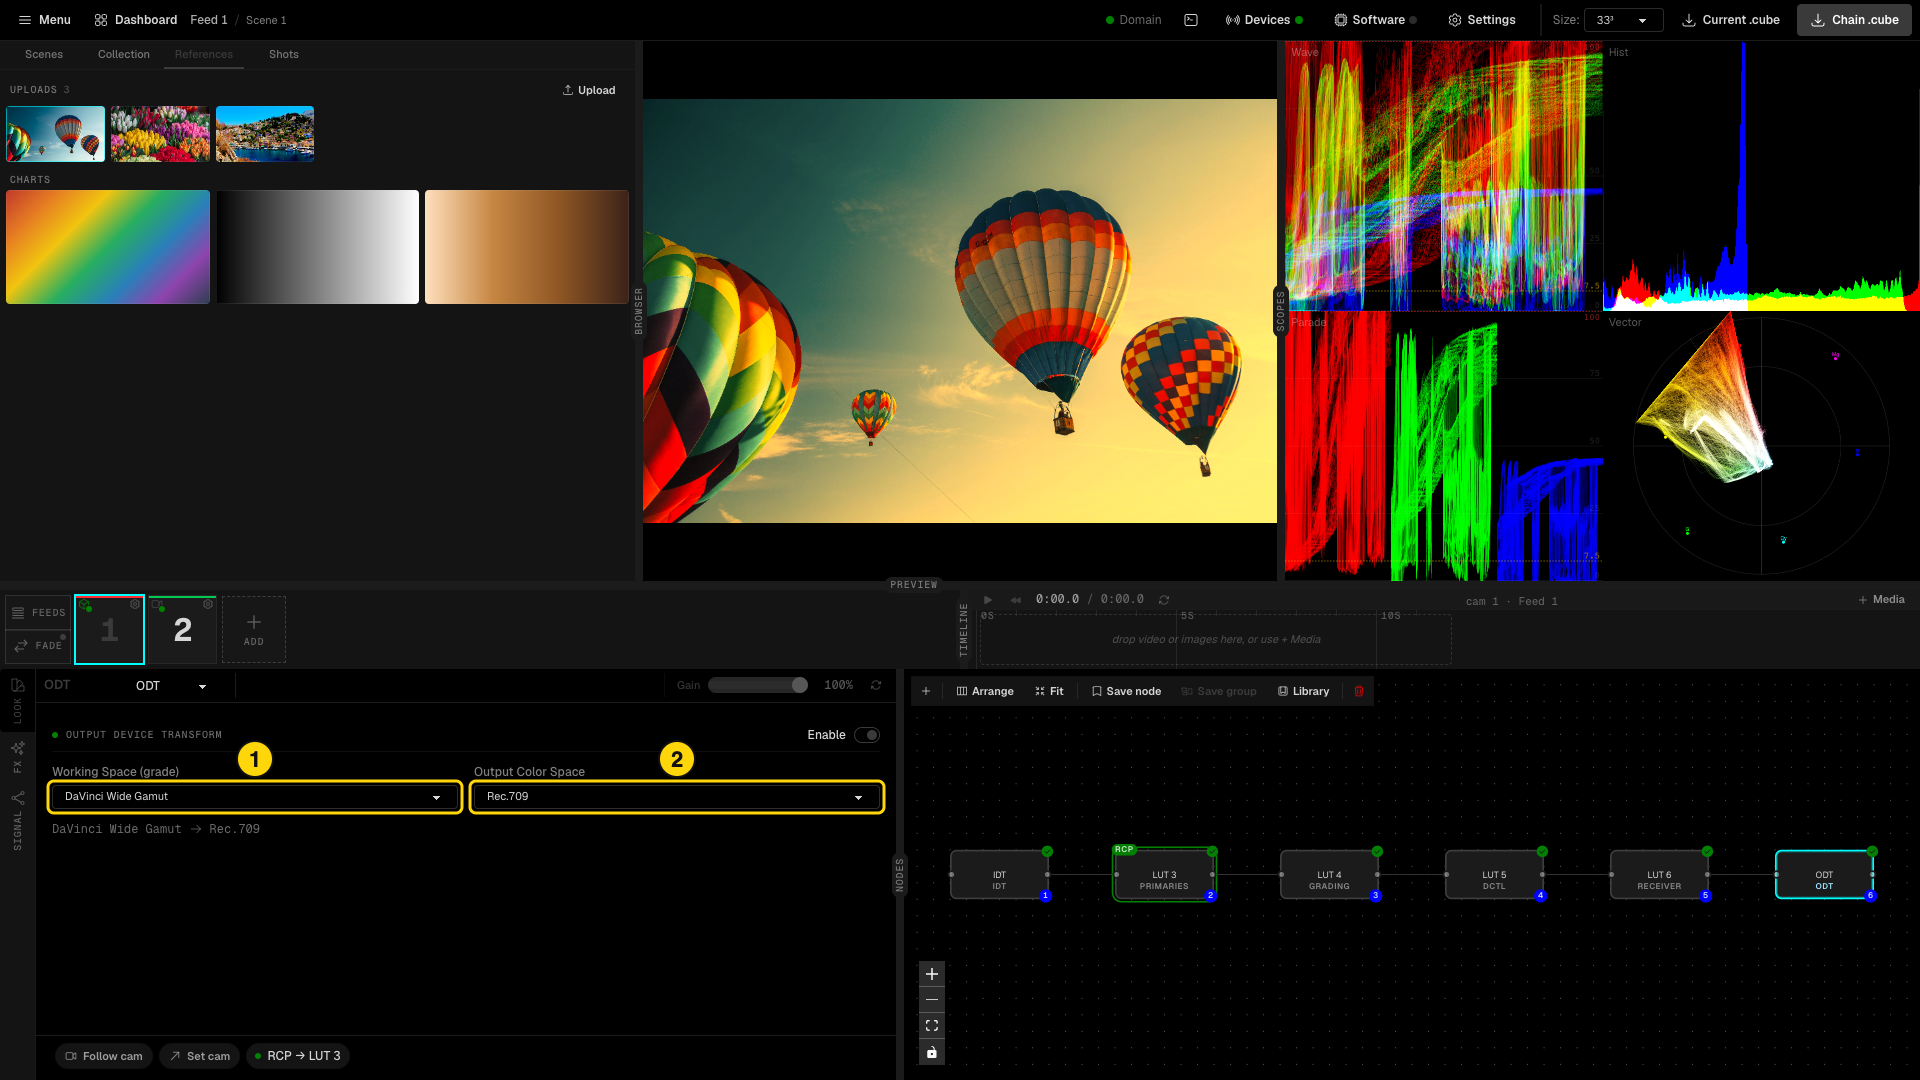
- Working Space (grade) - the same working space as the IDT.
- Output Color Space - what the LUT box must deliver, for example Rec.709, HLG or PQ.
A node saved to the Library can be used in other grades. A global node stays in sync in all grades that use it.
4. Preview and scopes
The preview shows your grade on a reference still, or on live video when the feed has a live input. Choose the still in the References tab of the BROWSER: one of the Charts (Color Checker, Grayscale, Skin Tone) or one of your Uploads. A shot can also become the reference (see step 5).
To add your own stills, click Upload in the References tab. Drop images or browse for them. LiveLab accepts JPG, PNG, WebP and TIFF files up to 100 MB.
Move the mouse over the preview to show its toolbar.
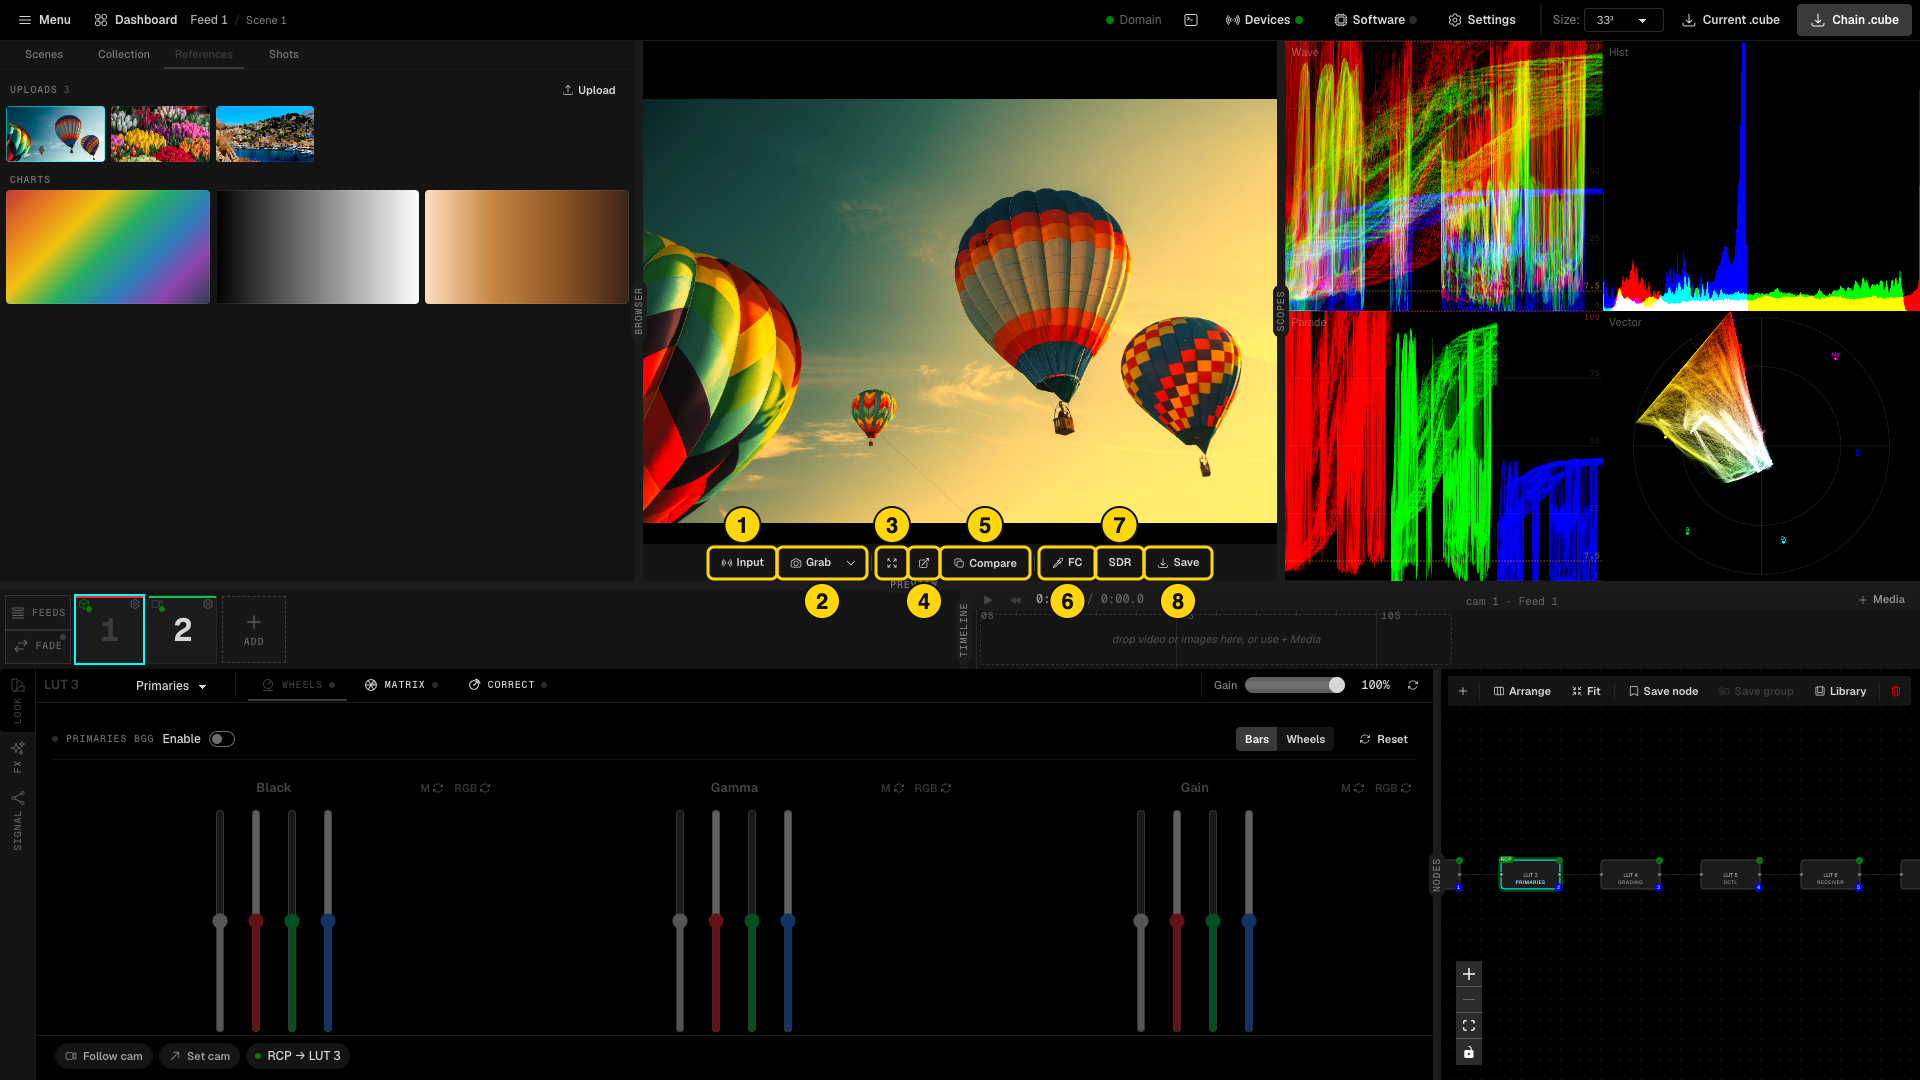
- Input - opens the live input drawer (see below).
- Grab - grabs a shot of the open feed. The arrow menu grabs all feeds (see step 5).
- Fill - fills the preview area.
- Pop-out - opens the preview in a new window.
- Compare - shows another feed or a Power Grade side by side with the open feed on the same still. Exit compare (or Escape) closes it.
- FC - turns the false color exposure check on or off.
- SDR - decodes the graded output for your display. Click to cycle SDR, PQ, HLG and HLG P3. Use PQ or HLG on an HDR display.
- Save - saves the current preview as an image.
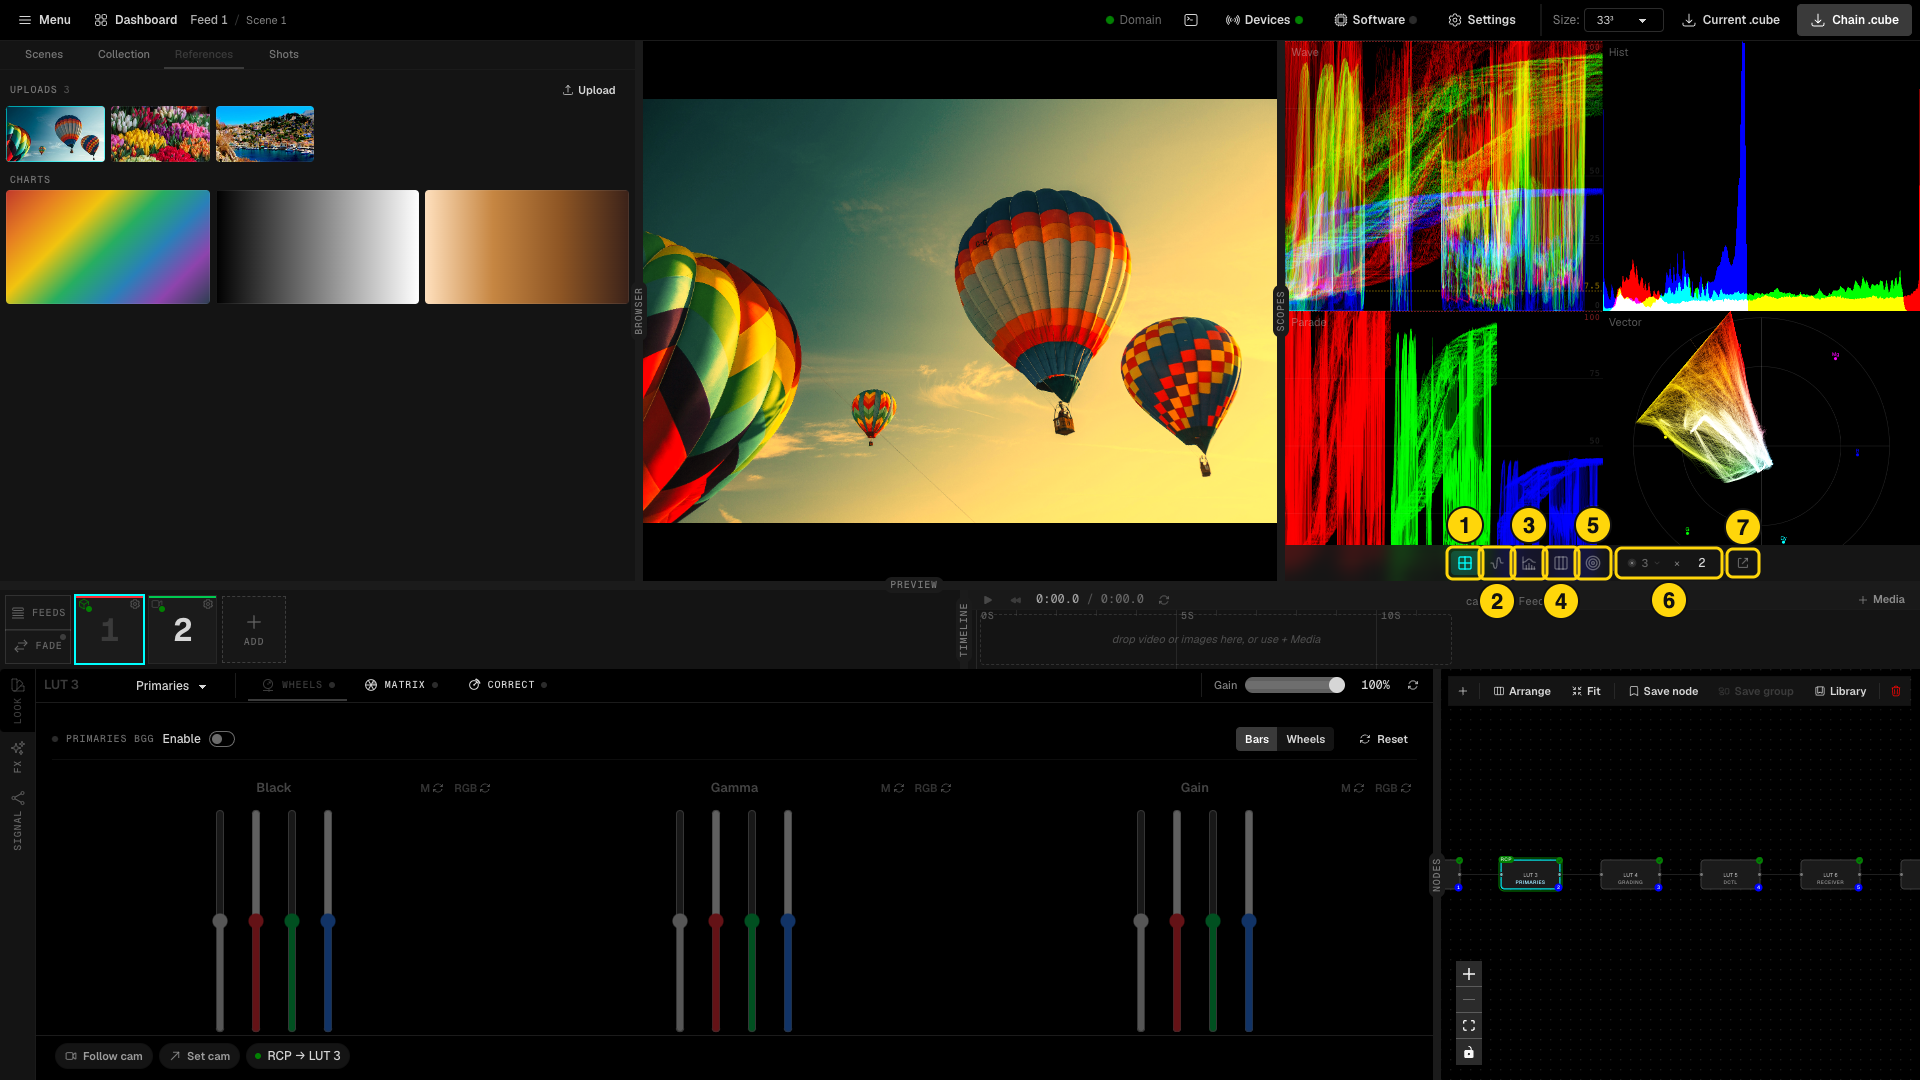
- All four scopes together.
- Waveform.
- Histogram.
- Parade.
- Vectorscope.
- Intensity of the traces.
- Pop-out - opens the scopes in a new window.
The scopes read the graded preview. In PQ or HLG the waveform and parade show HDR levels.
Live input
Click Input in the preview toolbar to open the drawer for the open feed. Each feed keeps its own input.
- Capture - pick a DeckLink device and click Start. Feeds that pick the same device share it; the feed on screen owns the signal. Match display refresh switches the display to an exact multiple of the feed frame rate while the feed is shown, for a smooth preview.
- SDI output - pick a DeckLink output and click Start output to send the graded picture.
- Stream - receive SRT (as Listener or Caller) or RTP, in H.265 or H.264. Set the address, port and, for SRT, the latency, passphrase and stream ID, then click Connect.
Press Escape or click the X to close the drawer. The input keeps running.
Live input and SDI output work on macOS and on Windows. The capture group shows only when the Blackmagic Desktop Video driver is installed. Install it on the computer that runs Studio.
5. Shots
A shot keeps one moment of a feed: the raw frame, the graded frame, the look as a frozen .cube and the camera values from the RCP. Use shots to match cameras, to note a look, or to grade later on the real picture.
- Open a feed and click Grab in the preview toolbar or in the Shots tab (Cmd+G, Ctrl+G on Windows).
- To grab every feed at the same moment, open the arrow menu next to Grab and choose Grab all feeds (Cmd+Shift+G).
- Under Keep in the same menu, choose Raw + graded, Graded only (lutted) or Raw only (no LUT). A small lut or raw badge on the button shows a choice other than both.
The Shots tab lists the grabs by time, newest first. Click a grab to show its shots. Graded and Raw switch the thumbnails. The table icon opens the contact sheet in place of the preview: one row per grab and one column per feed.
Click a shot to open it in the Shot window:
- Graded, Raw, Split and vs prev take change the view (keys 1 to 4). Left and right arrows move to the next feed of the grab, up and down arrows to the next or previous take.
- Use as reference makes the raw frame the reference still, so you can grade on it.
- Restore camera shows iris, white balance, tint and ND from the shot. Check them, then click Send to camera.
- Scene, Take and Notes label the grab. Camera at grab lists the camera values; values that differ from the previous take are marked.
- Export and Delete.
Export (on a shot, a grab, every grab, or from the command palette) writes into a new folder in the LUT export destination (see step 6): Graded and Raw stills as JPEG, TIFF 8-bit or PNG, the look as a .cube (33 or 65 points), a shots.csv and one .json per shot with all camera values. The file name pattern accepts {scene}, {take}, {feed}, {camera}, {grade}, {date} and {time}.
6. Output
LiveLab bakes the grade of the selected feed into a 3D LUT. It pushes the LUT to the device of that feed on every change. You do not need a save or send button.
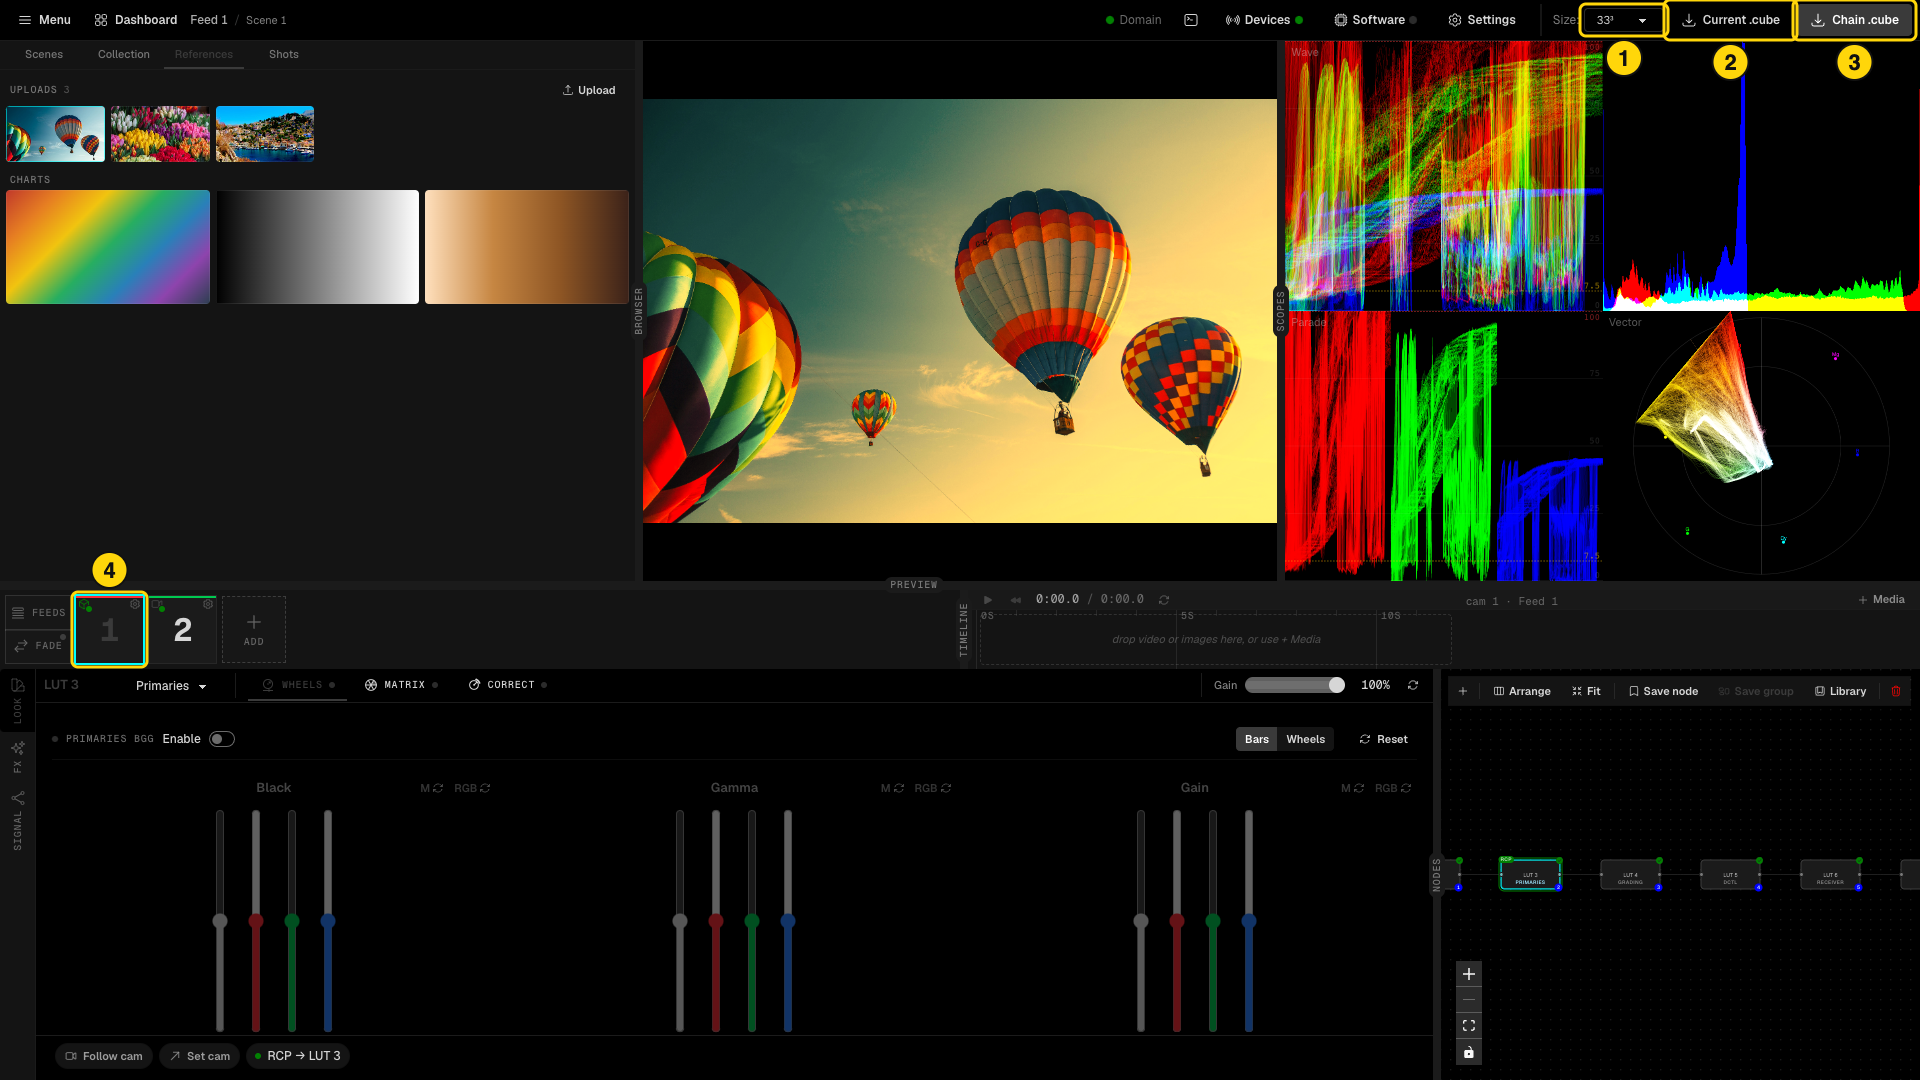
- Size - the LUT size: 17, 33 or 65.
- Current .cube - exports the LUT of the selected node.
- Chain .cube - exports the LUT of the full chain.
- The feed tile whose grade is exported.
To set where exports go, open Settings and the EXPORT tab. Click Set destination to pick the folder, or switch on Ask destination each time. The File name pattern accepts {grade}, {node}, {feed}, {size}, {date} and {time}.
Fade
Every change you make goes to the LUT box at once. On air, a big change in one step is visible as a jump. The FADE button opens the LUT fade window, where you make the box crossfade from the old LUT to the new one instead. A dot on the FADE button shows that fade is on.
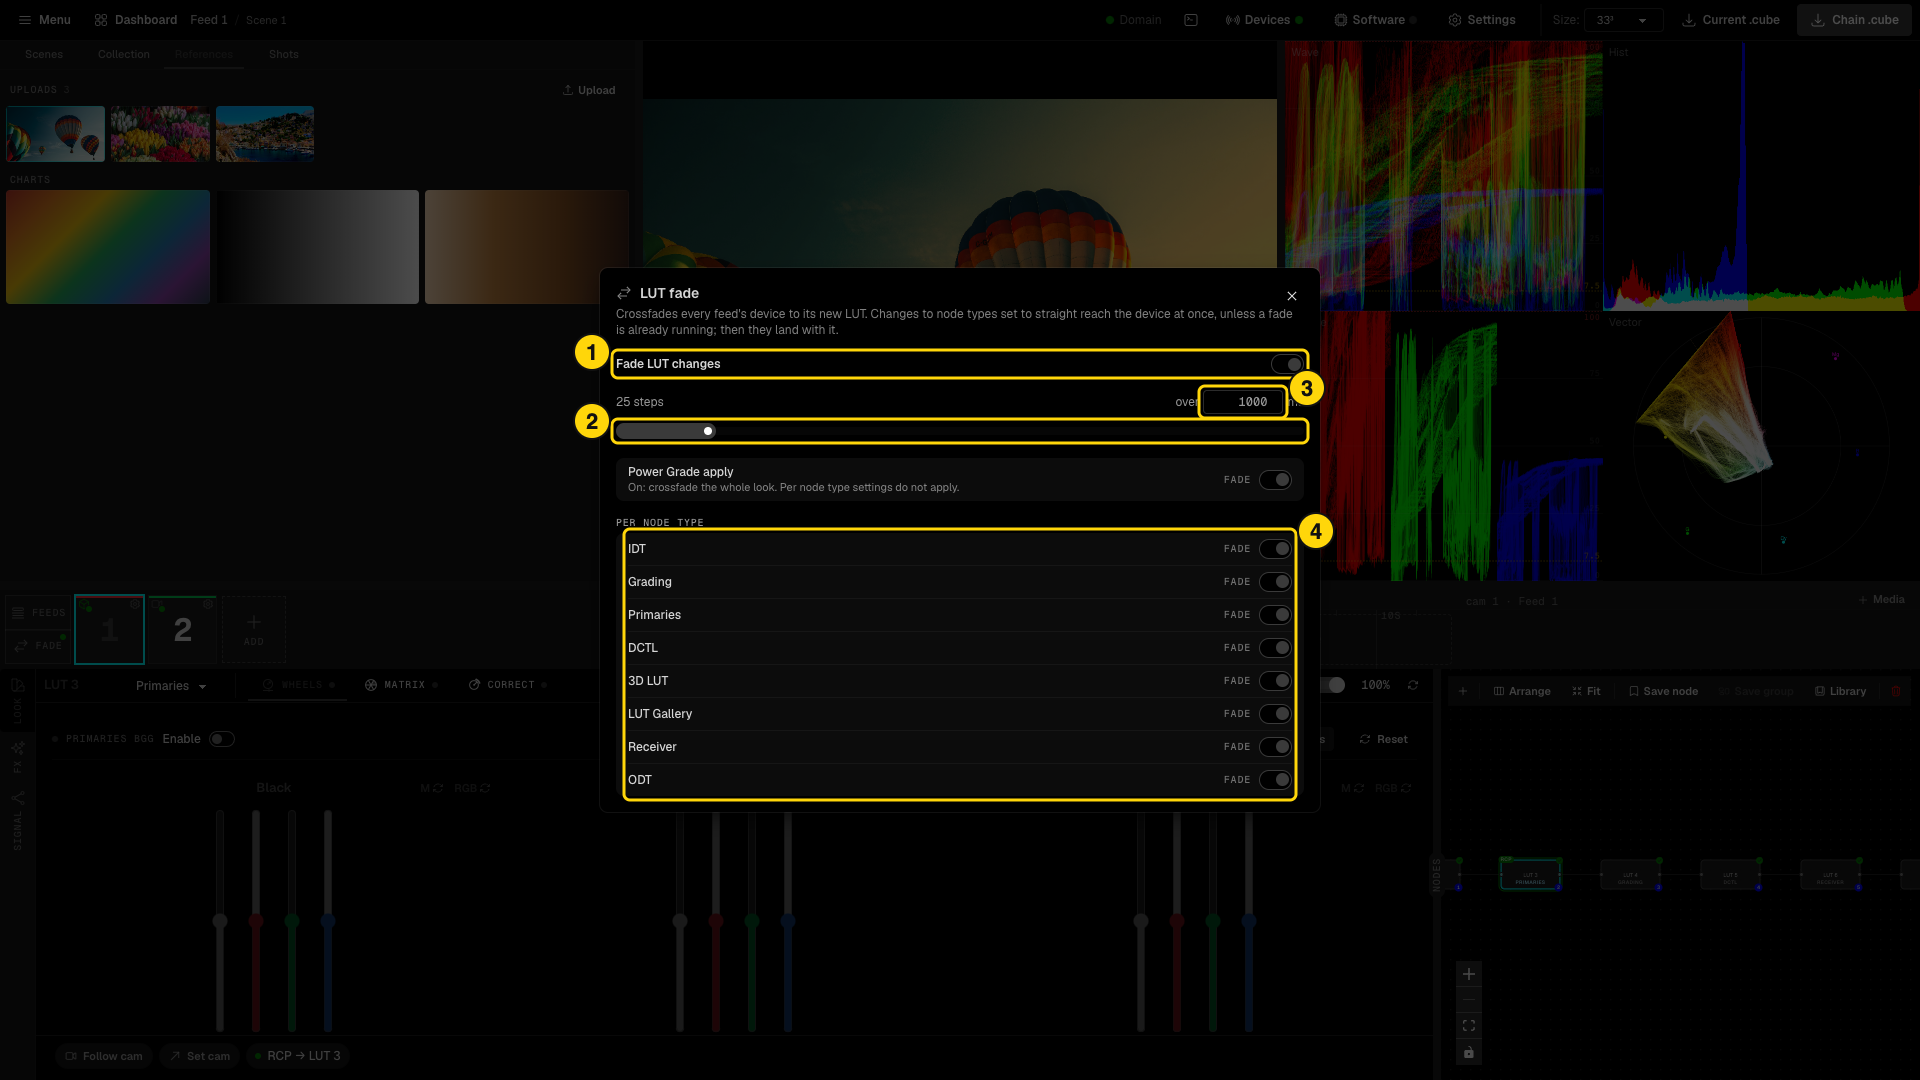
- Fade LUT changes - turns the crossfade on or off for every feed and every device.
- Steps - how many intermediate LUTs the box receives. Drag the slider.
- Duration in milliseconds - the time the crossfade takes. 25 steps over 1000 ms is a good start.
- PER NODE TYPE - each node type is set to FADE or STRAIGHT. A straight node type reaches the device at once, for example a LUT Gallery switch that must be instant. If a fade is already running, straight changes land together with it.
Power Grade apply sets whether applying a Power Grade crossfades the whole look or cuts to it. The per node type settings do not apply to it. The palette command Toggle LUT Fade turns fade on or off without the window.
Fade works on every device kind. A slow box takes longer to apply each step, so use fewer steps with slow hardware. Push LUTs in the Devices modal re-sends the final LUT without a fade.
To check the whole path of a feed, open the SIGNAL panel. It draws the signal path and shows which stages are live, idle or outside the app.
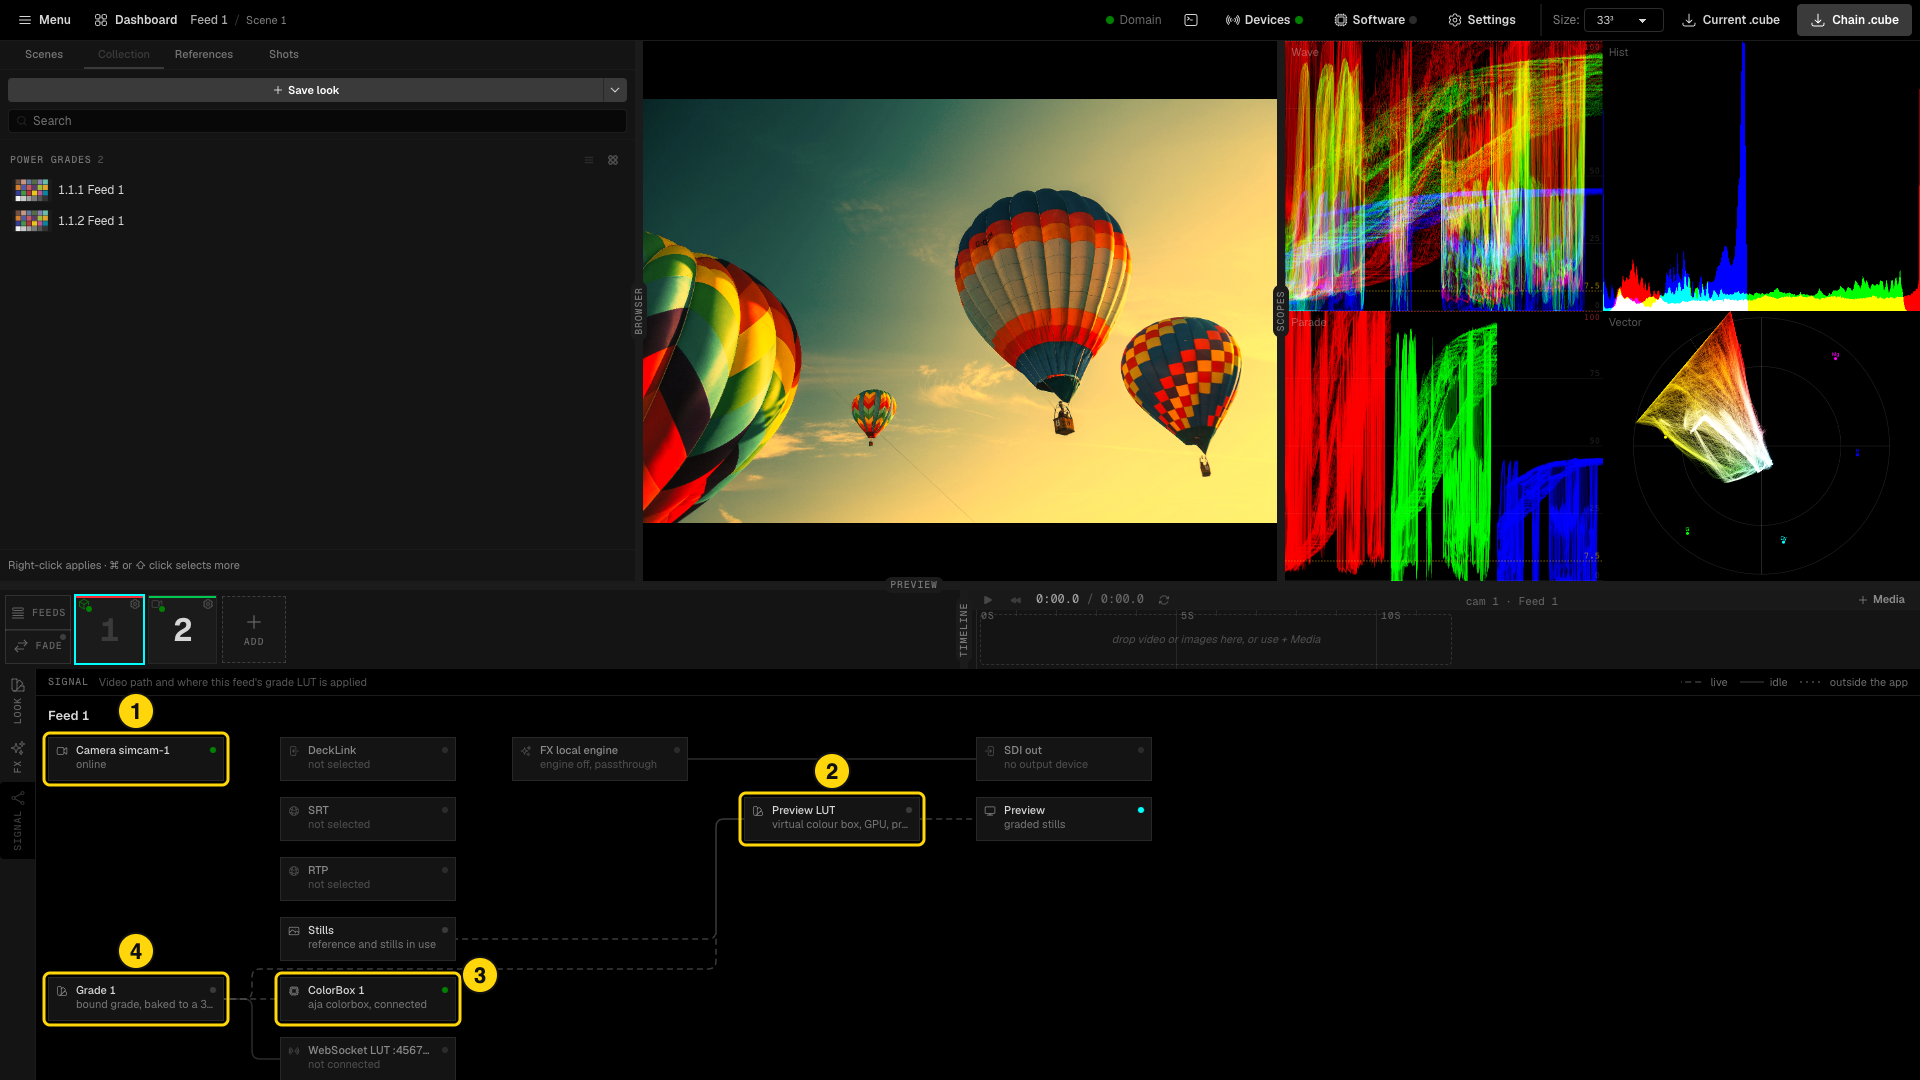
- The camera of the feed and its state.
- Preview LUT - the LUT used for the preview.
- The LUT device and its state.
- The bound grade, baked to a LUT.
The FX panel holds an OpenFX effects chain. It runs on the built-in engine of this computer or on an FXVP server. The CyanView 3D LUT plugin in that chain applies the grade, with its own fade. See the FXVP manual.
7. Scenes and the Collection
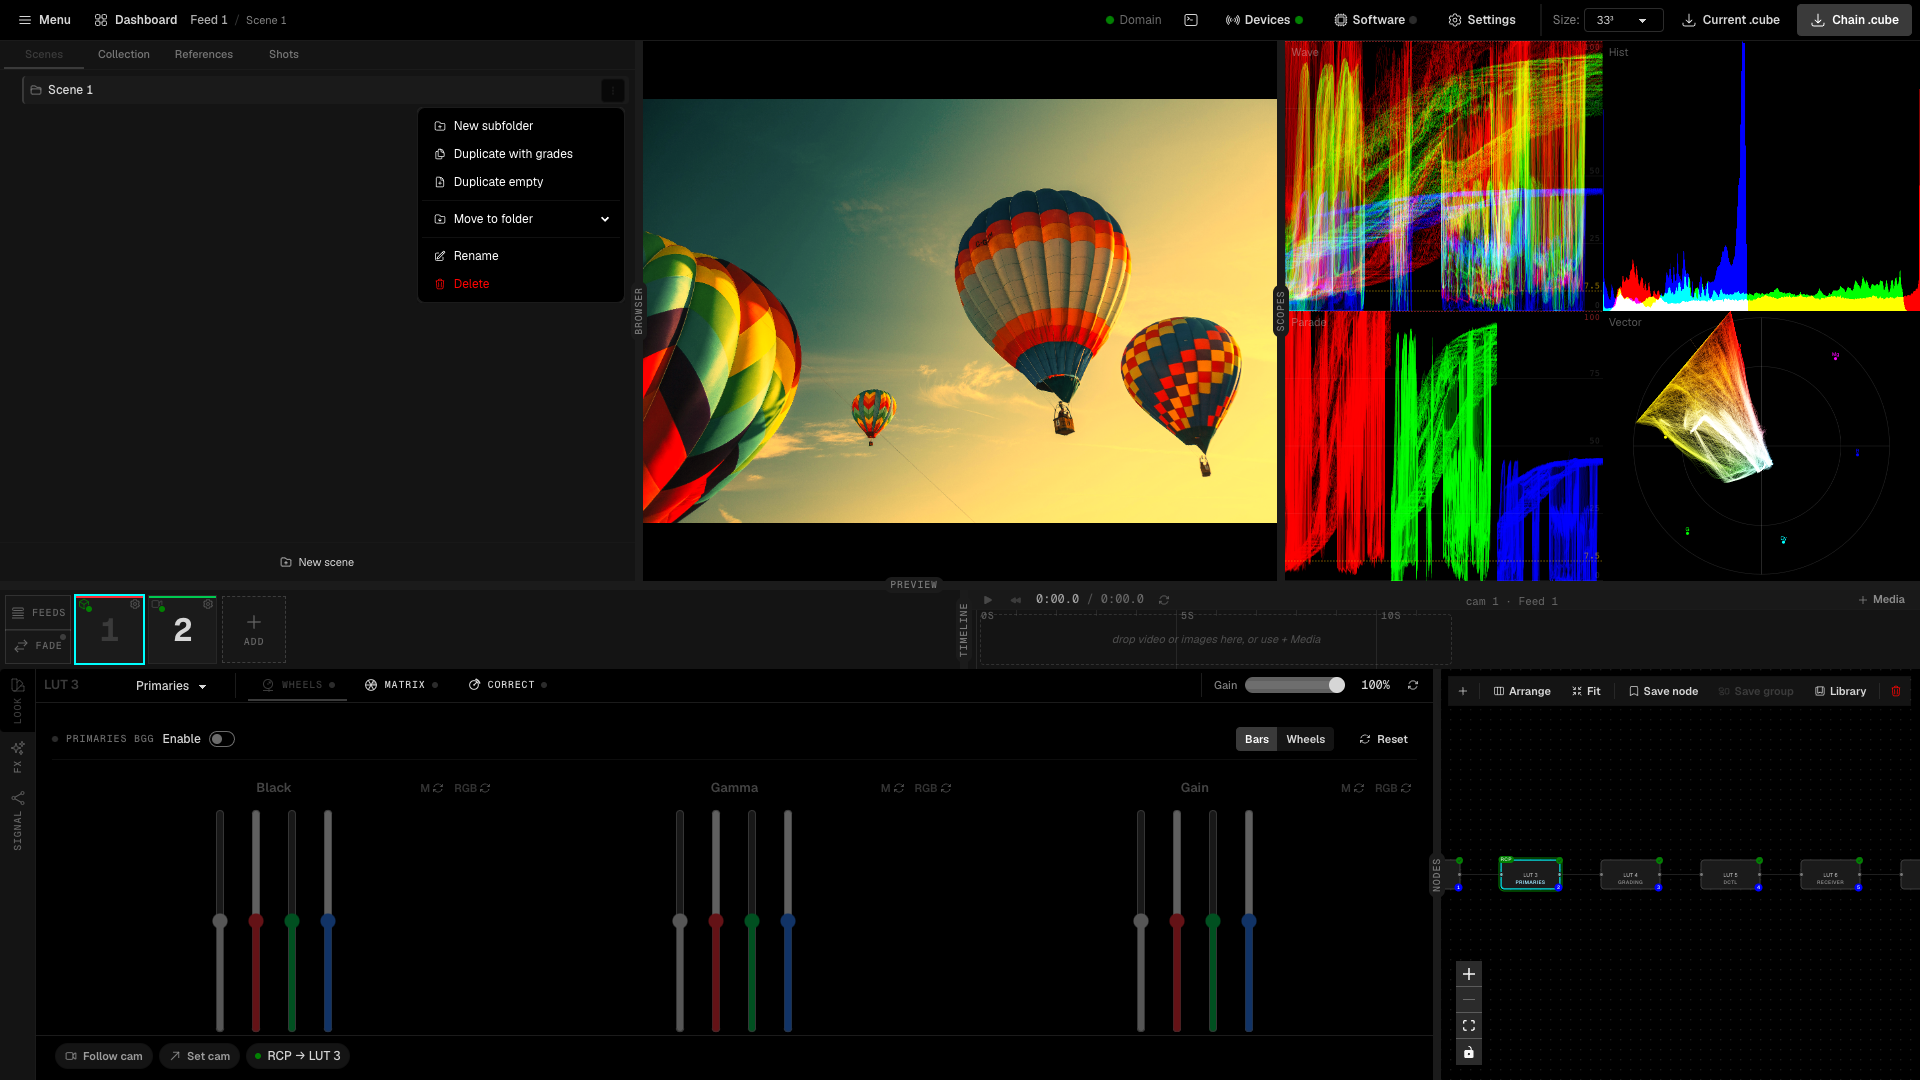
The Scenes tab lists your scenes as folders. Click a scene to make it the active scene: every feed switches to its grade in that scene and the LUTs go to the devices. Click New scene to add one. The kebab menu of a scene gives New subfolder, Duplicate with grades, Duplicate empty, Move to folder, Rename and Delete.
The Collection tab holds your reusable looks. A Power Grade keeps every value of a look, with a thumbnail. A Node Template keeps only the node chain.
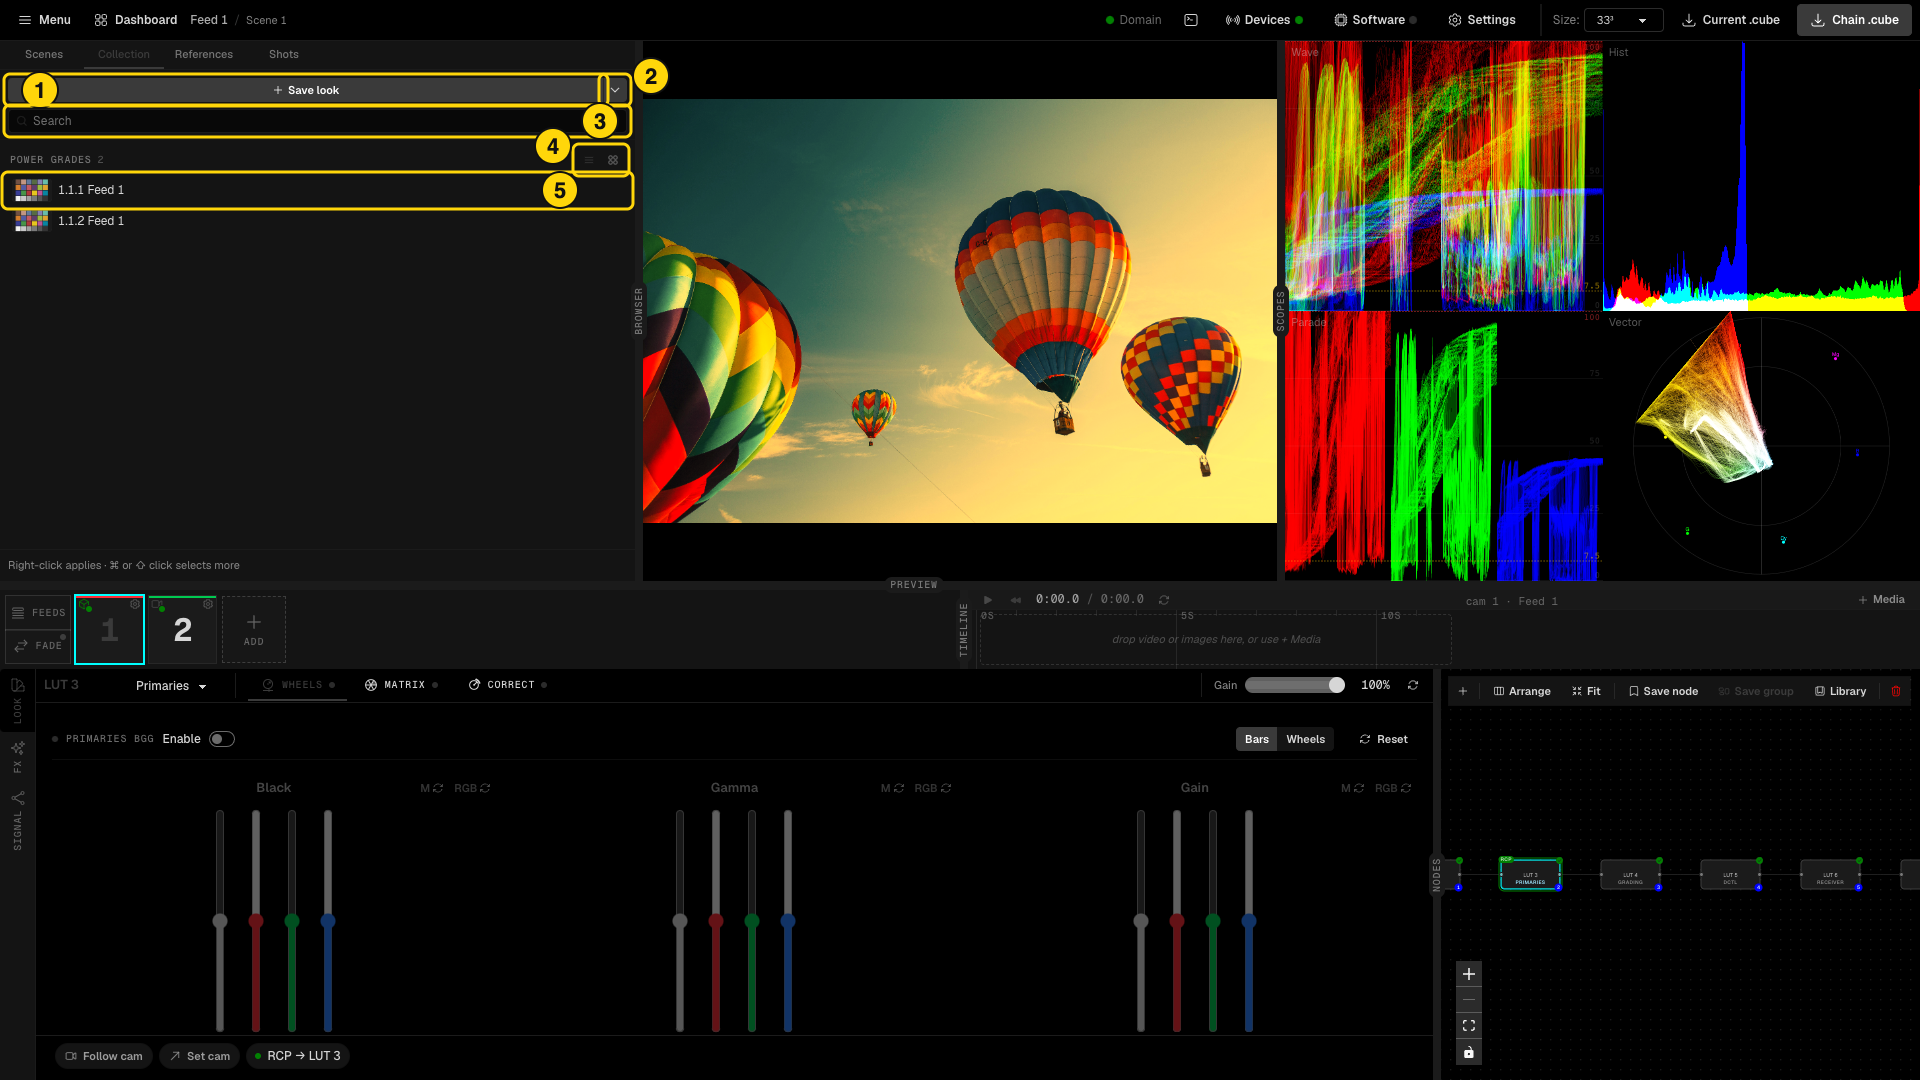
- Save look - saves the open feed's look as a new Power Grade (Cmd+Shift+S). By default a Power Grade is named scene.feed.version, like a Resolve gallery still.
- The arrow menu - Save node chain as template, Restore a deleted item, and Grade naming… to set the naming scheme of new grades.
- Search box.
- List and grid buttons - small or large thumbnails.
- A Power Grade. Right-click it to apply it to the open feed. Click selects it; Shift and Cmd select several, Delete removes the selection.
The kebab menu of a Power Grade gives:
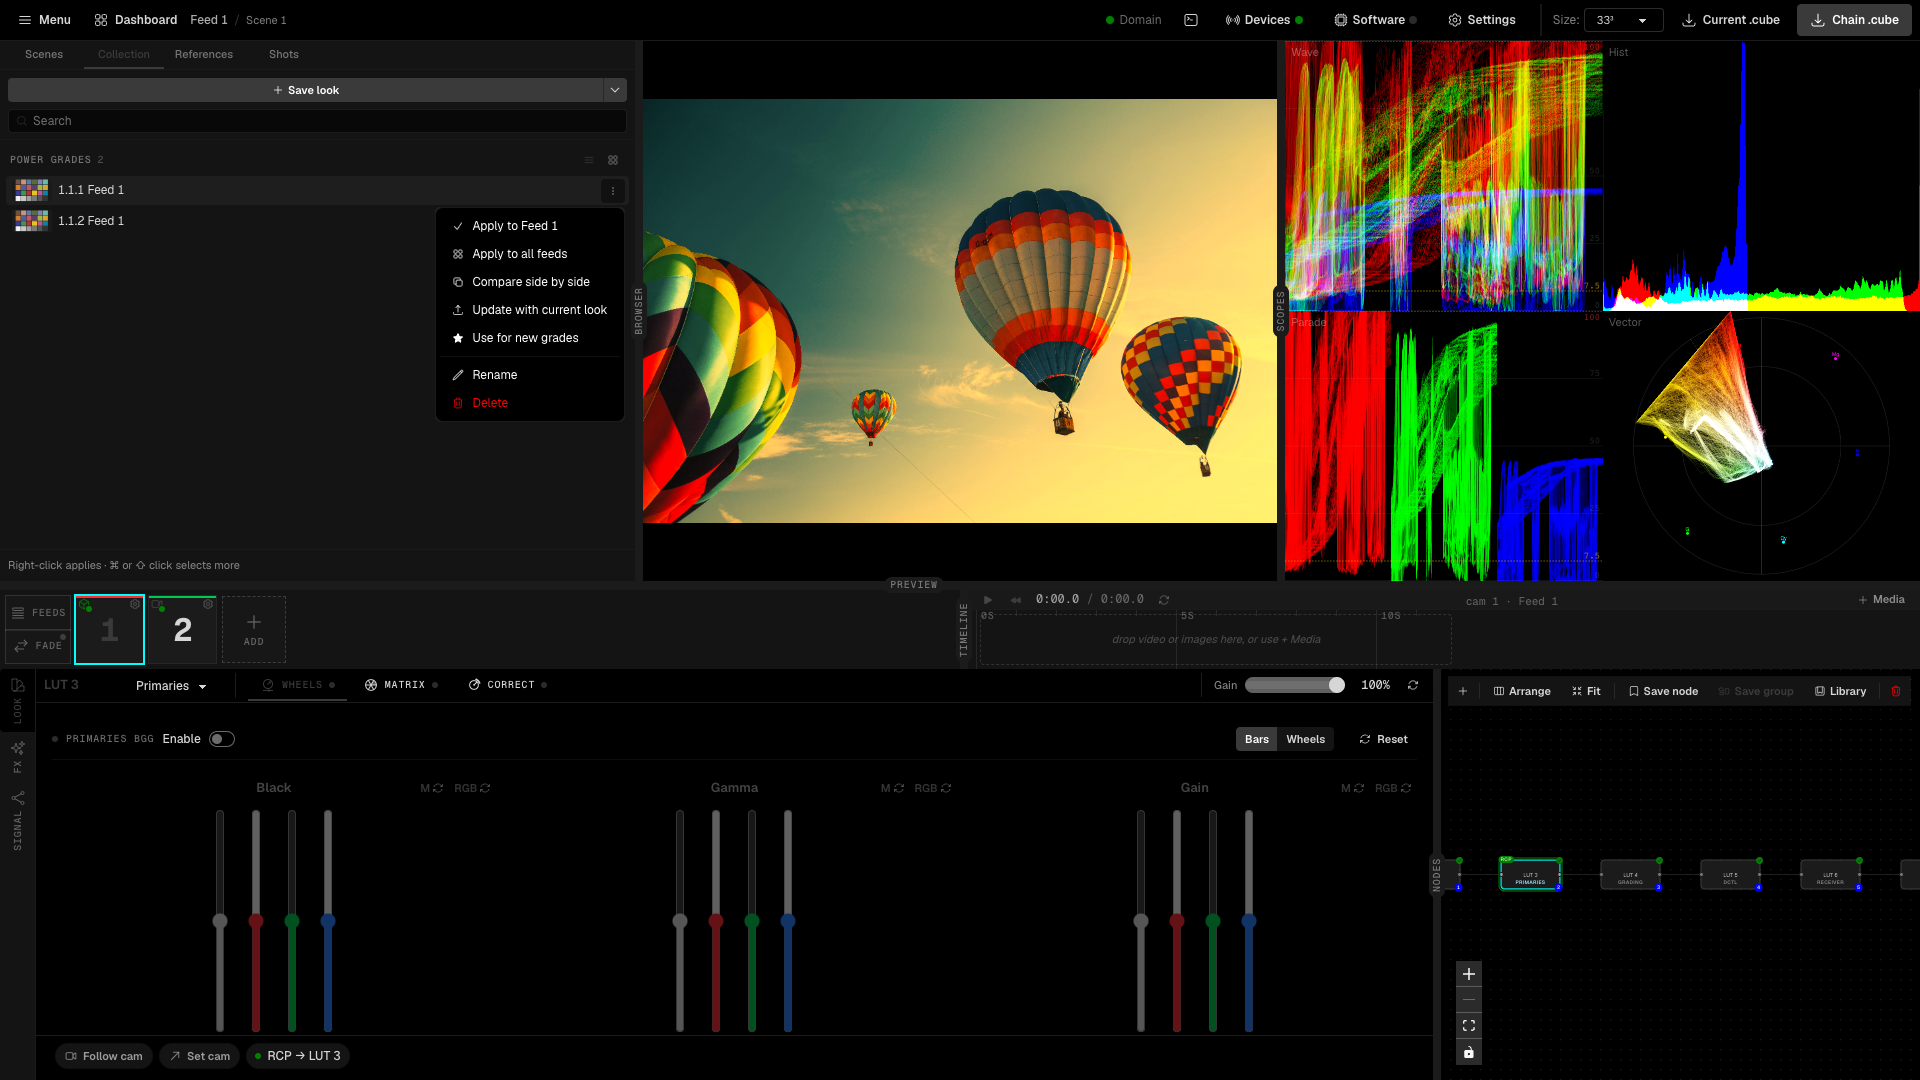
- Apply to the open feed, or Apply to all feeds.
- Compare side by side - shows the Power Grade next to the open feed on the reference still.
- Update with current look - overwrites it with the open feed's look. Restore the previous look undoes that.
- Use for new grades - new grades start from this Power Grade.
- Rename and Delete.
Applying a Power Grade is one undo step (Cmd+Z). Power Grades can also be applied remotely over OSC and the HTTP API.
8. Follow cam and Set cam
Two buttons sit at the bottom left of the LOOK panel.
- Follow cam - LiveLab follows the active camera of the RCP between feeds.
- Set cam - when you open a feed, its camera becomes the active camera of the RCP.
Next to them, an RCP badge shows the state of the RCP link for the open feed: RCP live while the RCP paints this feed, RCP: add a primaries node when the grade has no Primaries node to drive, RCP: camera offline or RCP: offline.
Use the Dashboard link in the header to go back to camera control.
9. Settings and software
Settings has three tabs:
- GENERAL - preview and scopes resolution, slider sensitivity, the node selected on feed switch, Keep panel on feed switch, incoming throttle for the receiver and the RCP, and the Startup workspace reset.
- EXPORT - LUT export destination, Ask destination each time and the file name pattern.
- STORAGE - where project files live (applied at next launch, with Copy everything or Start fresh) and an extra OFX plugins folder (applied after a restart).
Software has three integrations:
- NDI Output - sends the preview after the LUT as an NDI source. It needs the NDI runtime.
- DaVinci Resolve - sends the chain LUT over WebSocket to the WsLut OpenFX plugin. Enter Host, Port and Channel, then click Connect.
- LUT Receiver - a WebSocket server. External software sends LUT frames to
ws://host:port/ws/lut/<channel>. Use a Receiver node with the same channel to bring them into a grade.
10. Command palette and shortcuts
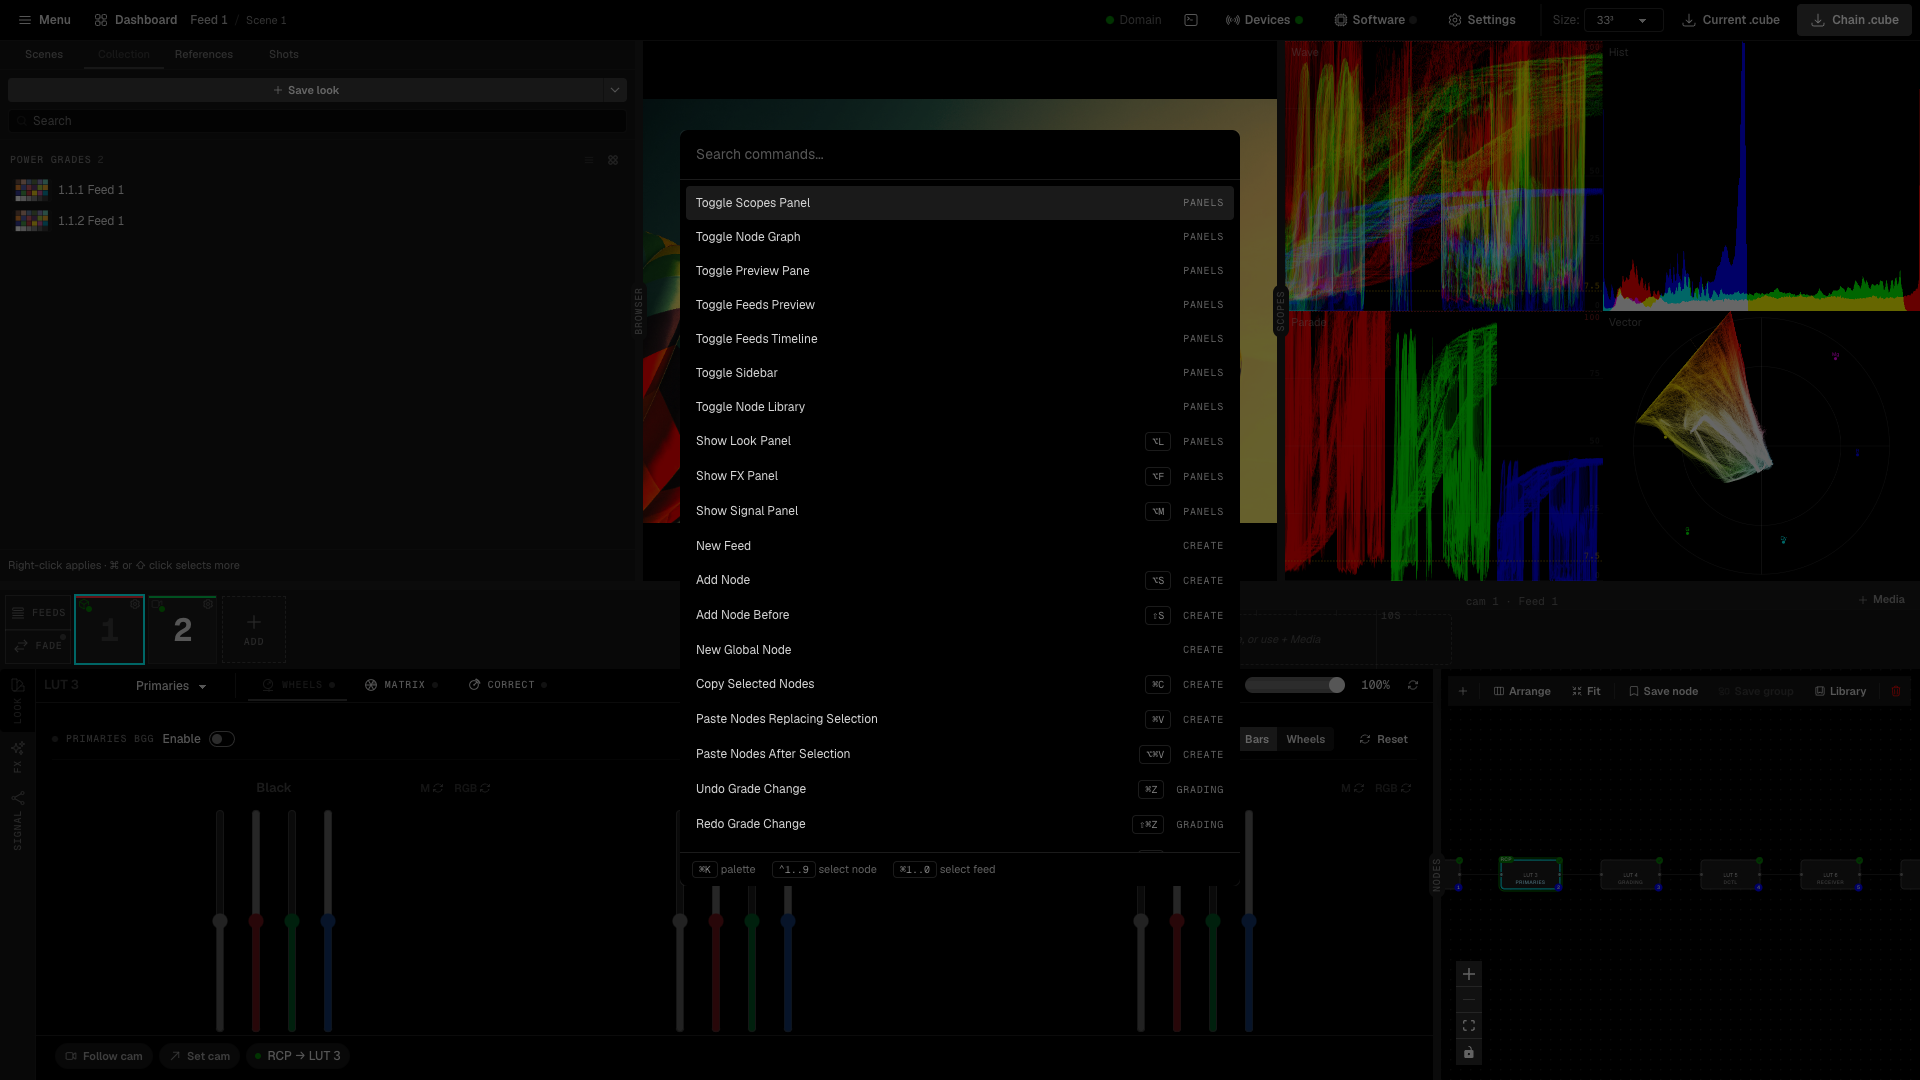
Press Cmd+K (Ctrl+K on Windows) or click the command palette icon in the header to open the command palette. It searches all commands, so you can jump to a page or action without the mouse. Each command shows its shortcut in the form your platform uses (⌘ on macOS, Ctrl on Windows). Popover menus also work with the arrow keys.
On Windows, use Ctrl in place of Cmd, except to open a feed (Alt).
| Shortcut | Action |
|---|---|
| Cmd+K | Command palette |
| Cmd+1 to Cmd+0 (Alt+1 to Alt+0 on Windows) | Open feed 1 to 10 |
| Ctrl+1 to Ctrl+9 | Select node 1 to 9 |
| Alt+L, Alt+F, Alt+M | Show the LOOK, FX or SIGNAL panel |
| Alt+S | Add a node after the selected one |
| Shift+S | Add a node before the selected one |
| Cmd+D | Turn the selected node on or off |
| Backspace | Delete the selected nodes |
| Cmd+C | Copy the selected nodes |
| Cmd+V | Paste nodes in place of the selection |
| Cmd+Alt+V | Paste nodes after the selection |
| Cmd+Z, Cmd+Shift+Z | Undo, redo a grade change |
| Cmd+Shift+S | Save the look as a Power Grade |
| Cmd+G | Grab the open feed |
| Cmd+Shift+G | Grab all feeds |
A held key does not repeat a grab.