Studio FXVP
Overview
The FX panel of LiveLab applies a chain of OpenFX (OFX) effects to the video of a feed. OFX plugins are the same plugins that DaVinci Resolve uses, for example film emulation, grain or a display transform. The chain changes the live video in real time, between the input and the SDI output.
An engine runs the chain. There are two types of engine:
- Local (this computer) - the built-in engine of CyanView Studio. It uses the GPU and the DeckLink card of the computer that runs Studio, Mac or Windows PC.
- FXVP server - a different Mac, for example a Mac mini in the rack. It has no screen and runs the FXVP service. Studio controls it through the network. The video goes in and out through the DeckLink card of that Mac.
Each feed has one engine. One Studio can control the local engine and many FXVP servers at the same time.
| Local (this computer) | FXVP server | |
|---|---|---|
| Where it runs | The computer that runs Studio | A different Mac, controlled through the network |
| Video I/O | DeckLink, SRT and RTP inputs and the SDI output of this computer | The DeckLink card of the server |
| Start and stop | Start engine / Stop engine, for all feeds of this computer | Start / Stop of the server pipeline |
| Where Studio saves the chain | In the grade of the feed and in Power Grades | Studio does not save it. The server keeps it. |
| Monitoring | Frame time and lag | Throughput, health, headroom history, live preview, host data, logs |
| Platform | macOS and Windows | macOS server, Studio on macOS or Windows |
| License | LiveLab license | LiveLab license with FXVP nodes |
To apply the LiveLab grade in the chain, add the CyanView 3D LUT plugin. Studio sends the grade LUT to the plugin. The plugin crossfades each change. Refer to step 5.
How the video goes through

- Built-in engine - the chain changes the live input of the feed. Start the capture and the SDI output in the Input drawer of the preview. Refer to Live input in the LiveLab manual. The LiveLab preview shows the result of the chain.
- FXVP server - connect the camera SDI to the DeckLink input of the server. Connect the DeckLink output of the server to your monitor or switcher. The video does not go through Studio. The live preview in the FX panel shows the output of the server.
Quick start
Built-in engine, with the grade and a fade:
- Install the Desktop Video driver and your OFX plugins (step 2). The CyanView 3D LUT plugin is built in (Install the plugin).
- In LiveLab, open the feed.
- Click Input. Start the DeckLink capture and the SDI output.
- Open FX (Alt+F).
- Select Local (this computer). Click Start engine.
- Click Add effect. Add Cyanview 3D LUT, then your other effects.
- Click Devices. Add a VP4 device with address
127.0.0.1and port 4569. - Open the feed settings. In CAMERA / COLOR BOX, select the VP4 device.
- Grade in the LOOK panel. Each change goes to the SDI output with a crossfade of 25 frames.
FXVP server:
- Install the FXVP package on the server (Install the server).
- Connect the SDI cables to the DeckLink input and output of the server.
- In Studio, click Devices. Add an FXVP device with the address of the server and port 9020.
- Open the feed. Open FX.
- Select the server in the engine list.
- Click Add effect and add your effects.
- If the pipeline is stopped, click Start.
Key concepts
- Engine - the process that runs the chain: the local engine or one FXVP server.
- Chain - the list of effects of one feed. The video goes through the effects from top to bottom.
- Node - one effect in the chain, with its parameters.
- Pipeline - on an FXVP server, the input, the chain and the output together. A pipeline is running or stopped.
- Gang - more FXVP servers that get the same chain and the same parameter changes as the engine of the feed.
- Preset - a saved chain with all its parameter values.
1. Open the FX panel
- Open a feed.
- Click FX on the vertical tabs at the left of the bottom panel (Alt+F).
- To get more space, drag the divider above the FEEDS row up.
- Click NODES to hide the node graph.
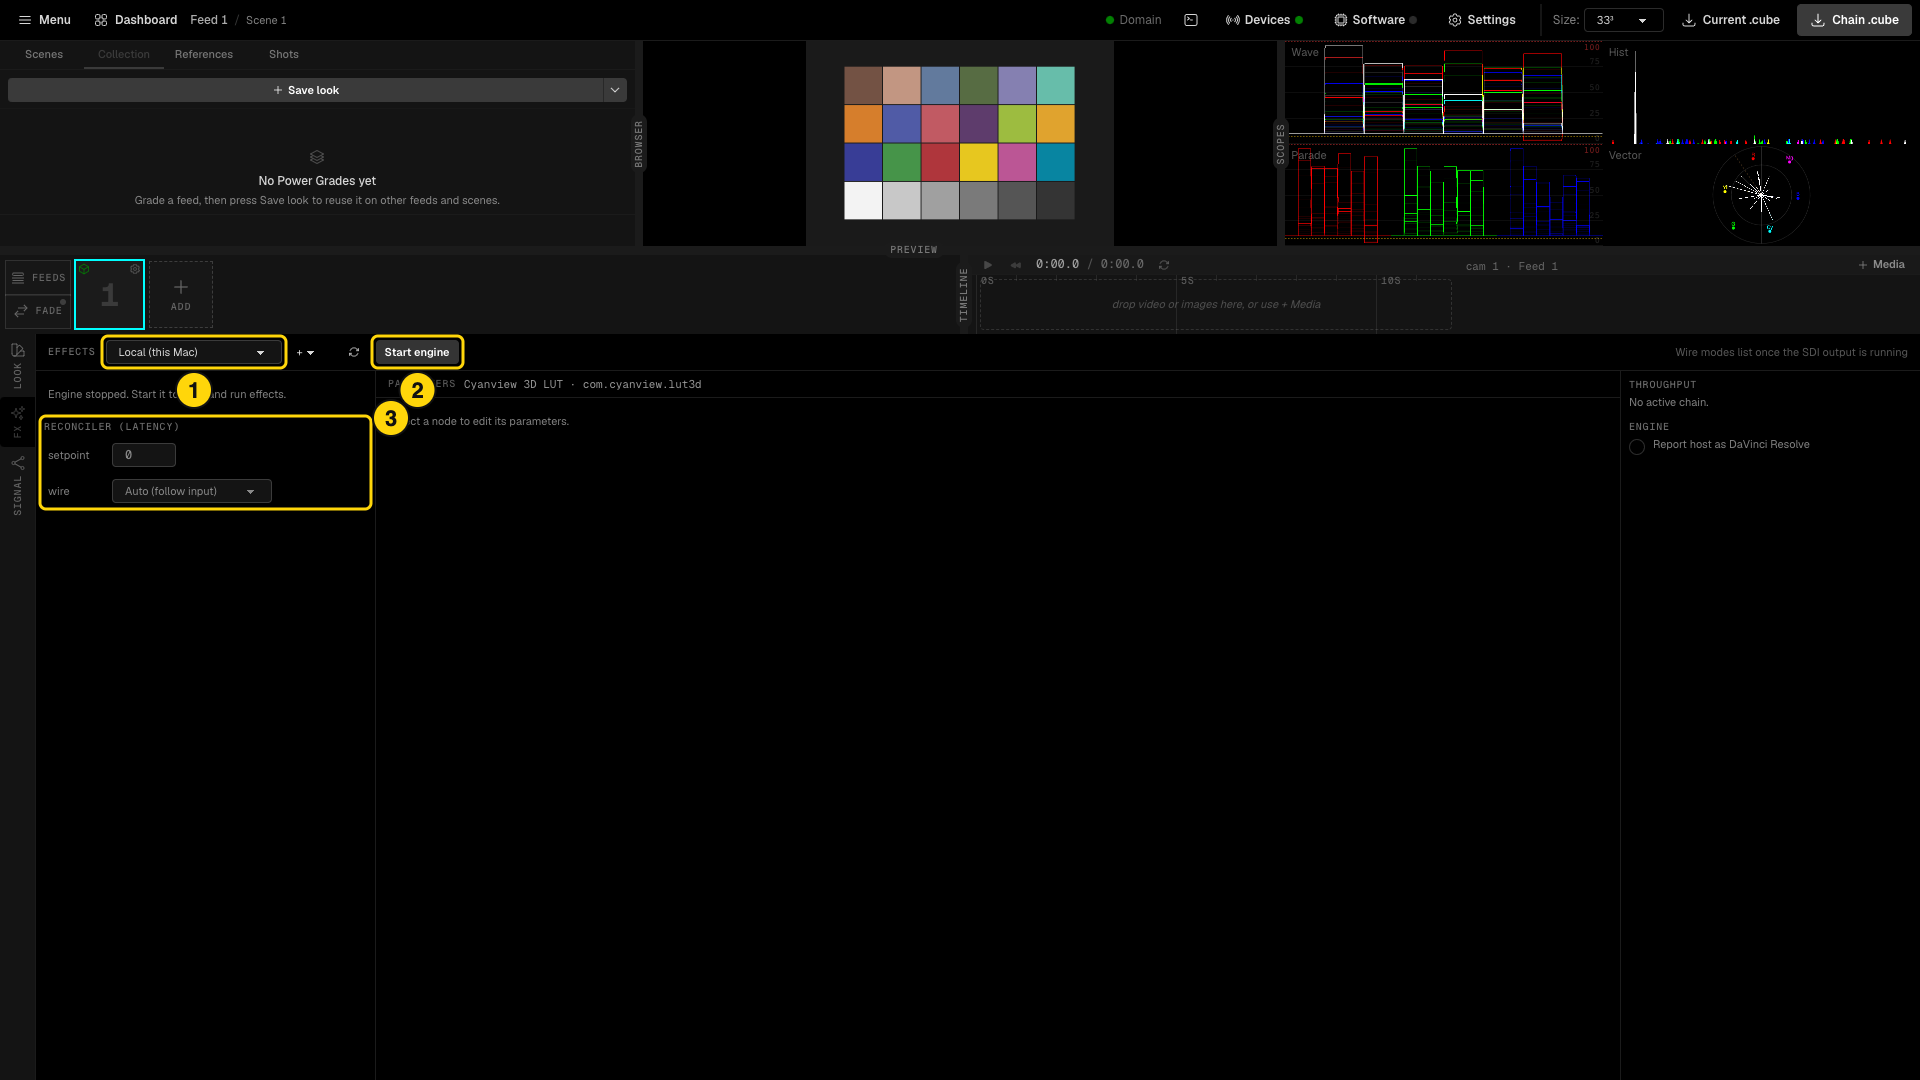
- Engine - the engine of the open feed: Local (this computer) or one of your FXVP servers.
- Start engine - starts the local engine. For an FXVP server, the pipeline state and Start / Stop show here.
- Before the engine starts, only the output latency settings show. Refer to Output latency.
The panel has three columns:
- CHAIN (left) - the effects of the chain, Add effect, the latency settings and the presets.
- PARAMETERS (center) - the parameters of the selected node.
- Status (right) - throughput, health and engine data.
Studio saves the engine for each feed. If you move a grade to a different feed, the grade uses the engine of that feed.
2. The built-in engine
The built-in engine runs on the computer that runs Studio. It works on macOS and on Windows. It needs the Blackmagic Desktop Video driver, also when you do not use a DeckLink card. If the driver is not installed, the panel shows "Local engine unavailable". On Windows it also needs a GPU driver with OpenCL, which the normal NVIDIA, AMD and Intel drivers include.
Install OFX plugins
When the engine starts, it loads the OFX plugins from these folders:
- The standard OFX folder:
/Library/OFX/Pluginson macOS,C:\Program Files\Common Files\OFX\Pluginson Windows. If you use DaVinci Resolve on this computer, its plugins are already there. - An extra folder. You set it in Settings > STORAGE > OFX plugins. After you change it, restart Studio.
On macOS, the system blocks a plugin that you downloaded. If a plugin is not in the list, remove the quarantine flag. Open Terminal and type:
sudo xattr -dr com.apple.quarantine /Library/OFX/Plugins
Then click the rescan button (3 in the next picture). Studio loads the plugins again without a restart.
A rescan stops all chains for a short time. Do not rescan on air.
Build a chain
- Select Local (this computer) in the engine list.
- Click Start engine. At the first start, the engine scans all plugins. With many plugins, this takes some seconds.
- Click Add effect.
- Type a name in the search box, or scroll the list. The list shows the plugins in groups, by vendor.
- Click a plugin to add it to the chain.
- Click a node to change its parameters.
In the list, a GPU badge (for example METAL, OPENCL or CUDA) shows the GPU types that the plugin supports. On Windows the engine uses OpenCL. A CPU badge shows a plugin that runs on the processor. A check mark shows a plugin that is already in the chain.
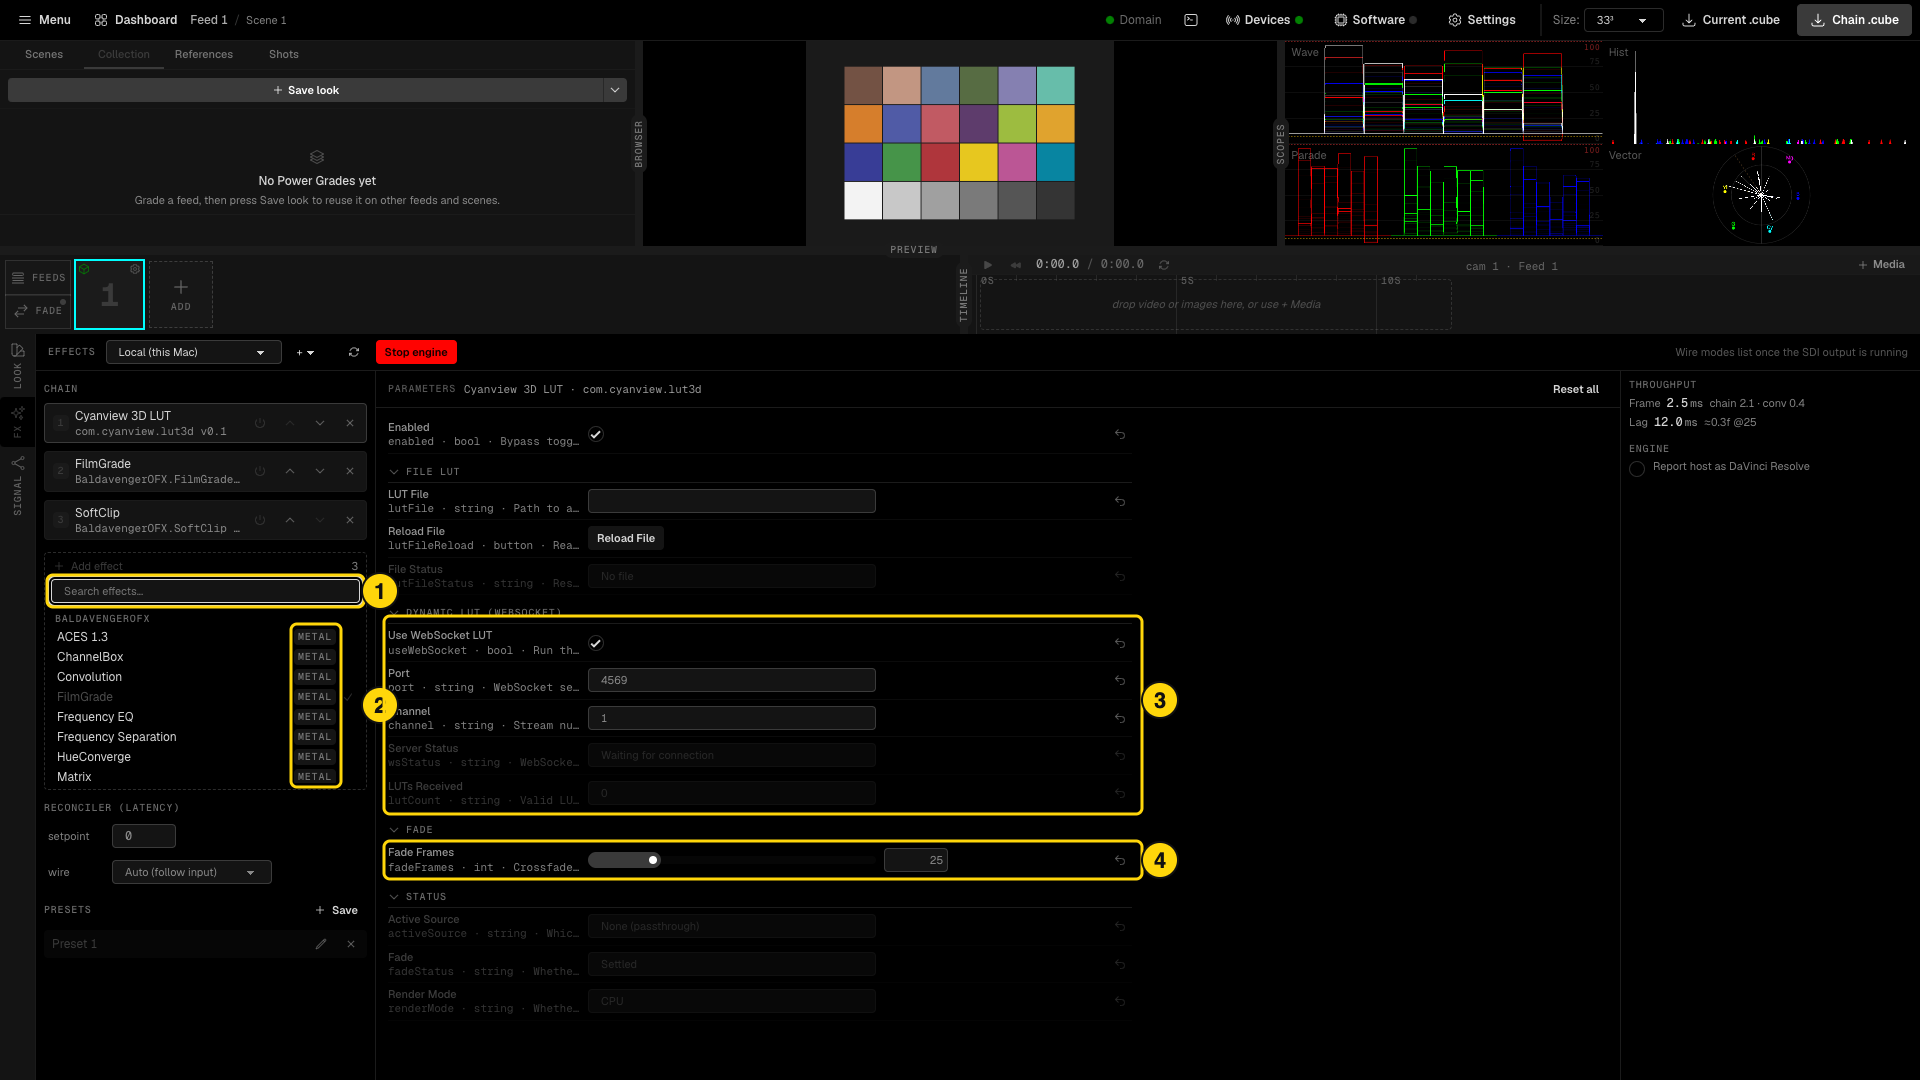
- Search box.
- The GPU badge of each plugin.
- The parameters of the selected node. Here, the node is the CyanView 3D LUT.
- Fade Frames of the 3D LUT plugin. Refer to step 5.
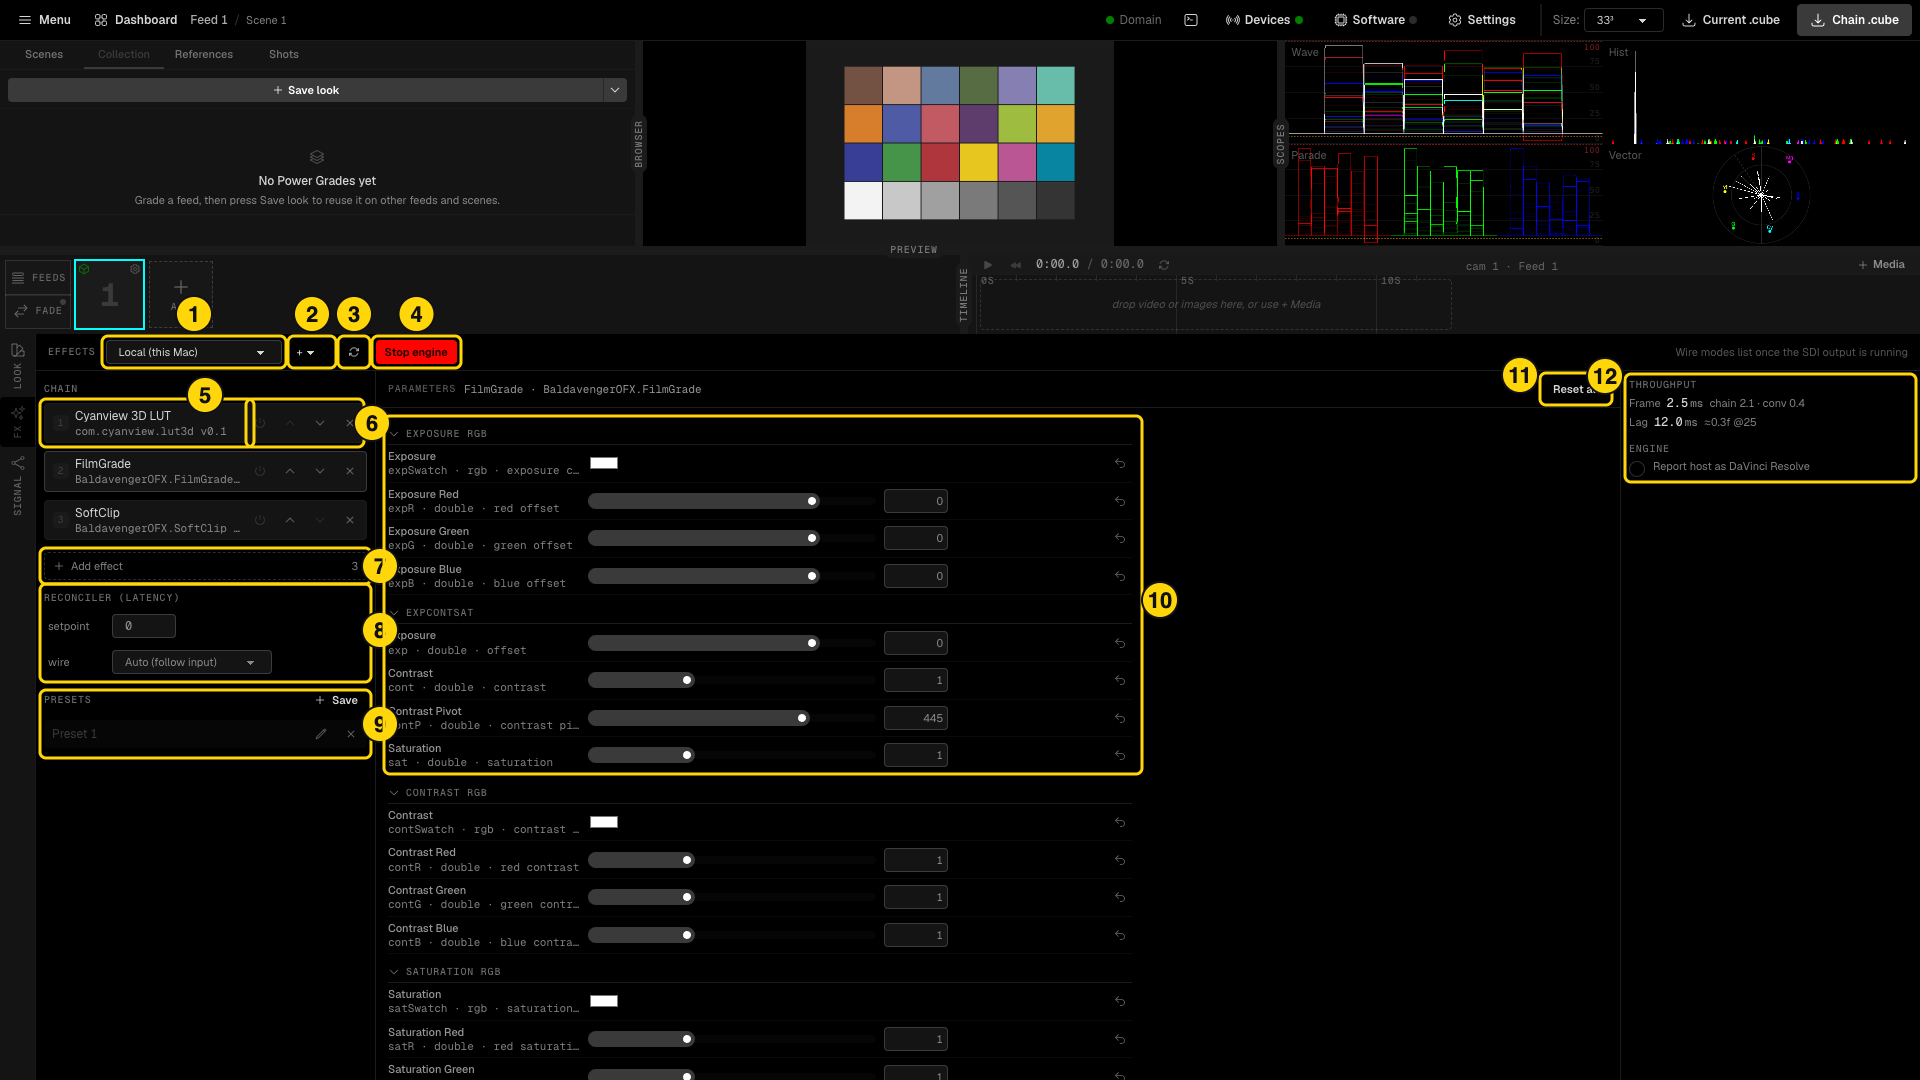
- Engine - Local (this computer).
- Gang - adds FXVP servers that copy this chain. Refer to step 4.
- Rescan - loads the plugins again from the disk.
- Start engine / Stop engine - starts or stops the local engine for all feeds of this computer. Ganged servers do not stop.
- A node: its position in the chain, the plugin name, its identifier and its version.
- Node buttons: Bypass (power icon), Move up, Move down and Remove.
- Add effect - the number is the quantity of effects in the chain.
- RECONCILER (LATENCY) - output latency and SDI wire mode.
- PRESETS - saved chains.
- PARAMETERS - the parameters of the selected node, in the groups of the plugin. Click a group name to close or open the group.
- Reset all - sets all parameters of the node to their default values.
- THROUGHPUT - frame time of the chain and lag. ENGINE - Report host as DaVinci Resolve.
To change a parameter, drag the slider or type a value in the box. The change applies immediately, also on air. To reset one parameter, click the arrow at the end of its row.
Some plugins work only in DaVinci Resolve. For these plugins, turn on Report host as DaVinci Resolve. Then restart Studio.
What is saved
Studio saves the local chain in the grade of the feed. It saves all parameters that you changed. When you open a different feed or select a different scene, Studio loads the chain of that grade. A Power Grade also keeps the chain. When you apply a Power Grade, you also apply its chain.
If a plugin of a saved chain is not on this computer, Studio does not delete it from the grade. The chain runs without that plugin. When you install the plugin again, it comes back.
Output latency and wire mode
- setpoint - the output delay. The total delay is 2 + setpoint frames. It is the same for all feeds. The change applies immediately.
- Use 0 if the chain has only a 3D LUT, or no effects.
- Use 1 for OFX effects.
- Use a higher value if a heavy plugin is sometimes too slow and frames drop.
- wire - the SDI wire mode. Auto (follow input) sends the format of the input. If the card cannot send 3G Level A, it sends 1080i for a 1080p50 or 1080p60 input. The list fills when the SDI output runs.
Presets
A preset keeps the full chain and all parameter values. Use a preset to put the same chain on a different feed.
- To save the current chain as a new preset, click Save.
- To change the name of a preset, click the pencil icon.
- To load a preset, click it. On the local engine, the chain of the preset replaces the chain of the grade.
- A mark shows the preset that is the same as the current chain. If you change the chain, the mark goes away.
3. FXVP server
An FXVP server is a Mac with a DeckLink card. It runs the FXVP service without a screen and without a user session. Studio controls it through the network, on port 9020.
Install the server
You need:
- A Mac with Apple silicon and a DeckLink card.
- The Blackmagic Desktop Video driver.
- The OFX plugins that you want to use. Use the same versions as on your other computers.
- The FXVP installer package (
.pkg) from CyanView. - A network connection between the server and the Studio Mac.
- A fixed IP address for the server. Set it in System Settings > Network. With a fixed address, Studio always finds the server.
- Access to the server, to install and to type the commands on this page. Use a screen and a keyboard for the first setup. For remote access, turn on Remote Login (SSH) or Screen Sharing in System Settings > General > Sharing.
Connect the video:
- Connect the camera SDI to the DeckLink input of the server.
- Connect the DeckLink output of the server to your monitor or switcher.
Run the installer. It installs these items:
| Item | Location |
|---|---|
| The FXVP service | /Library/Application Support/Cyanview/fxvp/ |
| The configuration file | /Library/Application Support/Cyanview/fxvp/config.json |
| CyanView OFX plugins | /Library/OFX/Plugins/Cyanview/ |
| The start-up service | /Library/LaunchDaemons/com.cyanview.fxvp.plist |
| Logs | /Library/Logs/Cyanview/ (fxvp.log, fxvp-plugins.log, install.log) |
The service starts immediately. It also starts at each boot, before a user logs in. If the service stops, macOS starts it again. Some seconds after the start, the service answers on port 9020. The plugin scan continues in the background.
To add more OFX plugins:
- Install the plugins in
/Library/OFX/Plugins. - Remove the quarantine flag. Refer to Install OFX plugins.
- Restart the service:
sudo launchctl kickstart -k system/com.cyanview.fxvp
If the macOS firewall is on (System Settings > Network > Firewall), allow incoming connections for cy-fxvp. If you do not, Studio cannot connect to the server.
Some plugins show a license window when they load. The server has no user session, so it cannot show this window. After 180 seconds, the service ignores that plugin and starts without it. fxvp.log gives the name of the plugin.
Choose the DeckLink input and output
The server uses the first DeckLink device (number 0) for the input and the output. If your card has more connectors, you can select other devices.
- List the devices and their numbers:
"/Library/Application Support/Cyanview/fxvp/cy-fxvp" --list-devices
- Set the numbers in
config.json. This example uses device 0 for the input and device 1 for the output:
{
  "io": {
    "input": { "device": 0 },
    "output": { "device": 1 }
  },
  "server": {
    "authToken": ""
  }
}
- Restart the service.
The HOST block of the FX panel shows the input and the output that the server uses.
Protect the server with a token
If there is no token, all computers on the network can control the server. To prevent this, set a token.
- Open
config.jsonon the server:
sudo nano "/Library/Application Support/Cyanview/fxvp/config.json"
- Type your token in
server.authToken. Do not remove the other keys.
{
  "server": {
    "authToken": "choose-a-long-secret"
  }
}
- Save the file and restart the service:
sudo launchctl kickstart -k system/com.cyanview.fxvp
- Type the same token in Studio. Refer to Add the server in Studio.
An update of FXVP does not change your config.json.
Add the server in Studio
- In the LiveLab header, click Devices.
- In the new row, set the kind to FXVP.
- Type a name, the IP address of the server and port 9020.
- Click Add.
- Make sure that a green dot and connected show. OK shows when the health of the server is good.
- If the server has a token, click the Auth token button in the actions of the row. Type the token in AUTH TOKEN.
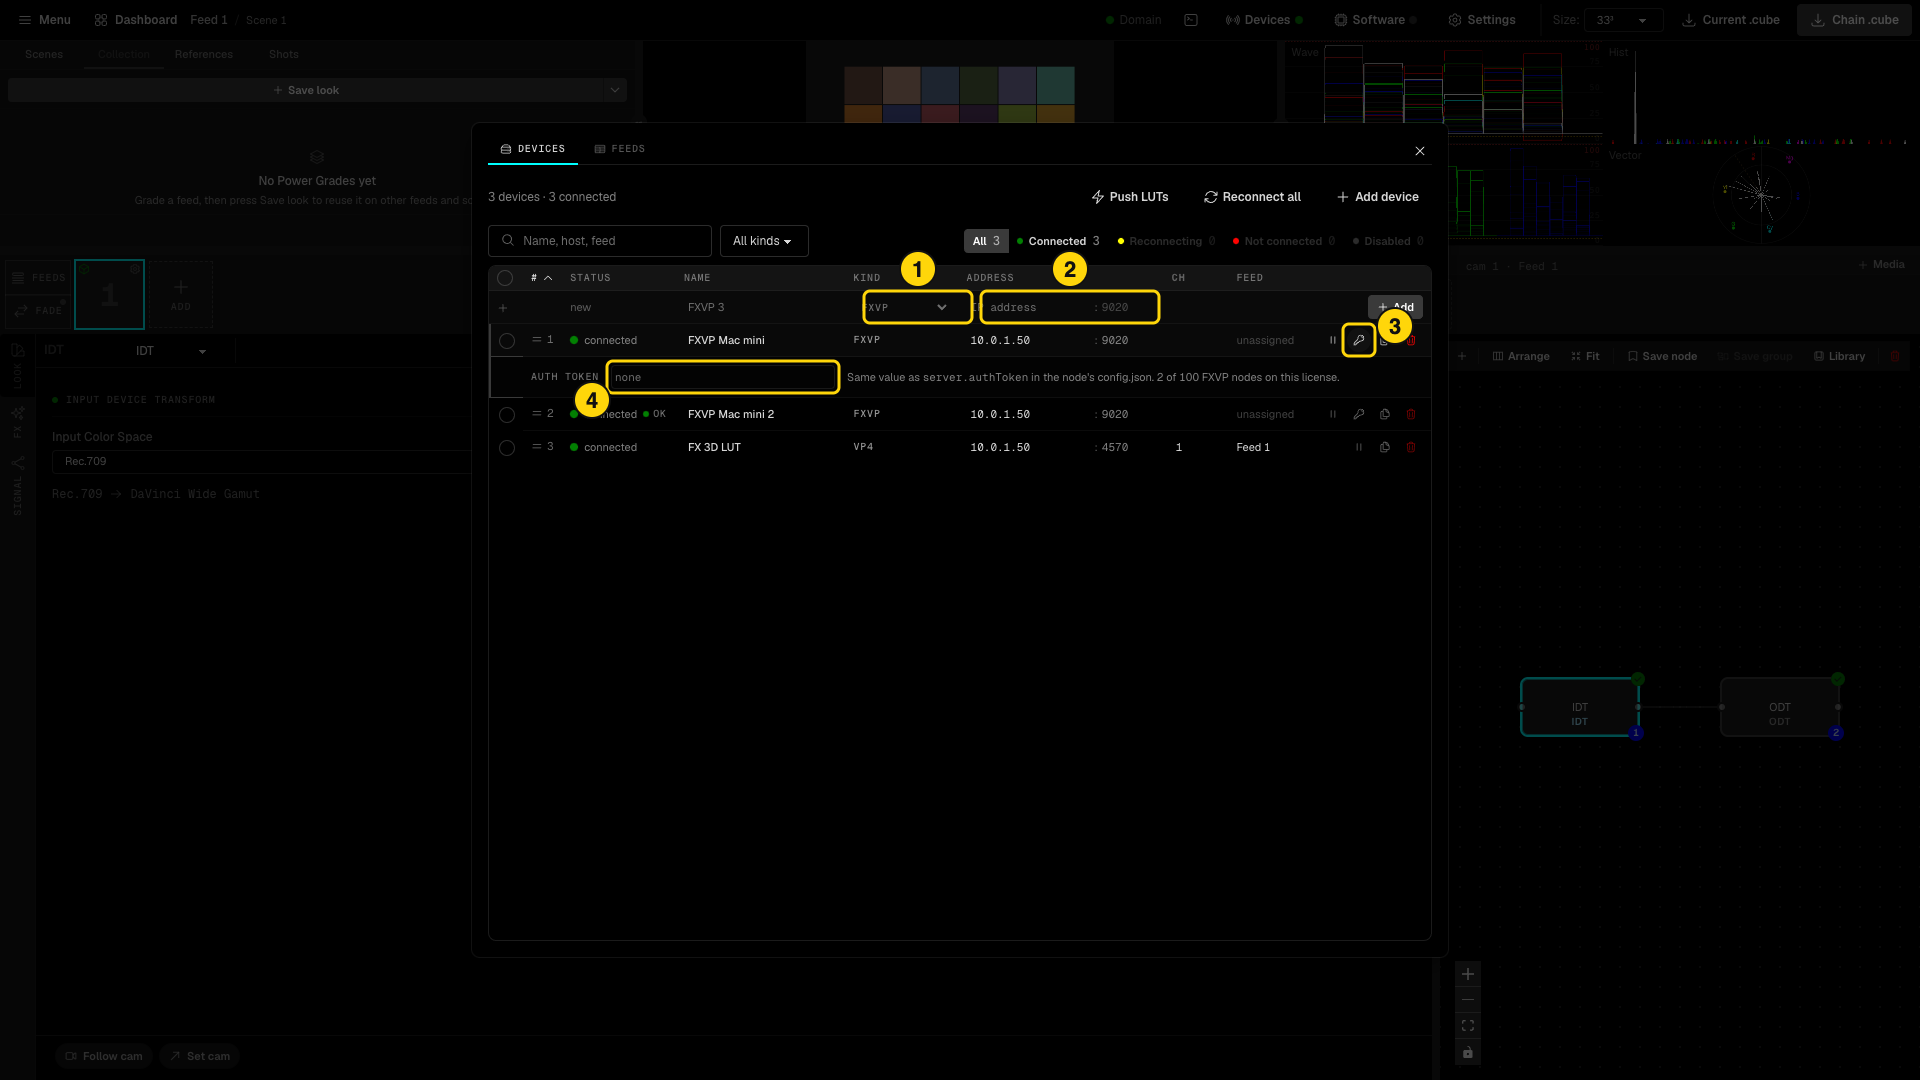
- Kind FXVP.
- IP address and port 9020.
- Auth token - opens the token row.
- The token. It must be the same as
server.authTokeninconfig.jsonon the server.
The token row also shows the quantity of FXVP nodes that your license allows. Each FXVP device is one node, in all your projects. If you have no more nodes, Studio does not add the device. It shows "your license allows N FXVP node(s); remove one to add another".
One FXVP server processes one feed. If a feed uses a server, the engine list of the other feeds does not show that server. To use the server on a different feed, first select a different engine on the first feed.
Run a chain on the server
- Open the feed and the FX panel.
- Select the FXVP server in the engine list. The state of its pipeline shows next to the list.
- Click Add effect and add effects, as on the local engine.
- To start the pipeline, click Start. To stop it, click Stop.
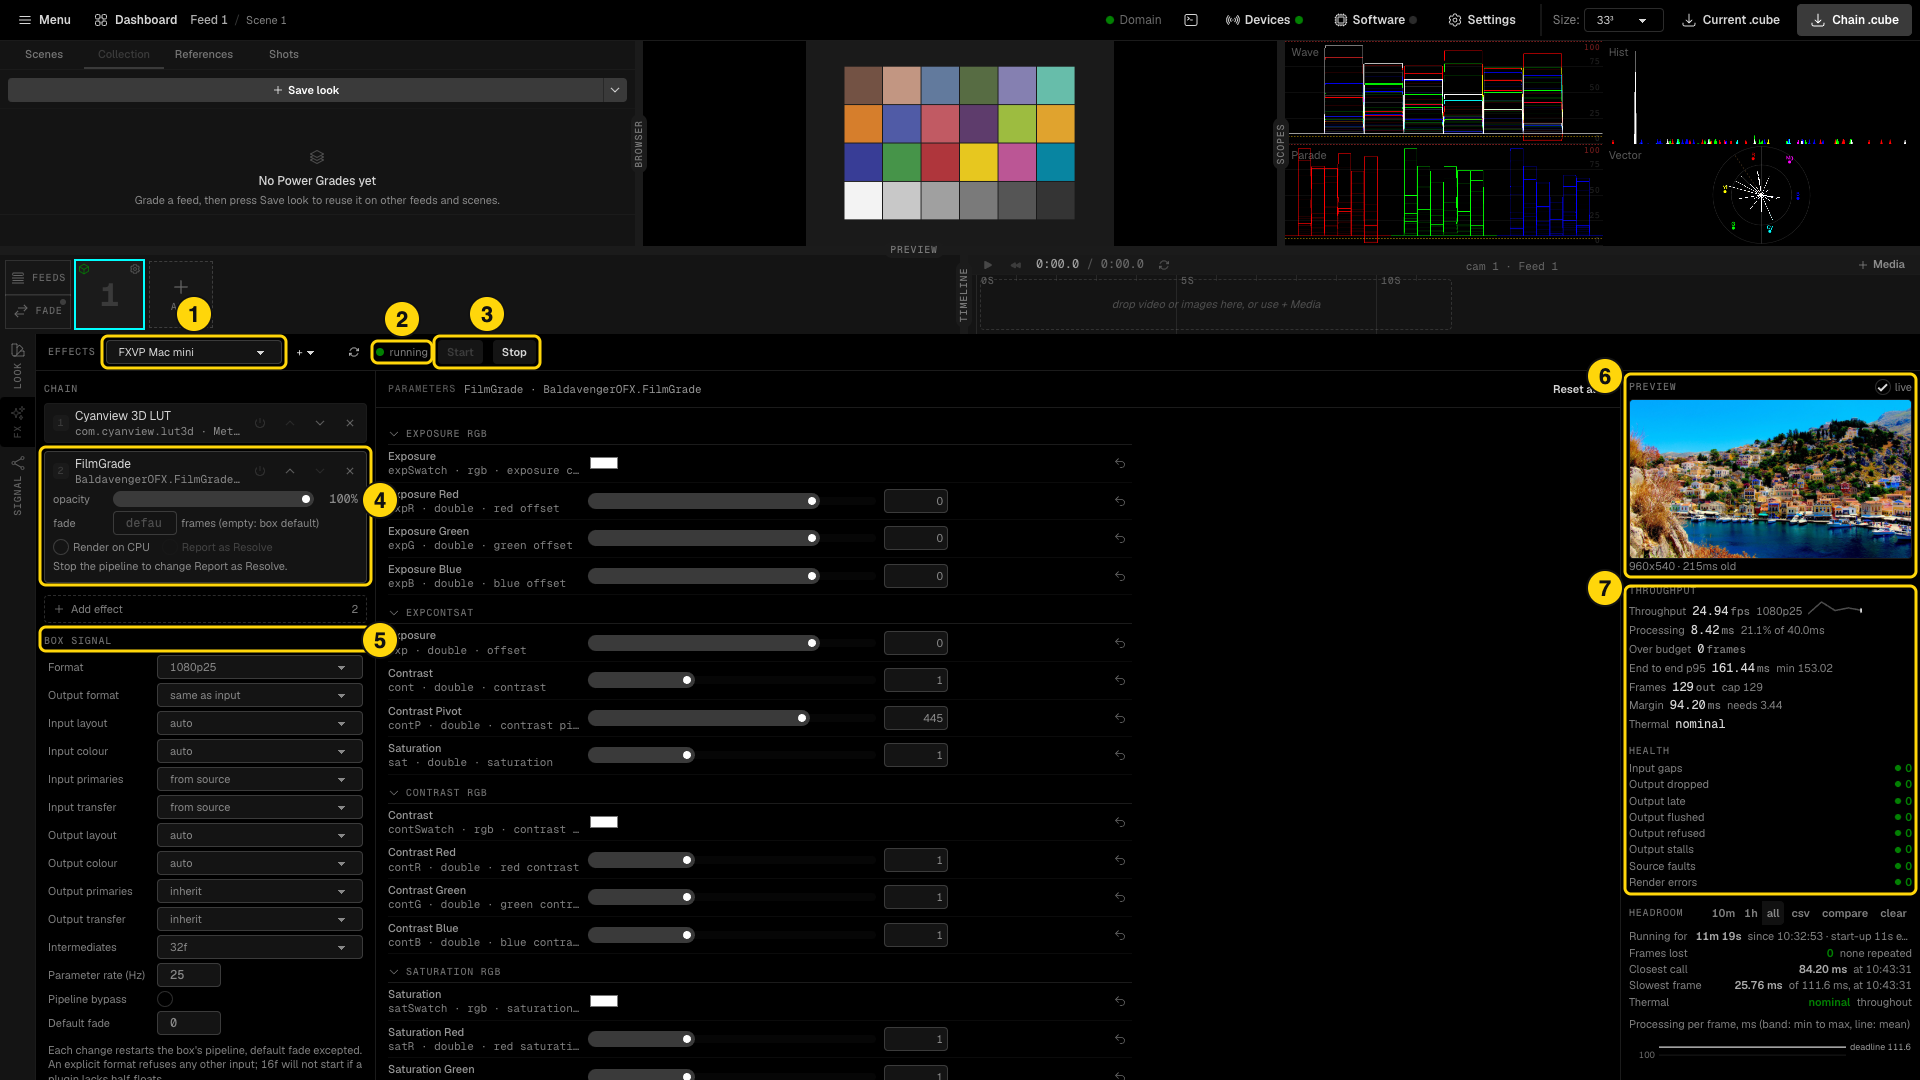
- Engine - the FXVP server.
- Pipeline state: running, stopped, starting, stopping or error. If there is an error, its message shows next to the buttons.
- Start and Stop. Only the button that you can use is active.
- The selected node:
- opacity - the mix of the effect, from 0 to 100%.
- fade - the quantity of frames for a change of this node. If it is empty, the node uses the default fade of the server.
- Render on CPU and Report as Resolve.
- BOX SIGNAL - the video formats and color settings of the server.
- PREVIEW - turn on live to see a small picture of the server output. It is off by default, because it uses GPU time on the server.
- THROUGHPUT and HEALTH - frame rate, processing time for each frame, margin before a frame drops, and fault counters. A green dot shows zero faults.
Some changes apply immediately. Other changes restart the pipeline:
- These changes apply immediately, also on air: parameters, node bypass, opacity, fade and output latency.
- These changes restart the pipeline for some seconds: a change to the chain (add, remove, move), the box signal settings and Render on CPU.
- You can change Report as Resolve only when the pipeline is stopped. After the change, restart the FXVP service.
Studio does not save the chain of an FXVP server in the grade. Studio cannot know which plugins each server has. The server keeps its chain and its parameter values after a restart.
Box signal
Scroll down the CHAIN column to see the settings of the server pipeline.
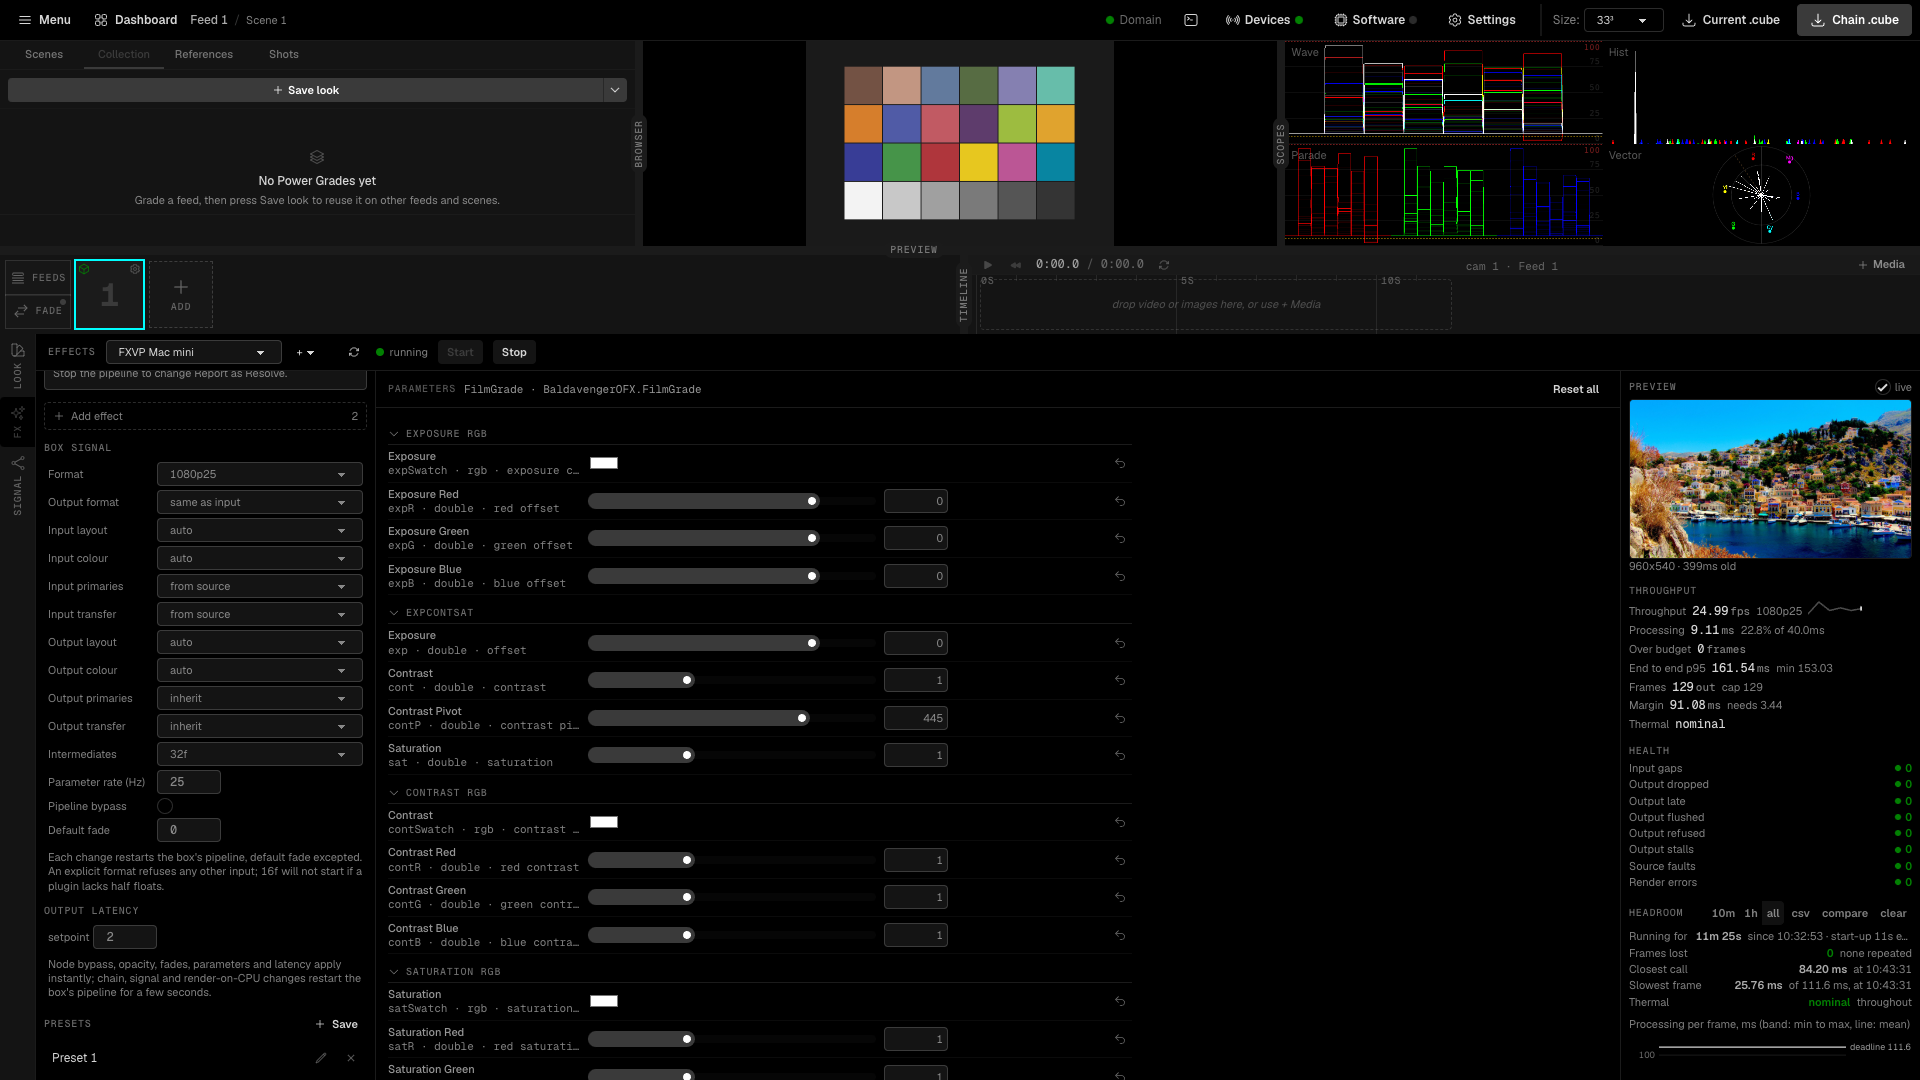
- Format - auto uses the format of the input. A fixed format does not accept a different input.
- Output format - same as input, or a fixed format.
- Input layout and Output layout - the pixel format on the card: auto, v210 (10-bit 4:2:2), v410 (10-bit 4:4:4) or rgba64.
- Input colour and Output colour - how the server changes YCbCr to RGB:
- auto uses the data that the source sends.
- forced sets BT.709 or BT.2020, with limited or full range.
- raw codes applies no matrix.
- Input primaries, Input transfer, Output primaries, Output transfer - the color space of the signal. The output values only tell the server what the last node makes (for example a display transform). They do not change the picture.
- Intermediates - the precision between nodes: 32f or 16f. With 16f, the pipeline does not start if a plugin cannot use half floats.
- Parameter rate (Hz) - the quantity of parameter updates that the server applies each second.
- Pipeline bypass - sends the input to the output without effects.
- Default fade - the quantity of frames for a parameter, opacity or bypass change, if the node has no fade of its own. 0 is an immediate change.
- OUTPUT LATENCY > setpoint - 0 gives a delay of 2 frames (3D LUT only). 1 gives 3 frames (OFX). 2 gives 4 frames (OFX with much jitter).
Health and history
Scroll down the status column to see the history of the run.
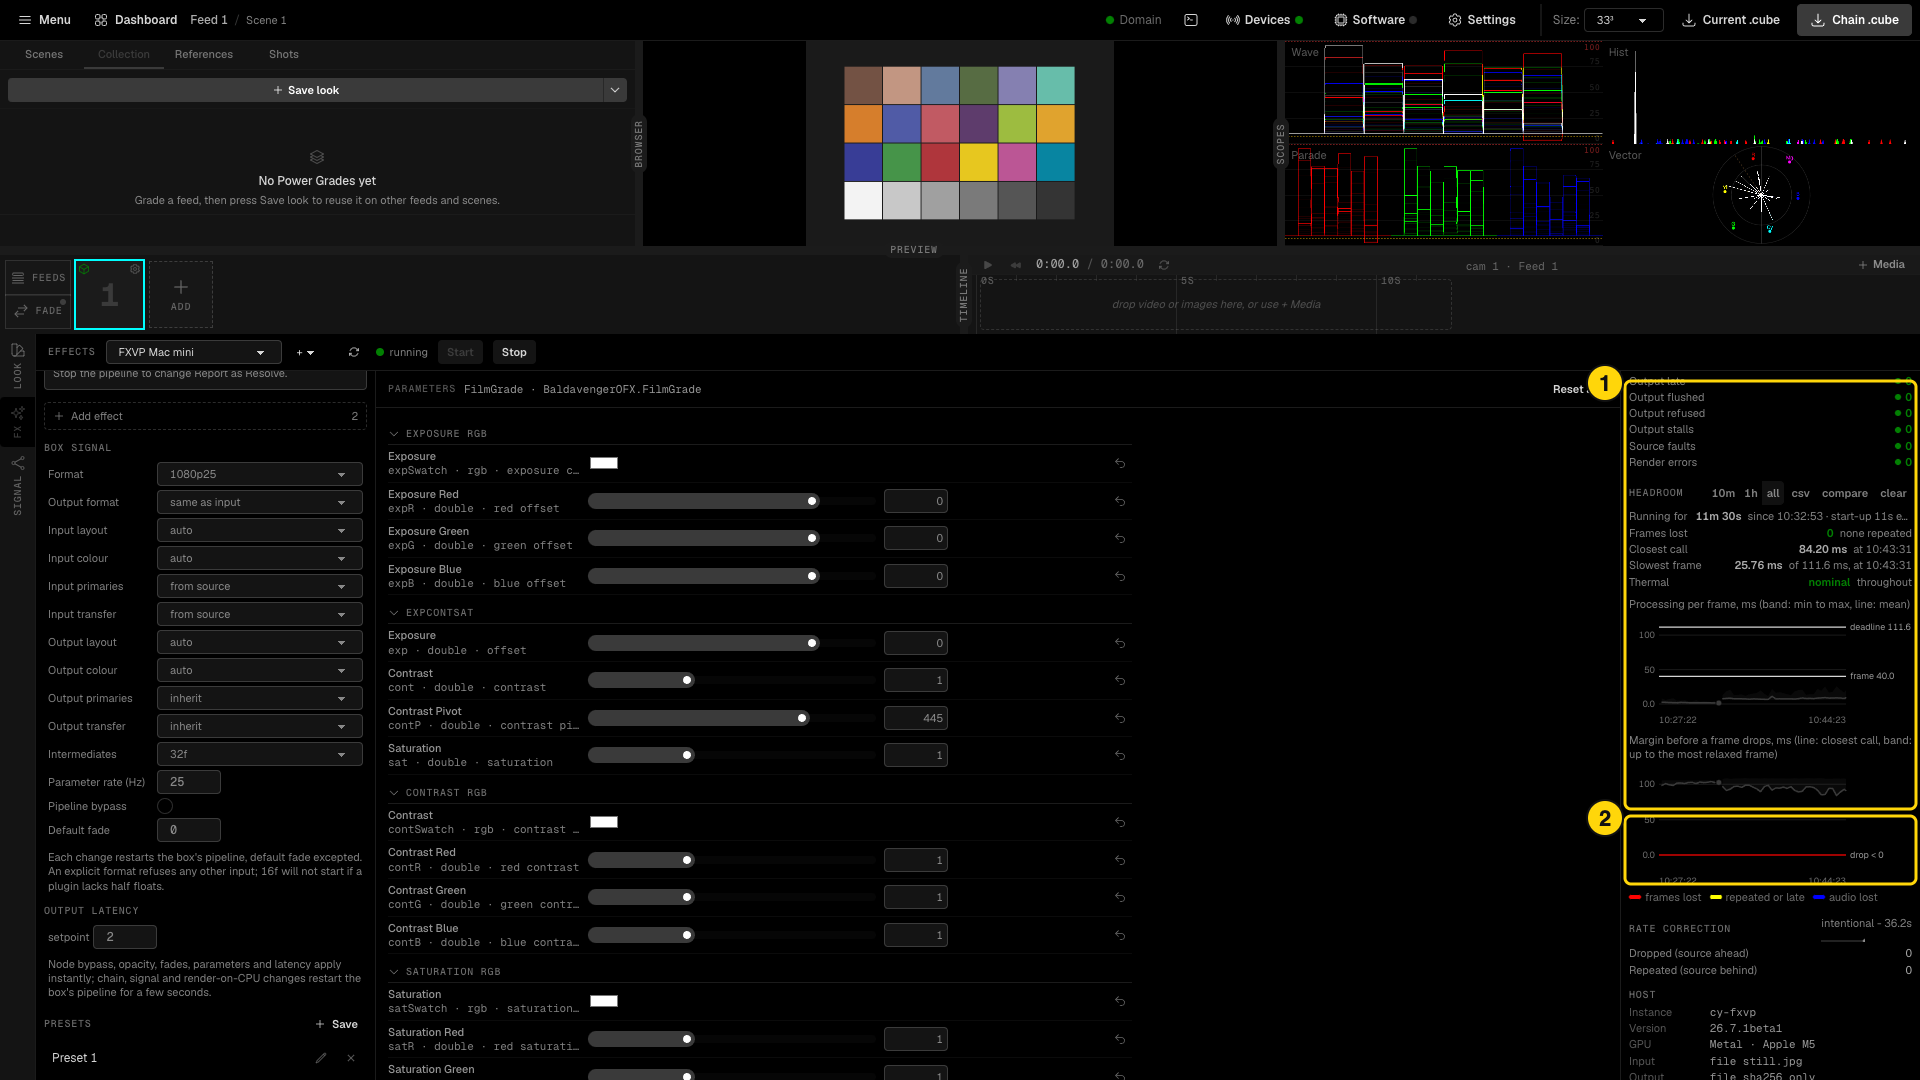
- HEADROOM - the run time of the server, lost frames, the closest call (the smallest margin before a frame drop) and the slowest frame. The charts show the processing time and the margin over time.
- 10m, 1h and all set the time range.
- csv saves the history in the export folder.
- compare shows a saved history below the live history, for example from a different server or a different day.
- clear starts a new record.
- RATE CORRECTION - frames that the server drops or repeats on purpose. The server does this when the clock of the source and the clock of the output are different.
Below these, HOST shows the FXVP version, the GPU, the input, the output, the format and the color conversion.
BOX TOOLS has these buttons:
- Reset counters - sets the fault counters to zero. The server does not restart.
- Export log and Export plugin output - save the log files of the server in the export folder of Studio (Settings > EXPORT).
- Export values - saves all parameter values in a JSON file. Use it as a backup, or to copy the setup to a different server.
- Import values - loads a JSON file of parameter values.
- Log level - sets the quantity of data that the server writes to its log.
4. Gang several FXVP servers
A gang sends the same chain and all parameter changes to more than one FXVP server. Use a gang when two servers process two copies of the same signal, for example a main server and a backup server.
- Open the feed and select its engine (local or an FXVP server).
- Click + next to the engine list.
- Select a different FXVP server.
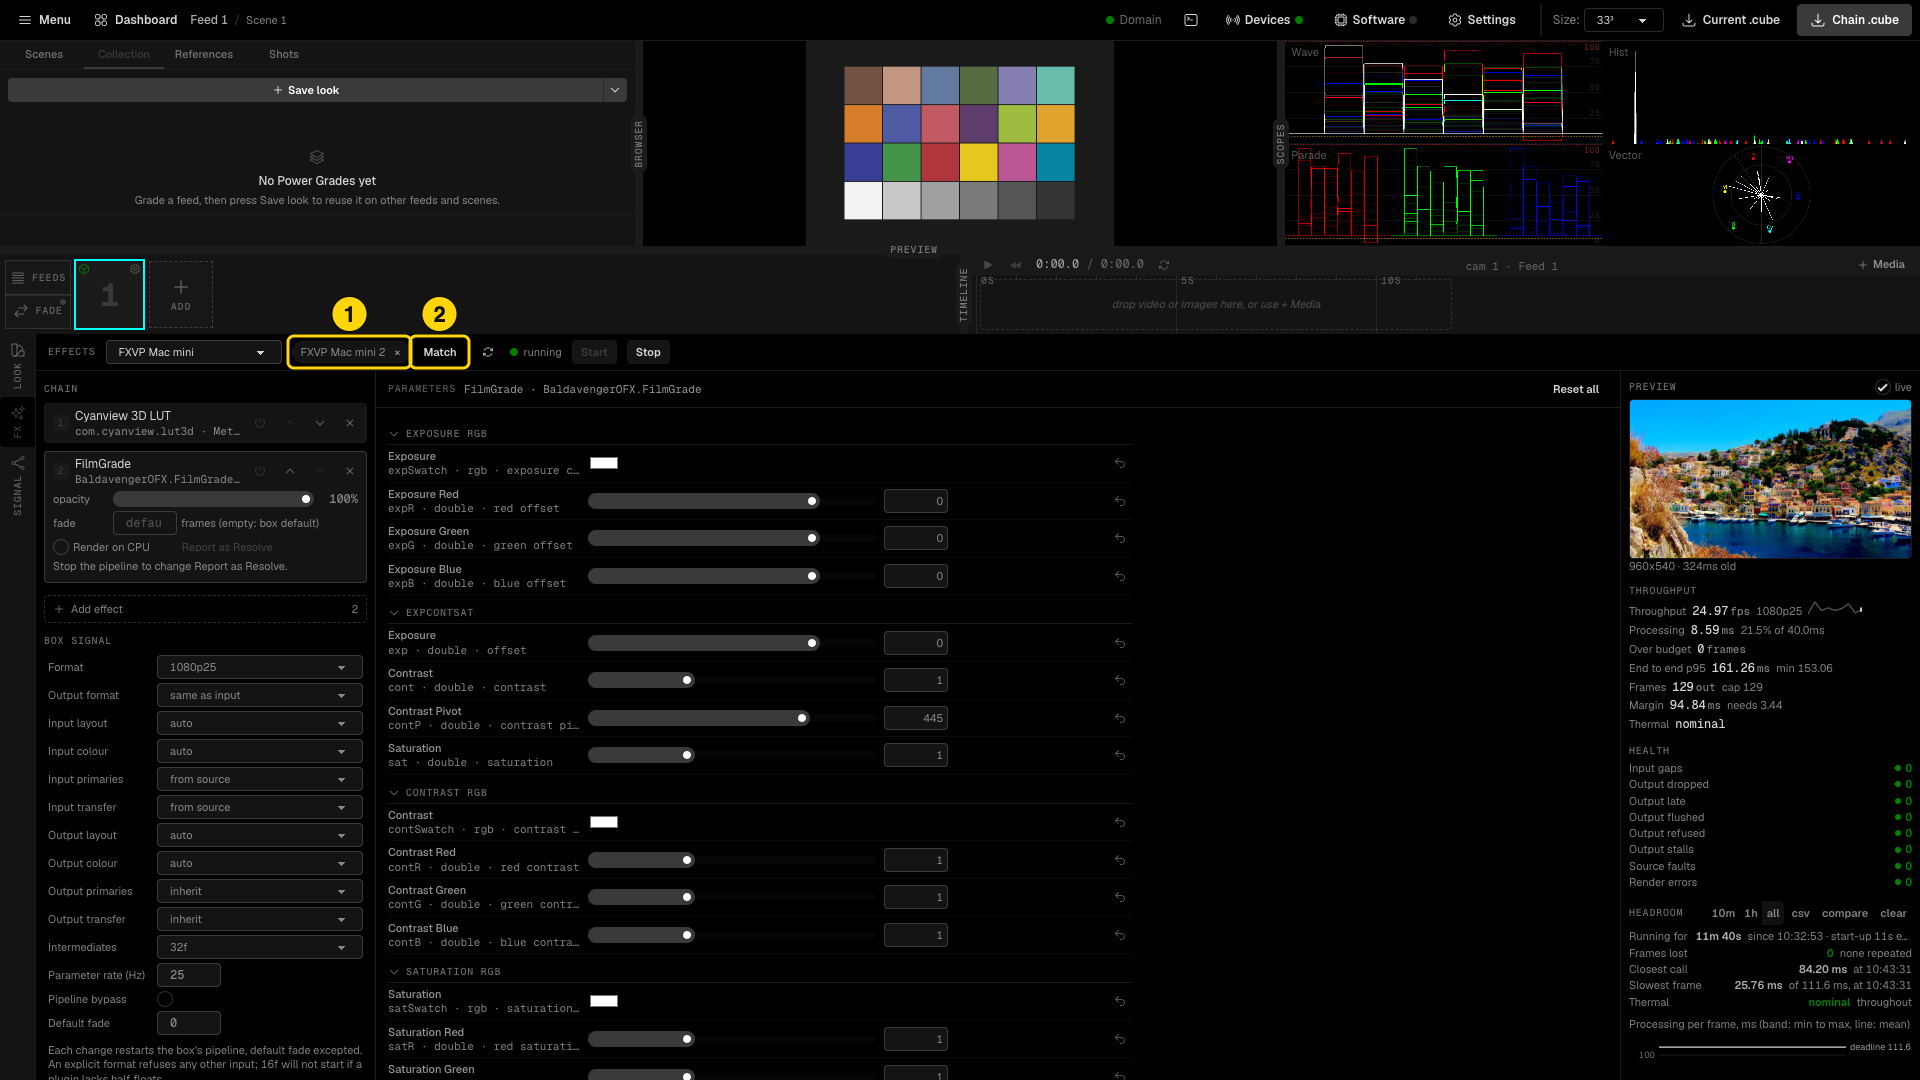
- A ganged server. To remove it from the gang, click ×. The server keeps its chain.
- Match - writes the chain and all parameter values of the engine to all ganged servers. Click Match after you add a server to the gang, or after a server was offline.
The panel shows the engine of the feed. The status column and the live preview show data from the engine only. A ganged server must have the same plugins as the engine. Errors from a ganged server show in the log of the panel.
The SIGNAL panel (Alt+M) shows the ganged servers below the FX stage.
5. The CyanView 3D LUT plugin
The CyanView 3D LUT plugin applies the LiveLab grade in the OFX chain. Studio changes the grade into a 3D LUT. At each change, Studio sends the new LUT to the plugin through the network. The plugin crossfades from the old LUT to the new LUT over a number of frames. On air, the change is smooth.
The plugin can also load a .cube file. If the plugin gets no LUT from the network, it uses the file.
Install the plugin
You do not install the plugin. It is built into the FXVP server and into the built-in engine of Studio. Your Studio license and your FXVP nodes include it. It shows as Cyanview 3D LUT in the Add effect list. Its identifier is com.cyanview.lut3d.
CyanView does not supply the plugin as a separate .ofx bundle. It does not work in other OFX hosts, for example DaVinci Resolve.
If an old Lut3D.ofx.bundle is in /Library/OFX/Plugins/Cyanview, the engine ignores it and uses the built-in plugin. You can remove the old bundle:
sudo rm -rf /Library/OFX/Plugins/Cyanview/Lut3D.ofx.bundle
Send the grade to the plugin
- In the FX panel, add Cyanview 3D LUT to the chain. Put it at the position where the grade must apply. Usually this is the first position, before the creative effects.
- Make sure that Use WebSocket LUT is on. The plugin listens on port 4569, channel 1.
- Click Devices. Add a device of the kind VP4.
- Type the IP address of the engine and port 4569. For the built-in engine, the address is 127.0.0.1. For an FXVP server, use the address of the server.
- On the feed tile, click the gear icon to open the feed settings.
- In CAMERA / COLOR BOX, select the VP4 device.
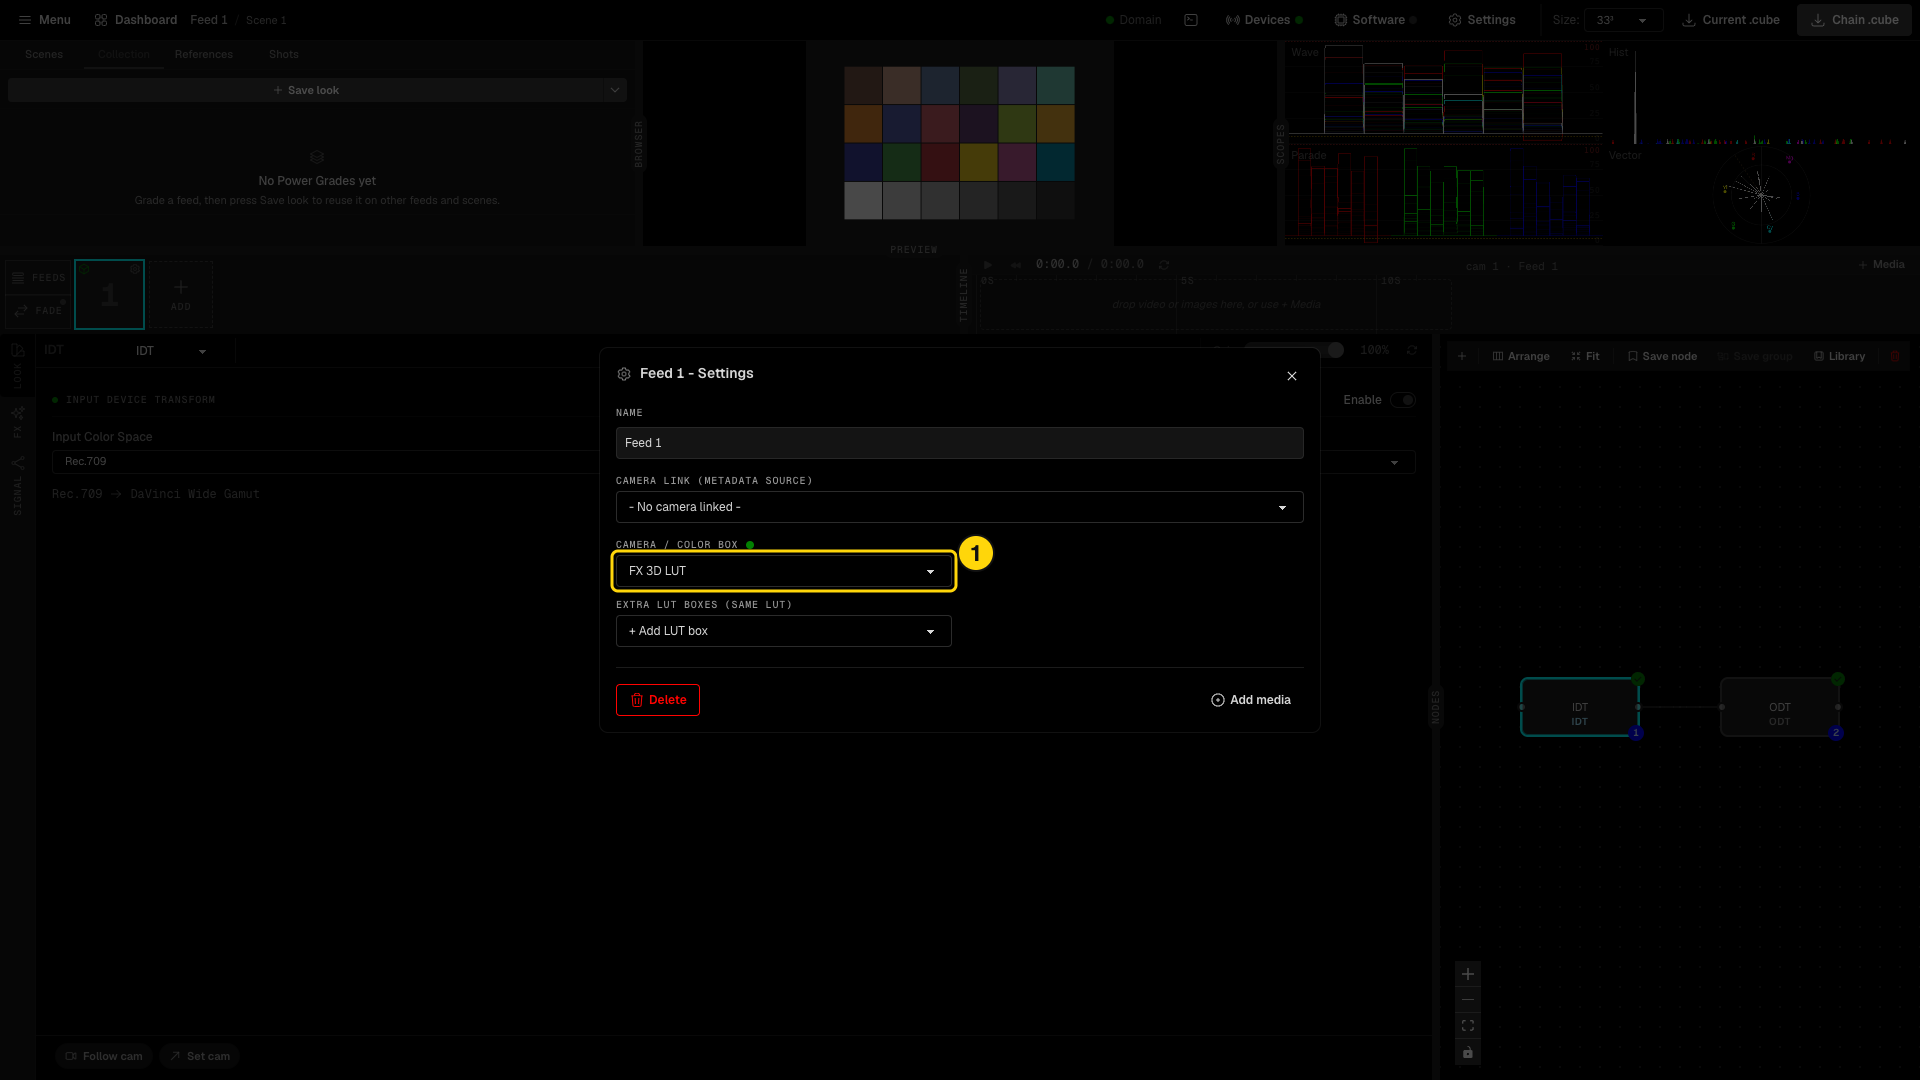
- The VP4 device that sends the grade to the 3D LUT plugin.
Studio now sends the grade of the feed to the plugin at each change, as to all LUT boxes. To make sure that it works, select the Cyanview 3D LUT node. Server Status shows "LUT loaded" and Active Source shows WebSocket.
If the feed also has a hardware LUT box (for example an AJA ColorBox) that must get the same grade, select that box in EXTRA LUT BOXES (SAME LUT) in the feed settings.
If two feeds use the 3D LUT plugin on the same engine, give each plugin a different port (4569, 4570 ...). Give each feed its own VP4 device.
Plugin parameters
Select the Cyanview 3D LUT node to see its parameters.
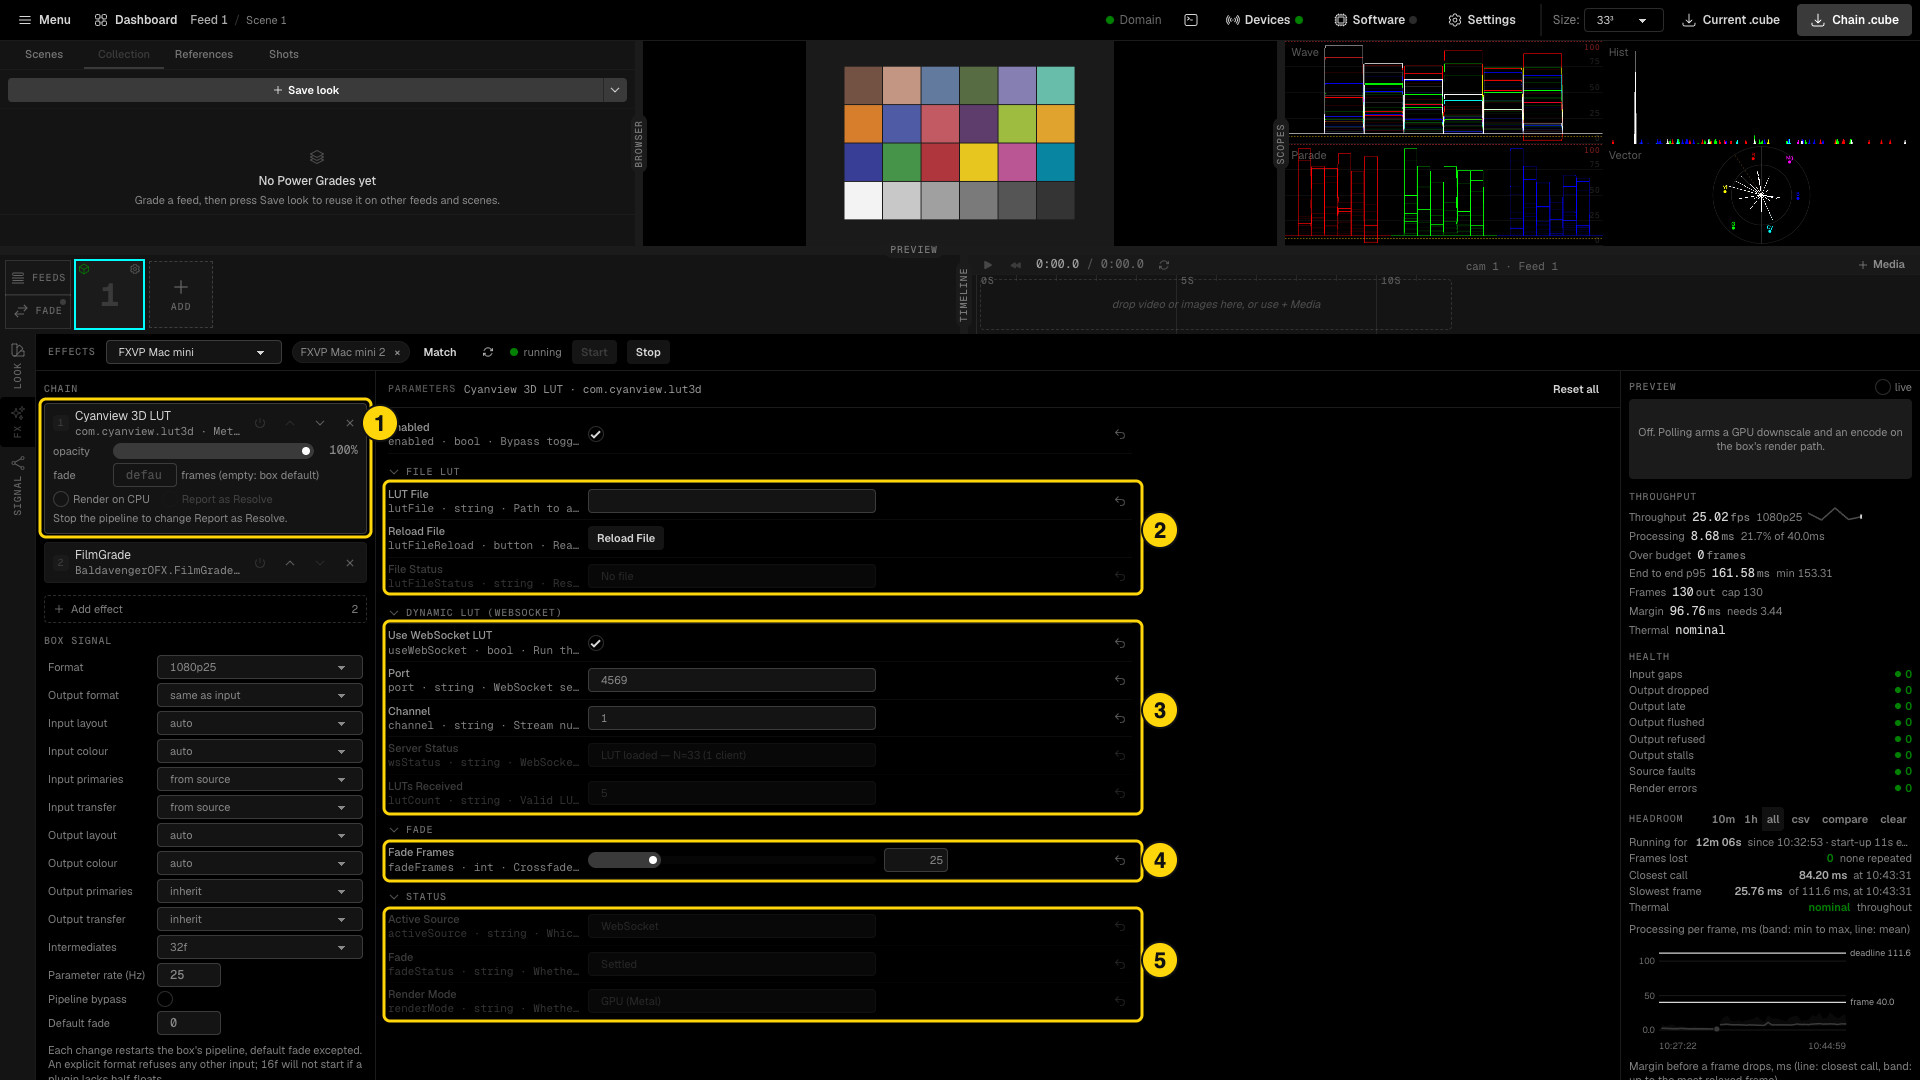
- The node. On an FXVP server, opacity mixes the graded picture with the original picture.
- FILE LUT:
- LUT File - the path of a
.cubefile on the engine computer (2 to 65 points). - Reload File - reads the file again after it changed.
- File Status - "Loaded" with the LUT size, or the error.
- LUT File - the path of a
- DYNAMIC LUT (WEBSOCKET):
- Use WebSocket LUT, Port and Channel.
- Server Status - "Waiting for connection", the quantity of connected clients, or "LUT loaded" with the LUT size.
- LUTs Received - the quantity of LUTs from Studio.
- FADE > Fade Frames - the length of the crossfade, in frames. 25 frames is one second at 25 fps. With 0, the change is immediate.
- STATUS:
- Active Source - WebSocket, File, None (passthrough) or Bypassed.
- Fade - Fading or Settled.
- Render Mode - GPU (Metal) or CPU.
How the fade works
- Each new LUT is a crossfade of Fade Frames frames. A change between the file and the network LUT is also a crossfade.
- If a new LUT comes during a fade, the fade continues from the current mix to the new LUT. It does not jump and it does not start again. When you drag a slider, the plugin gets many LUTs, and the picture moves smoothly.
- At the end of a fade, the picture is exactly the new LUT.
- The fade counts the rendered frames. On the built-in engine and on FXVP, 25 frames is exactly 25 frames of video.
- If you turn off Use WebSocket LUT, the plugin fades back to the file LUT. If there is no file, the plugin does not change the picture.
- If you turn off Enabled, the plugin does not change the picture. When you turn it on again, the fade continues from where it stopped.
The plugin fade and the LiveLab FADE do the same job. Refer to the LiveLab manual. The plugin fade is smoother, because it changes the LUT at each frame. Use only one of the two fades:
- If your other LUT boxes use the LiveLab fade, set Fade Frames of the plugin to 0. The LiveLab fade settings apply to all devices.
- If only the 3D LUT plugin must fade, turn off Fade LUT changes in the LUT fade window.
Check the path
Open the SIGNAL panel (Alt+M) to see the full path of the feed.
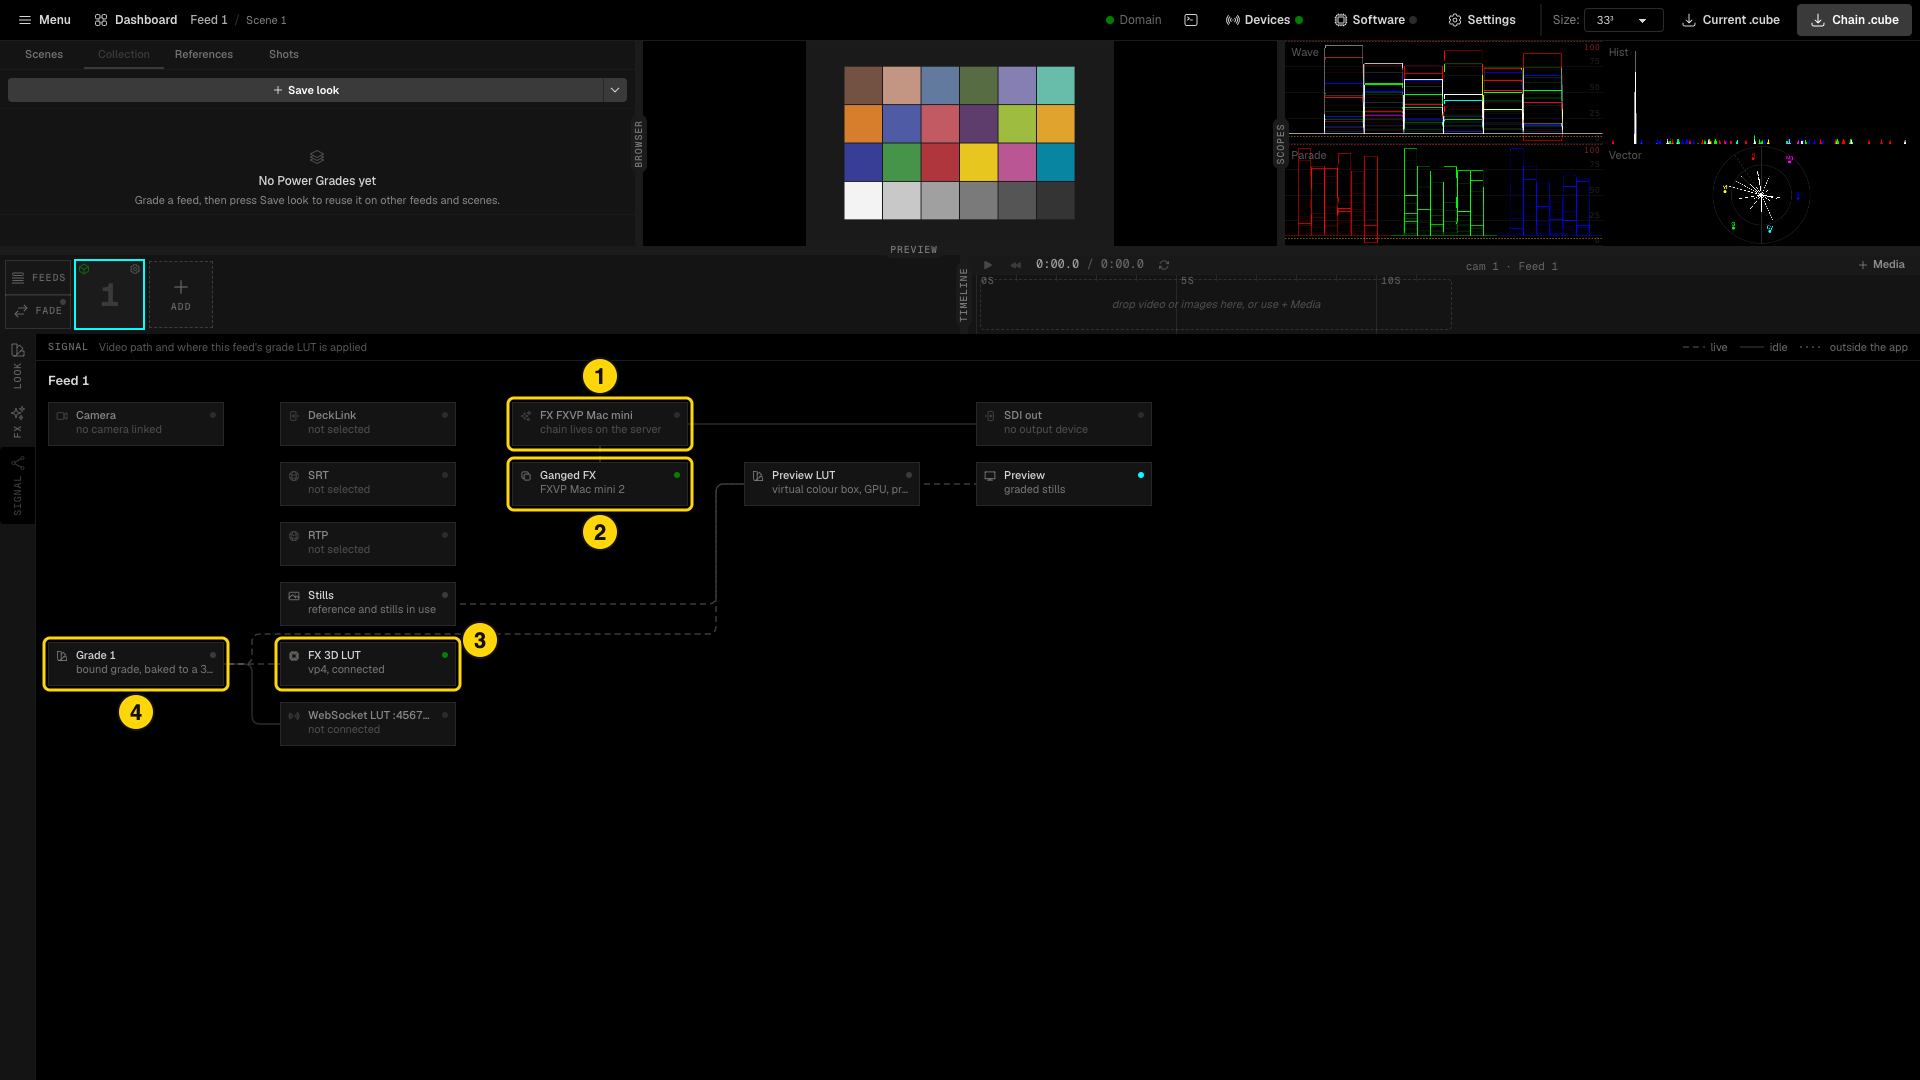
- FX - the engine of the feed. For an FXVP server, the chain is on the server.
- Ganged FX - the ganged servers, if there are some.
- The VP4 device that sends the grade to the 3D LUT plugin, and its state.
- The grade of the feed, as a 3D LUT.
The plugin also works in DaVinci Resolve. In Resolve, the fade length is not exact, because Resolve can render a frame more than one time.
6. Troubleshooting
| Problem | Action |
|---|---|
| "Local engine unavailable" | Install the Blackmagic Desktop Video driver, then restart Studio. On Windows, also update the GPU driver. |
| "Engine stopped. Start it to scan and run effects." | Click Start engine. |
| A plugin is not in the list | Make sure that the plugin is in the standard OFX folder or in your extra folder. On macOS, remove the quarantine flag. Click rescan. On a server, restart the service. |
| No picture on the SDI output (built-in engine) | In the Input drawer of the feed, start the capture and the SDI output. |
| No picture on the SDI output (FXVP server) | Examine the SDI cables. Make sure that the pipeline is running. In the HOST block, make sure that the input and output are the DeckLink devices that you connected. To change them, refer to Choose the DeckLink input and output. |
| The server is not in the engine list | A different feed uses the server. One server processes one feed. |
| "your license allows N FXVP node(s)" | Remove an FXVP device, or ask CyanView for more FXVP nodes on your license. |
| The FXVP device stays "Not connected" | Examine the IP address and port 9020. Make sure that the Studio computer and the server are on the same network, and that the firewall of the server allows cy-fxvp. Read /Library/Logs/Cyanview/install.log and fxvp.log on the server. |
| The FXVP device is connected, but the server refuses commands | The token in Studio is different from server.authToken on the server. Type the correct token. |
| The pipeline shows error | Read the message next to Start. Correct the box signal settings. Click Start. A fixed Format does not accept a different input. |
| A ganged server shows different values | Click Match. |
| The 3D LUT plugin shows "Waiting for connection" | Examine the VP4 device: the address of the engine and port 4569 (the Port of the plugin). Make sure that the feed uses that VP4 device. |
| The 3D LUT plugin shows an error on the port | A different program or a different 3D LUT node uses that port. Give the node a different port. Change the port of the VP4 device to the same value. |
| Frames drop with a heavy chain | Increase the output latency setpoint by one. In HEADROOM, look at the slowest frame. |