RCP Ember+ Interface
Overview
The RCP Ember+ interface provides a set of commands and parameters that allow external devices to control certain RCP features. Currently, the Ember+ interface offers limited functionality, but future enhancements are anticipated.
The Ember+ interface can currently be used to switch the RCP to a different camera or follow which camera has been selected. The RCP "Preview", "Next" and "Previous" buttons status are reported when pressed. It is also possible to create virtual GPIOs on Ember+ which can then be used like standard GPIOs inside the RCP configuration.
Several issues affecting the Ember+ interface were fixed in the 25.12.1rc1 release of the RCP firmware. We recommend using any more recent version when working with Ember+. In earlier versions, the last node in the Ember tree was not reported correctly when no virtual GPIOs were present. As a workaround on older firmware, you can add at least one virtual GPIO so that the full Ember tree is exposed correctly.
Ember+ Interface
The Ember+ server runs on the standard port 9000. The server is accessible via any of the IP addresses of the RCP. The Ember tree is structured as follows:
Tree
 - 0: identity (node)
  - 0.0: product [STRING] = "IP Gateway"
  - 0.1: company [STRING] = "CyanView"
  - 0.2: version [STRING] = "6da3ca915"
- 1: Devices (node)
  - 1.0: monitors (node)
    - 1.0.0: _15hrxy0 (node)
      - 1.0.0.0: requested_camera [STRING] = ""
      - 1.0.0.1: requested_camera_number [INTEGER] = 0
      - 1.0.0.2: requested_camera_name [STRING] = ""
      - 1.0.0.3: active_camera [STRING] = "1rfwo78"
      - 1.0.0.4: active_camera_number [INTEGER] = 1
      - 1.0.0.5: active_camera_name [STRING] = "Proton"
      - 1.0.0.6: tally_red [INTEGER] = 0
      - 1.0.0.7: tally_green [INTEGER] = 0
  - 1.1: rcps (node)
    - 1.1.0: _RCP-18-34 (node)
      - 1.1.0.0: camera_list [STRING] = ""
      - 1.1.0.1: active_camera_number [INTEGER] = 0
      - 1.1.0.2: preview [INTEGER] = 0
      - 1.1.0.3: next [INTEGER] = 0
      - 1.1.0.4: prev [INTEGER] = 0
  - 1.2: ios (node)
    - 1.2.0: _bure7u (node)
      - 1.2.0.0: io_number [INTEGER] = 8
      - 1.2.0.1: IO_1 [INTEGER] = 0
      - 1.2.0.2: IO_2 [INTEGER] = 0
      - 1.2.0.3: IO_3 [INTEGER] = 0
      - 1.2.0.4: IO_4 [INTEGER] = 0
      - 1.2.0.5: IO_5 [INTEGER] = 0
      - 1.2.0.6: IO_6 [INTEGER] = 0
      - 1.2.0.7: IO_7 [INTEGER] = 0
      - 1.2.0.8: IO_8 [INTEGER] = 0
Description:
- monitors: commands to synchronize the selected camera on the RCP with the signal shown on the monitor
- requested_camera: set to the camera unique ID to request the RCP to switch to that camera
- requested_camera_number: set to the camera number to request the RCP to switch to that camera
- requested_camera_name: set to the camera name to request the RCP to switch to that camera
- active_camera: read only, returns the camera unique ID of the active camera
- active_camera_number: read only, returns the camera number of the active camera
- active_camera_name: read only, returns the camera name of the active camera
- tally_red: read only, gives the current red tally status of the active camera
- tally_green: read only, gives the current green tally status of the active camera
- rcps: commands related to the RCP panel itself, independently of the synchronization with a router
- camera_list: set a list of numbers separated by a comma to limit the RCP navigation to a specific set of cameras
- active_camera_number: read or set the number of the camera to display on the RCP panel, bypassing any routing synchronisation
- preview: reports the status of the "Preview" key, this can be used to map the key to other functionalities than the ones supported by the RCP.
- next: reports the status of the left arrow key. The RCP has an option in the settings to disable the "Prev" and "Next" buttons.
- prev: reports the status of the right arrow key. The RCP has an option in the settings to disable the "Prev" and "Next" buttons.
- ios: commands related to the virtual GPIOs
- io_number: reports the number of virtual GPIOs configured
- IO_1: read or set the state of the virtual GPIO
Switching cameras
The monitors section of the Ember+ interface allows you to switch the camera on the RCP to a different one, in the same way as if the camera was selected manually on the RCP. The RCP has an internal routing mechanism that lets multiple components of the system follow the same camera, including external routers when such an integration has been added, either directly (for example an Atem) or via a protocol such as Probel SW‑P‑08. When a requested_camera value is set, the internal routing system is assigned to this camera: the RCP panel and other accessories like the dashboard are switched to that camera, and any external router configured will also be routed to that camera. The active_camera parameters then report the currently active camera, which should match the requested one if everything has worked correctly.
If the active_camera_number of the rcps section is changed directly, the RCP panel is immediately set to that camera, bypassing the routing mechanism so other components of the system remain on their current camera. This can be used to switch only the panel to a different camera without changing the overall routing system.
Adding Virtual GPIO
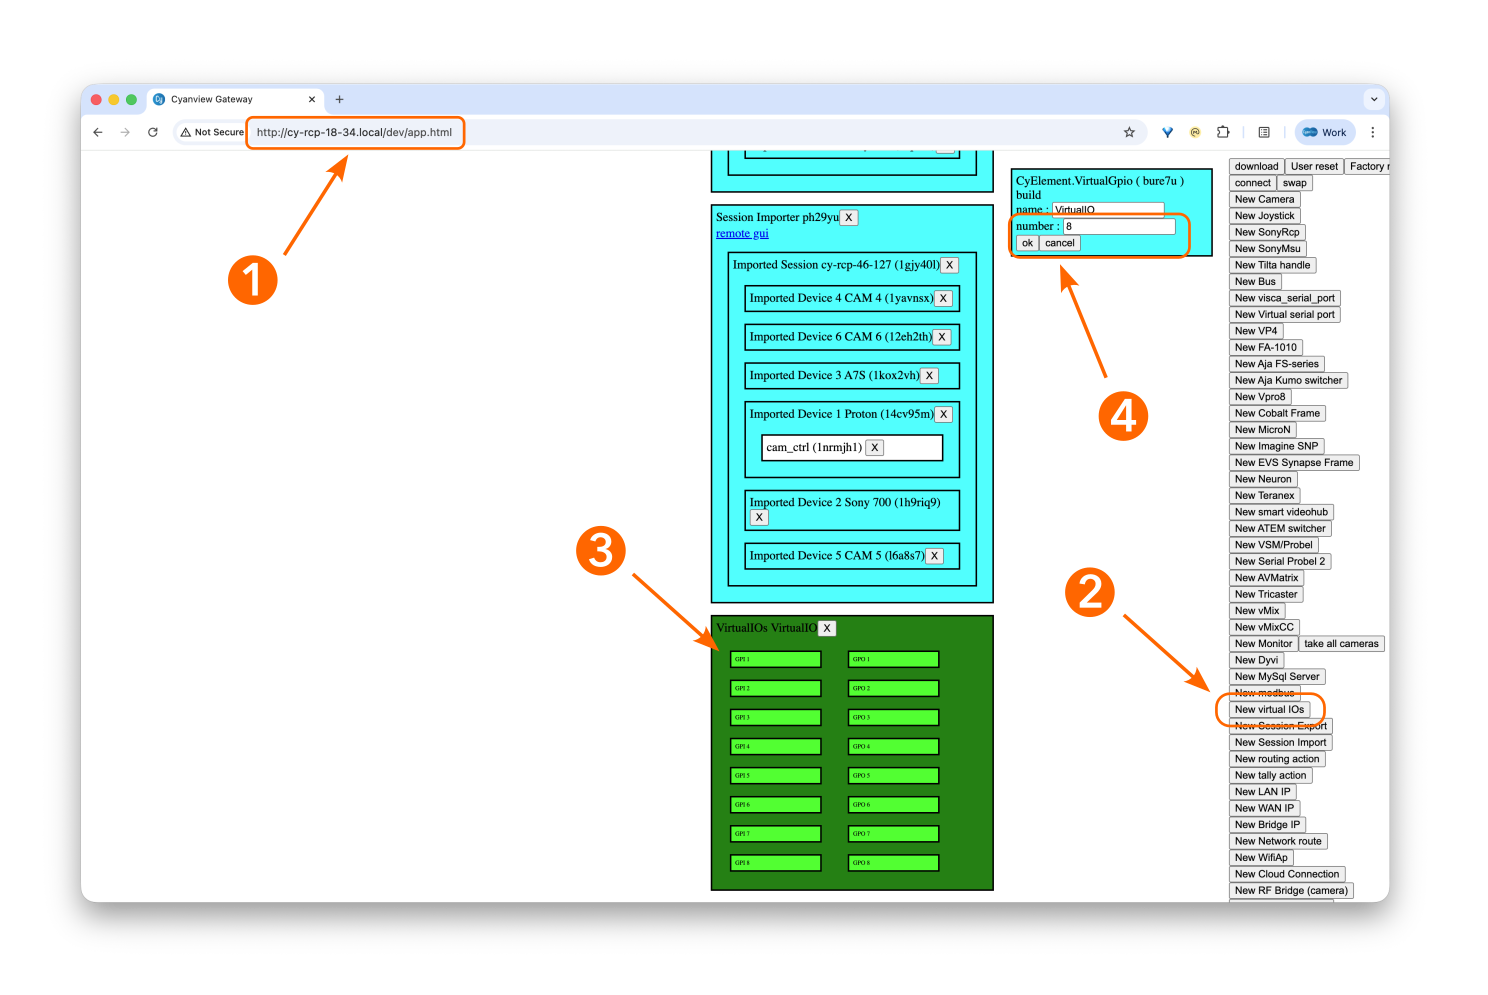
To add virtual GPIOs on the Ember+ interface:
- Open the RCP configuration in your browser and append
/dev/app.htmlto the URL to access the developer view. - Click on New Virtual IOs to create the virtual GPIOs on Ember+. A new block will appear at the very bottom of the page.
- Click on this new block (the outside area, not the small individual IOs); its properties will be shown in the top-right area of the view.
- In the block properties, adjust the number of GPIOs to create as needed, then save the properties.
These GPIOs will now be visible from the RCP GPIO tab in the main configuration page and can be used like regular GPIOs.