RF/UHF : Alfa Network
Introduction
It's a long range (up to 2km LOS), low bandwidth (up to 15Mbps) radio link, with the ease of use of Wi-Fi and the robustness of RF/UHF.
It's in open frequencies, so if you need reserved frequencies, you should use a licensed solution (like Domo/DTC, SATEL modems, etc.).
Typical latency is 10-20ms.
Features
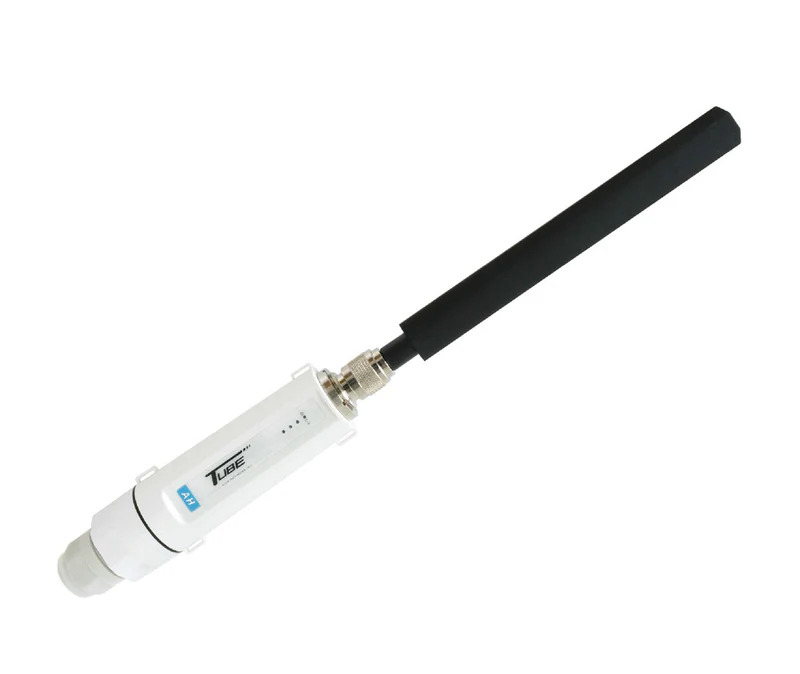
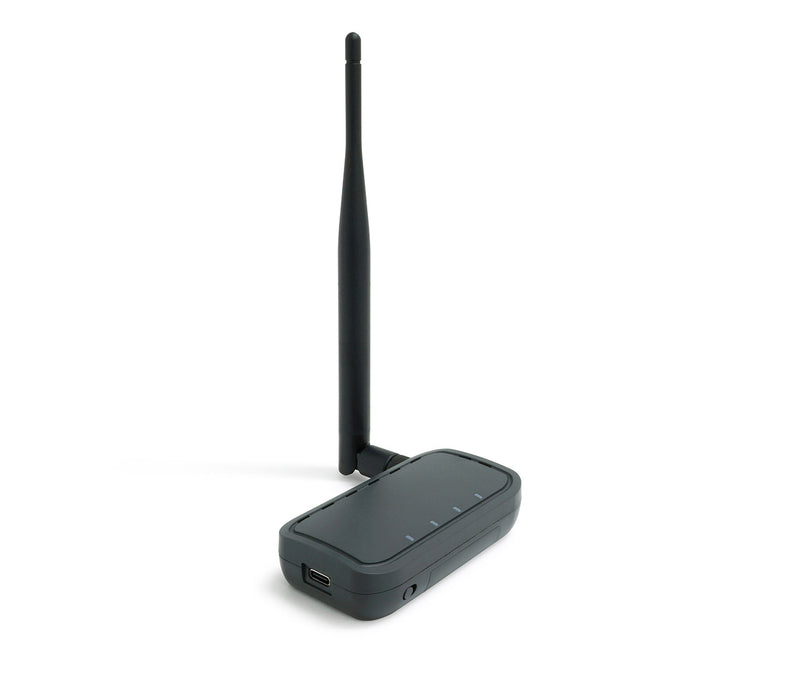
Tube-AH | Halow-U |
 |  |
Typical use cases | |
|
|
Features | |
|
|
Compatibility | |
|
|
Wiring - setup
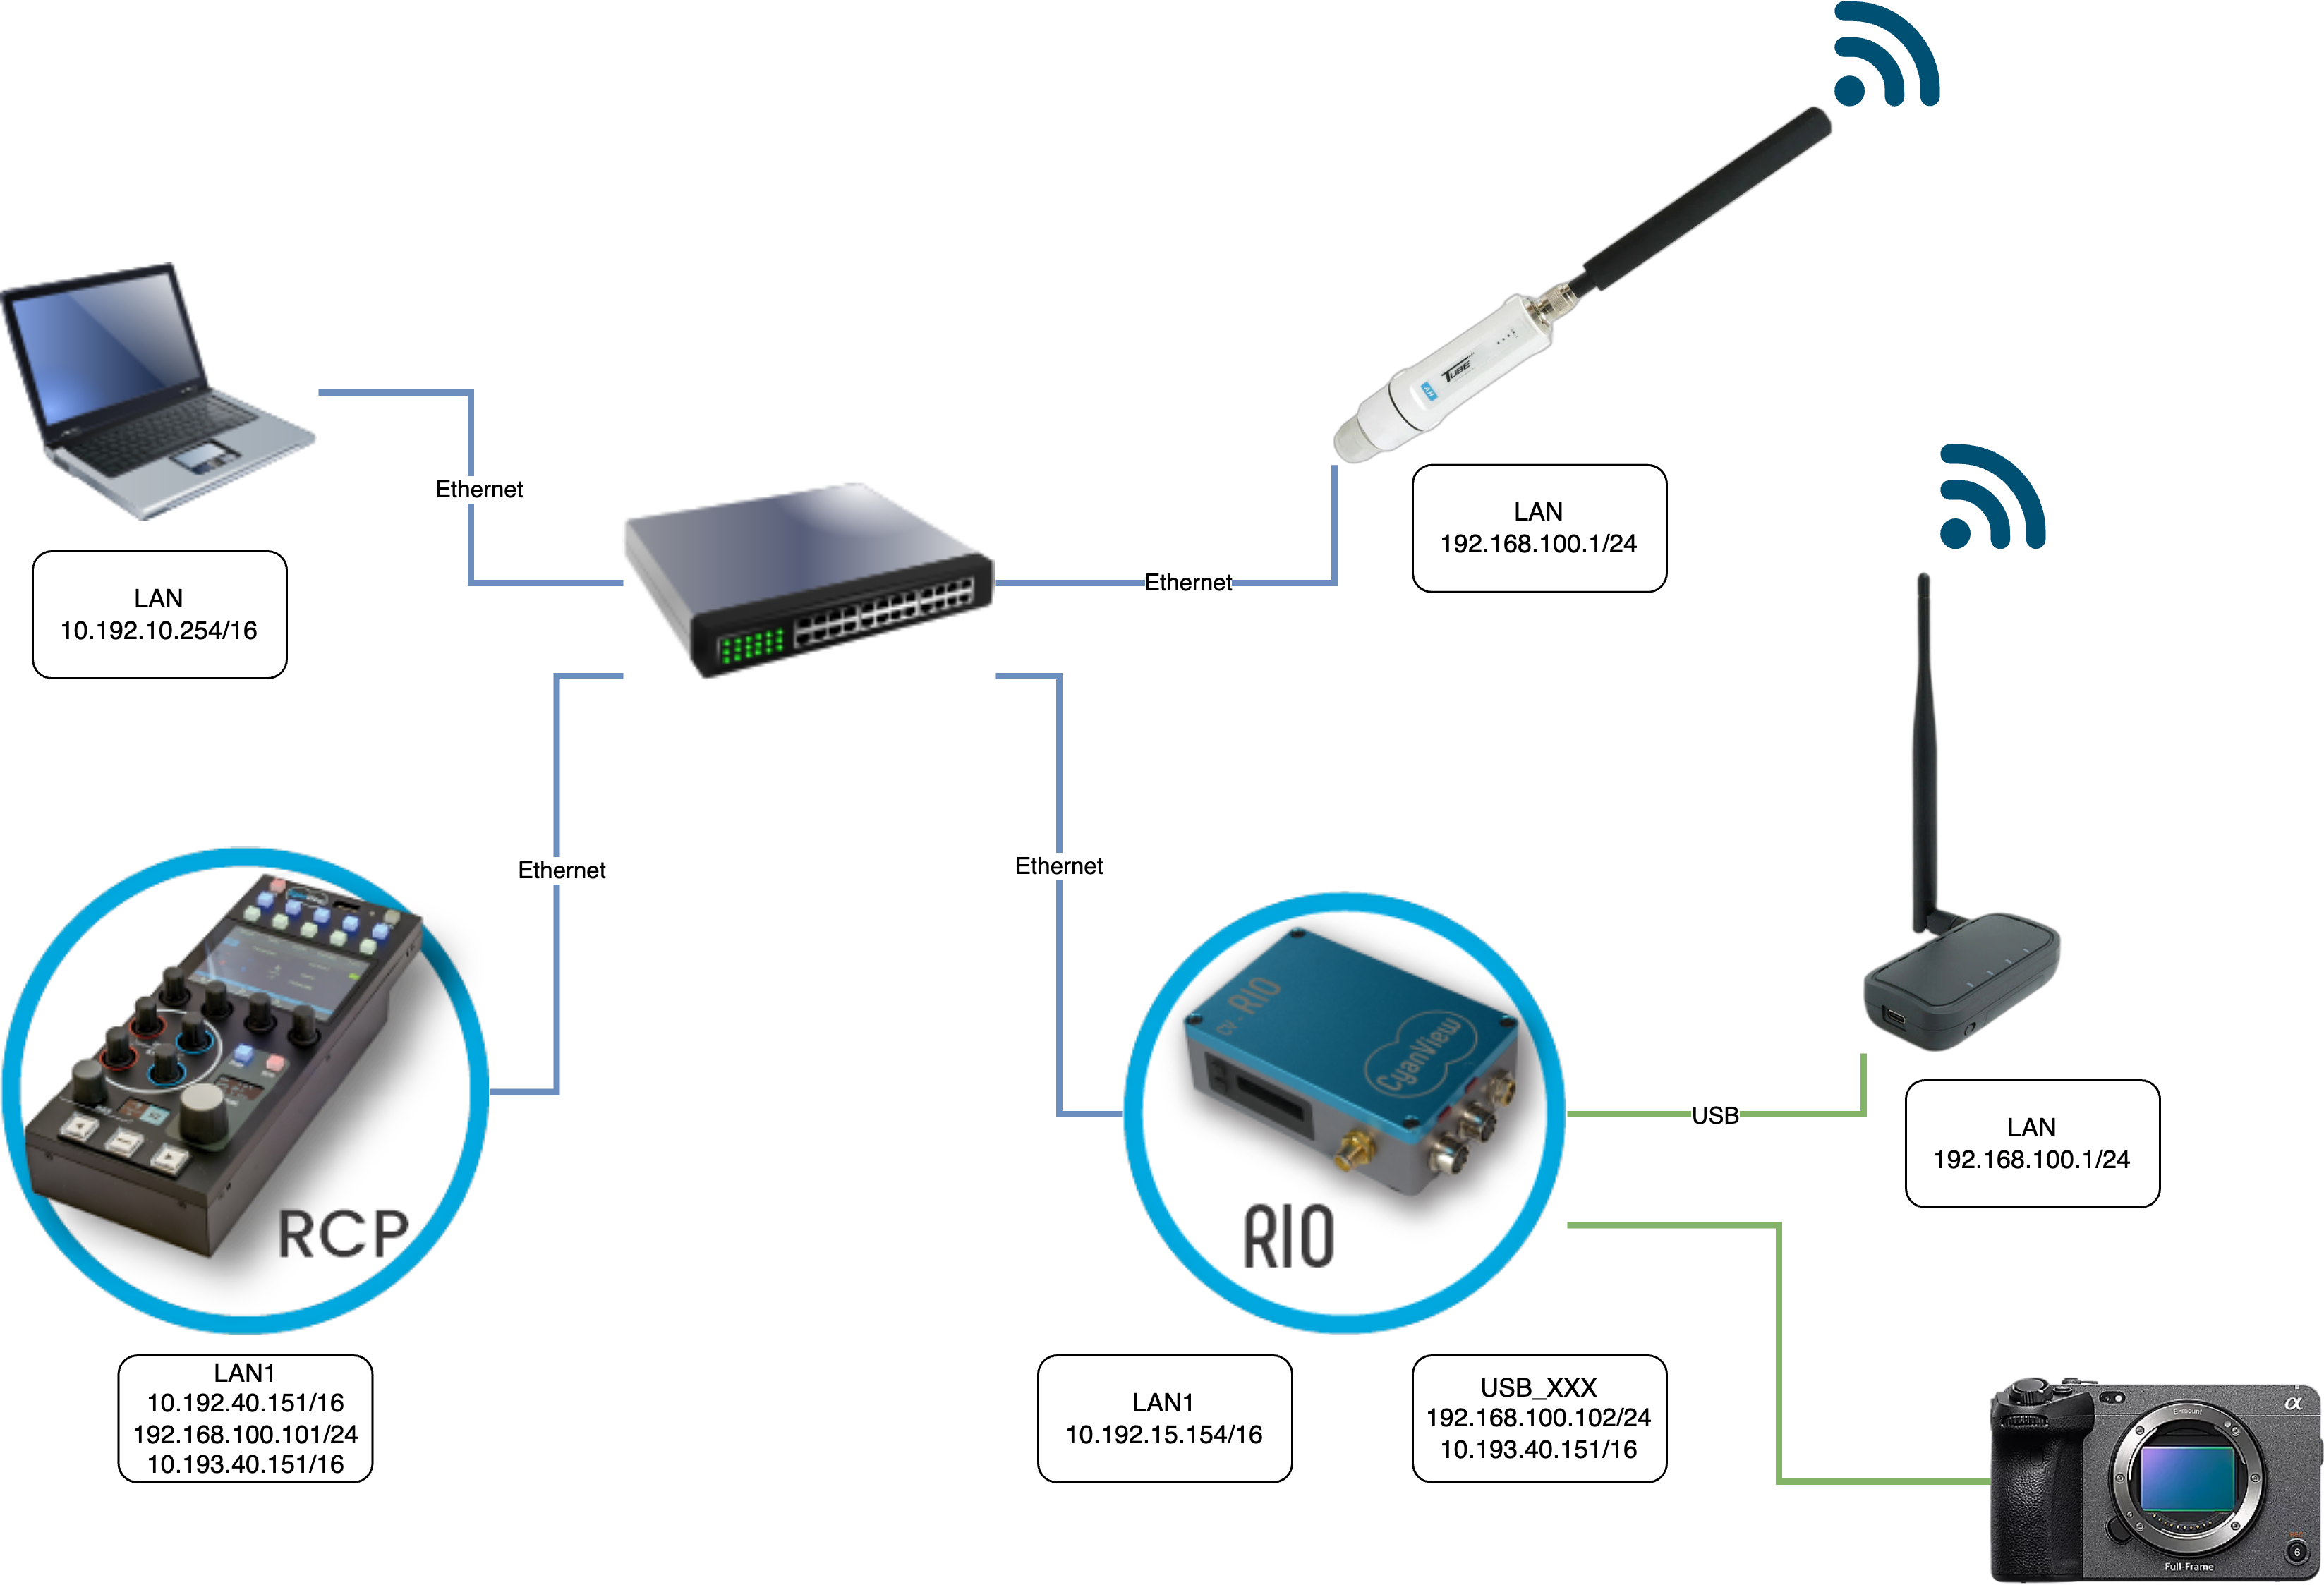
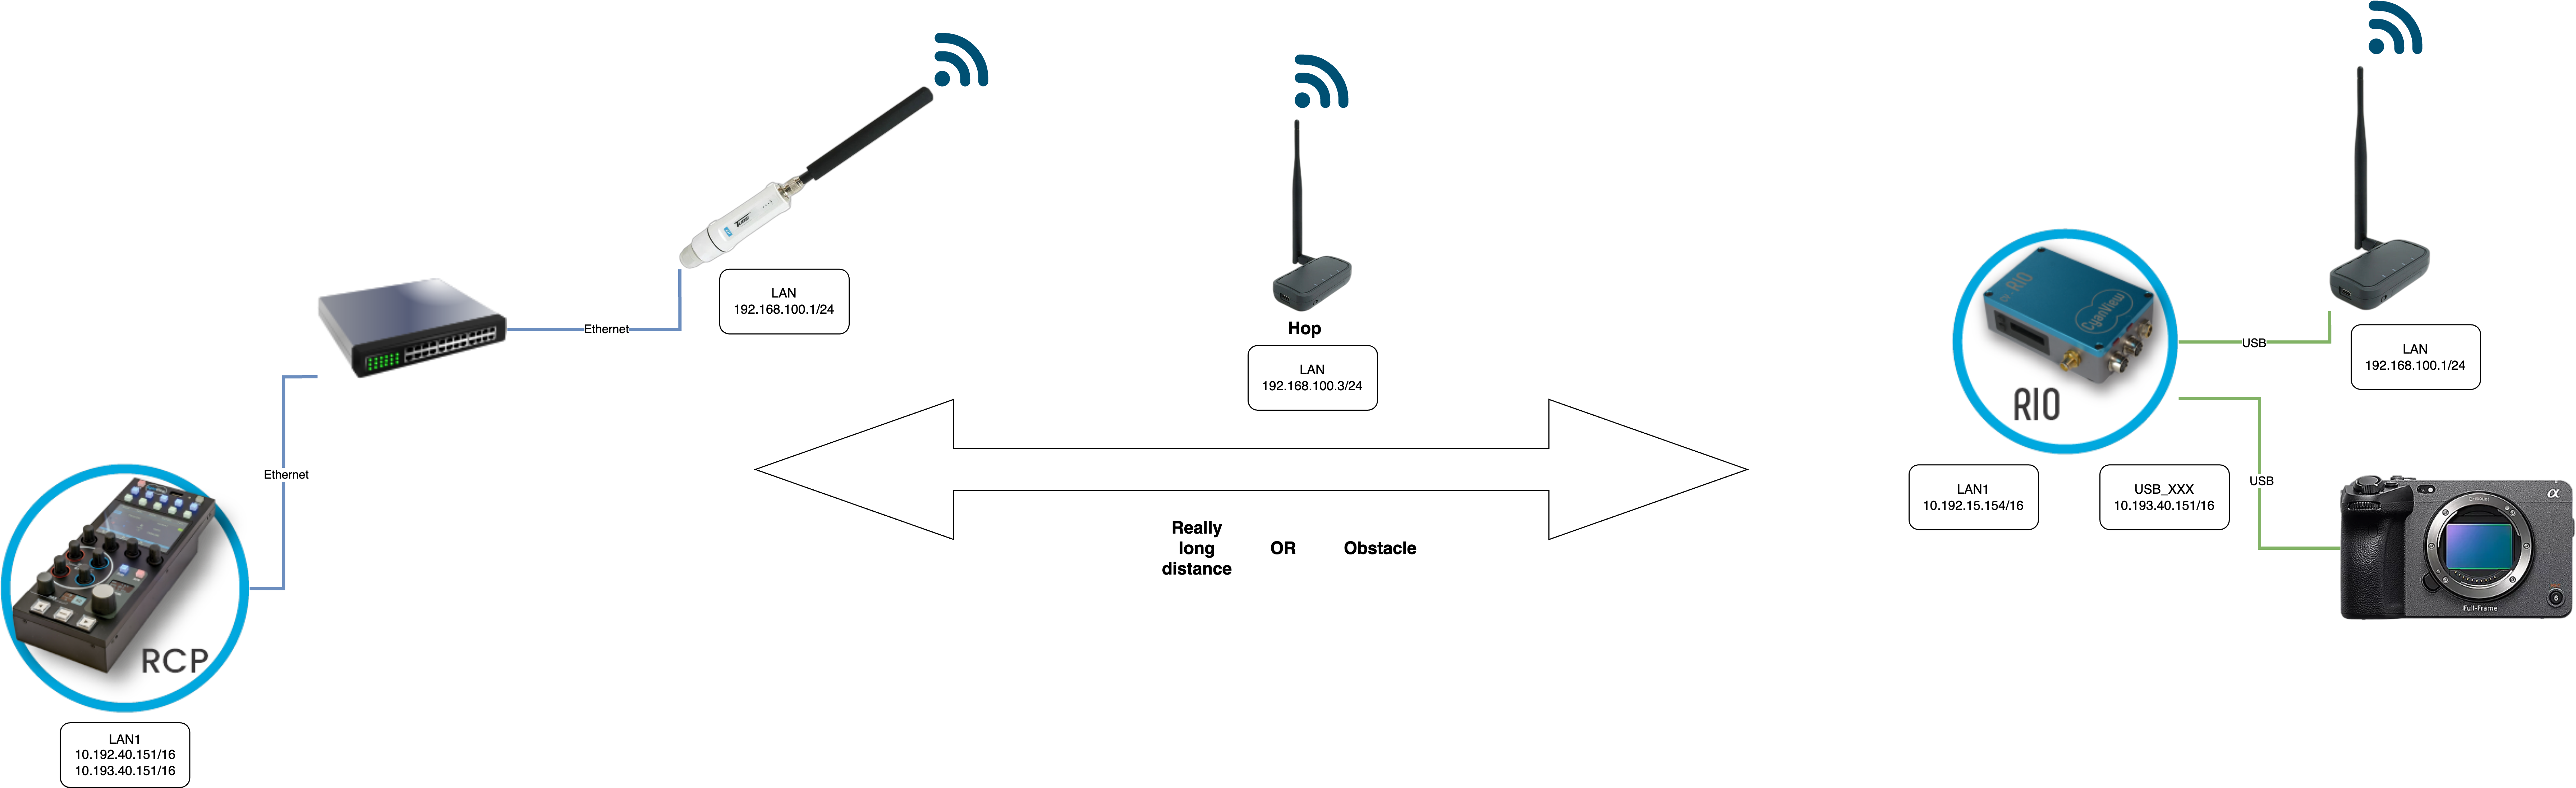
For the setup, we put:
- on a switch
- our laptop to do the setup
- an RCP
- a RIO with its Halow-U plugged on USB
- a Tube-AH on the RCP/laptop switch
The IP scheme is an example, and we'll get through the setup below, the important points are:
- Halow-U/Tube-AH have their own network (192.168.100.0/24):
- By default they start at 192.168.100.1/24
- You need to change the default IP to ensure they have unique IP
- You can change this range to anything you like
- It's better to choose a different range than the Cyanview range (10.192.0.0/16)
- RIO/RCP have:
- their factory IP in 10.192.0.0/16 (you can't change/delete it)
- an IP to communicate with Halow-U/Tube-AH and do the setup: 192.168.100.0/24
- an IP to communicate together (RCP/RIO) on the RF: 10.193.0.0/16:
- this range is not overlapping the factory one (10.192.0.0/16)
- I put that as it's easy to remember (the last digits are the serial numbers)
- it's also interesting to show that this range could be different from the Halow-U/Tube-AH (192.168.100.X/24)
- but you could use anything, including the same range as the Halow-U/Tube-AH, as long as:
- different interfaces (LAN1, USB_XX, etc.) don't have overlapping networks range (IP/mask)
- unique IP within the network (Tube-AH, Halow-U, RIO, RCP)
- laptop only has an IP to talk to RIO/RCP as the setup can be done directly on RCP
You could totally do the same setup using the Alfa network webpage directly. You would just need to put a compatible IP on your laptop (192.168.100.0/24 range). Have a Windows/Linux computer to set up the Halow-U one by one on USB.
In both case (setup through RCP/RIO webpage or from your laptop), once the setup of Halow-U/Tube-AH is done. You can totally remove the 192.168.100.0/24 range from your laptop/RCP/RIO. As the setup is done, the link is done, you don't need it anymore.
Setup IP
RCP
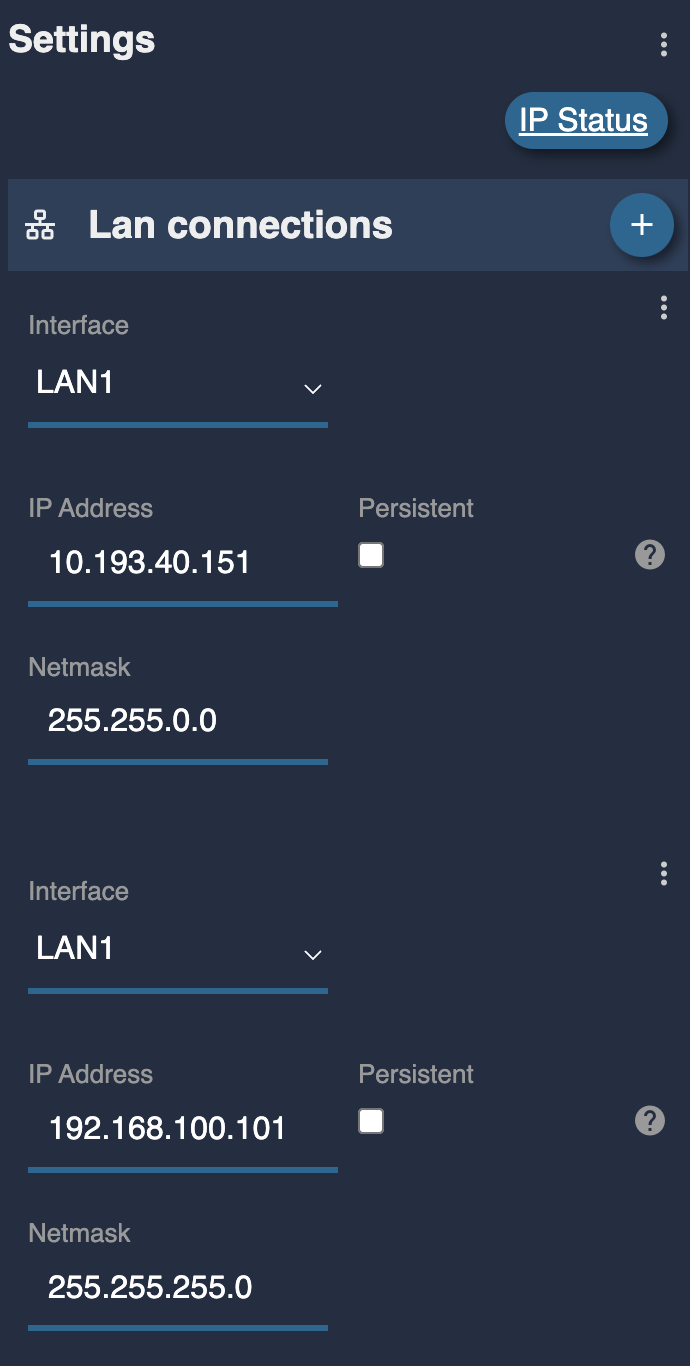 | RCP has:
|
RIO
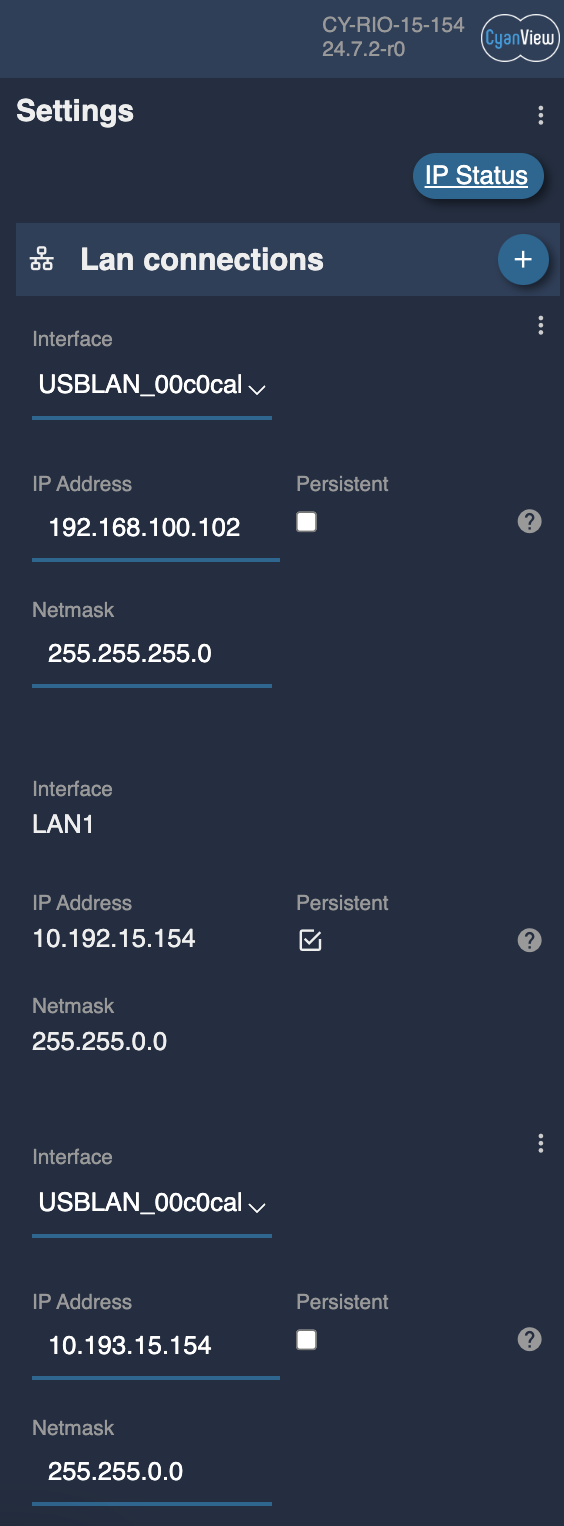 | RIO has:
|
Note that we can have 10.192.0.0/16 and 10.193.0.0/16 on two different interfaces on RIO (LAN1 and USB_XXX) because the range aren't overlapping. If you had an IP 10.192.X.Y/16 or /24, on both interfaces, the routing of packets/network would not work.
Also note that RCP is talking to RIO, Halow-U/Tube-AH on the same interface (LAN1), you can have "as many" IP as you want on the same network interface. Just ensure that every device on your network has a unique IP to avoid conflicts.
Setup RF
You can use the Halow-U/Tube-AH webpage. But we designed custom webpage on RCP and RIO with more option (and a single page).
This page is accessible from any Cyanview device using the port 5000:
- On my RIO:
- I can access the standard web UI on http://10.192.15.154
- I can access the RF setup webpage on http://10.192.15.154:5000
- Same on my RCP:
- I can access the standard web UI on http://10.192.40.151
- I can access the RF setup webpage on http://10.192.40.151:5000
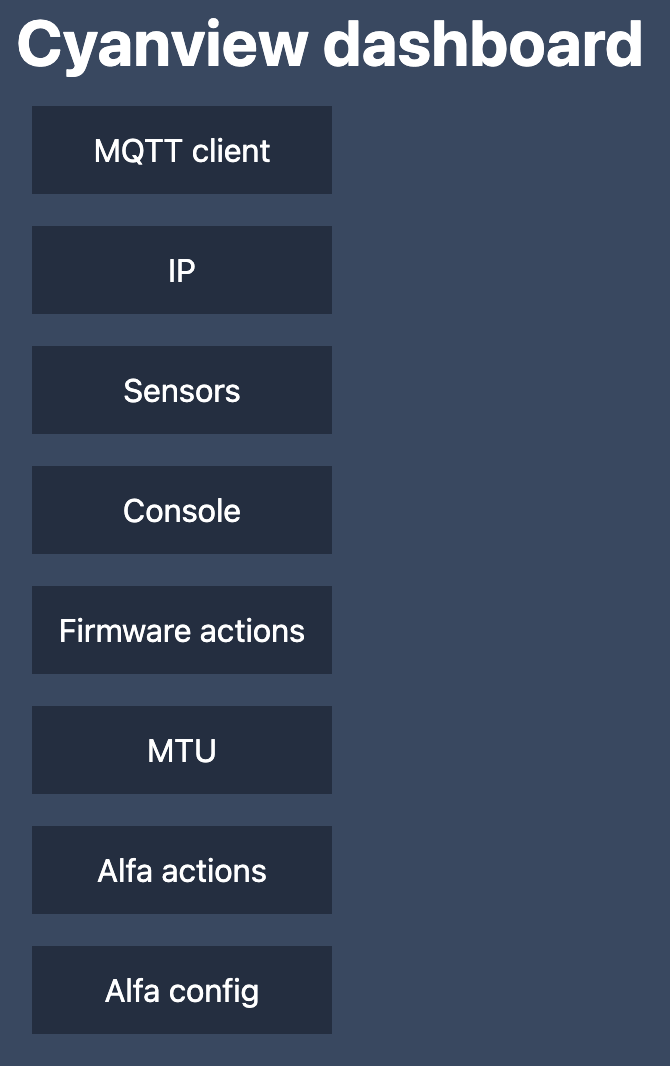
If you don't see Alfa actions and Alfa config, update your RCP/RIO with a SWU here
Tube-AH
- on my RCP dashboard: http://10.192.40.151:5000
- I first click on
Alfa actions - I select action
ping - I ensure the IP is the IP of my Tube-AH (by default it should be 192.168.100.1)
- Click on
runand
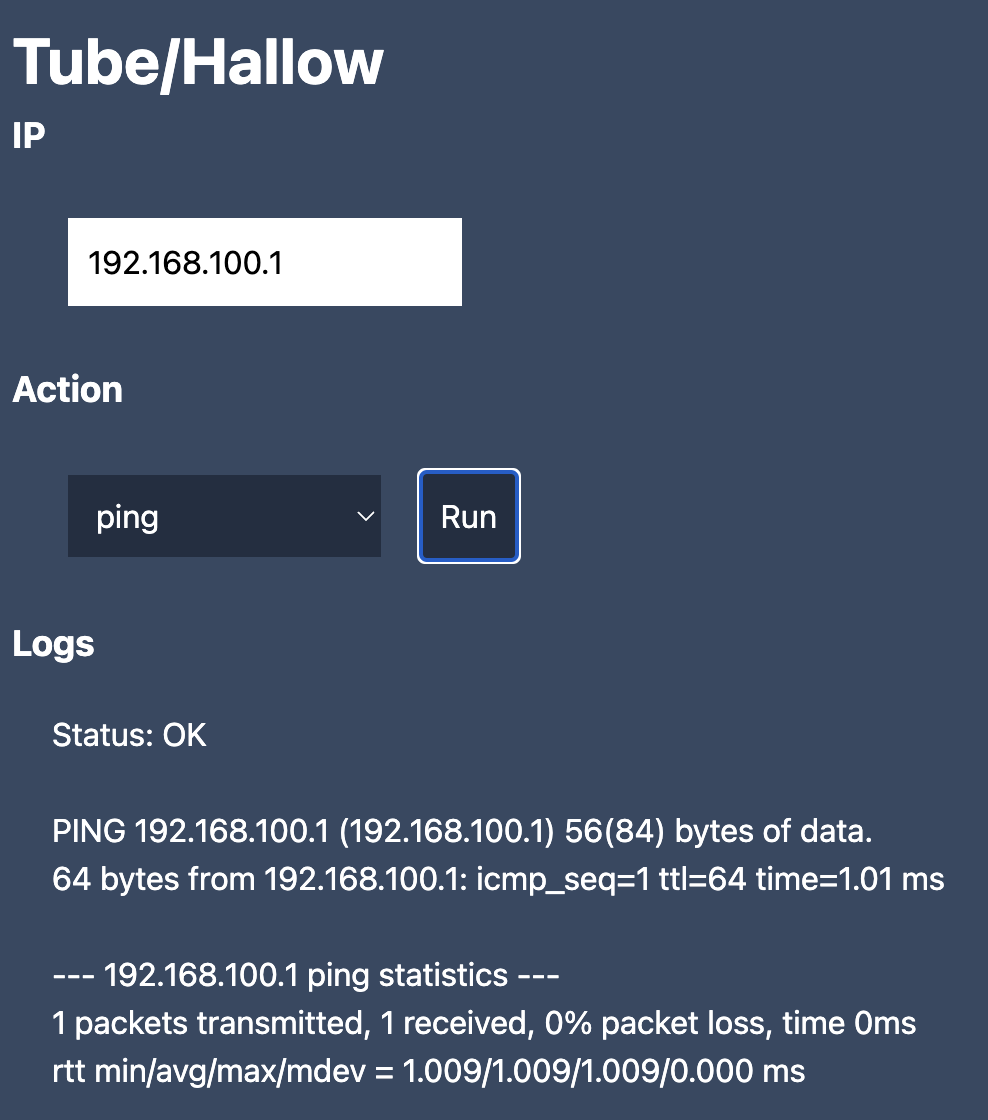
Status should be OK and you should see the latency and have 0% packet loss.
If you have something else check:
- wiring (RCP and switch, Tube-AH and switch)
- power of RCP
- power of Tube-AH
- IP setup (your RCP should have a compatible IP with the Tube-AH in
192.168.100.0/24)
While you're at it, install a firewall on it:

This is a step you need to do one time on the device (it doesn't hurt to do it multiple time). It installs a custom firewall on the device (Halow-U/Tube-AH) to avoid unwanted traffic to go on the RF (DNS, broadcast, multicast, etc.). It's important as it improves the performances and the stability by a factor 10 in some situations.
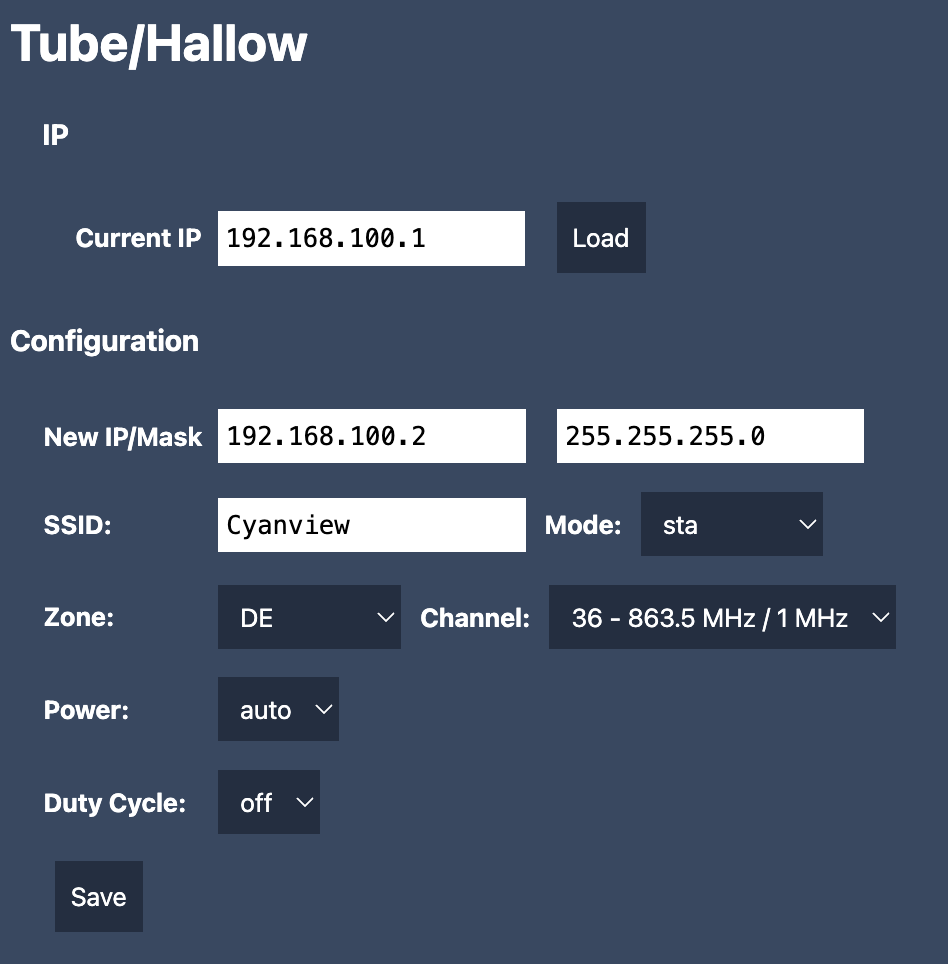
Now, go back to the dashboard home:
- On my RCP dashboard:
http://10.192.40.151:5000 - Click on
Alfa config - Ensure the IP is your Tube-AH actual IP (by default:
192.168.100.1) - Click on
Loadand wait until actual Tube-AH config is loaded properly - I keep the default IP for my Tube-AH
- I changed the SSID
- Click on
Save
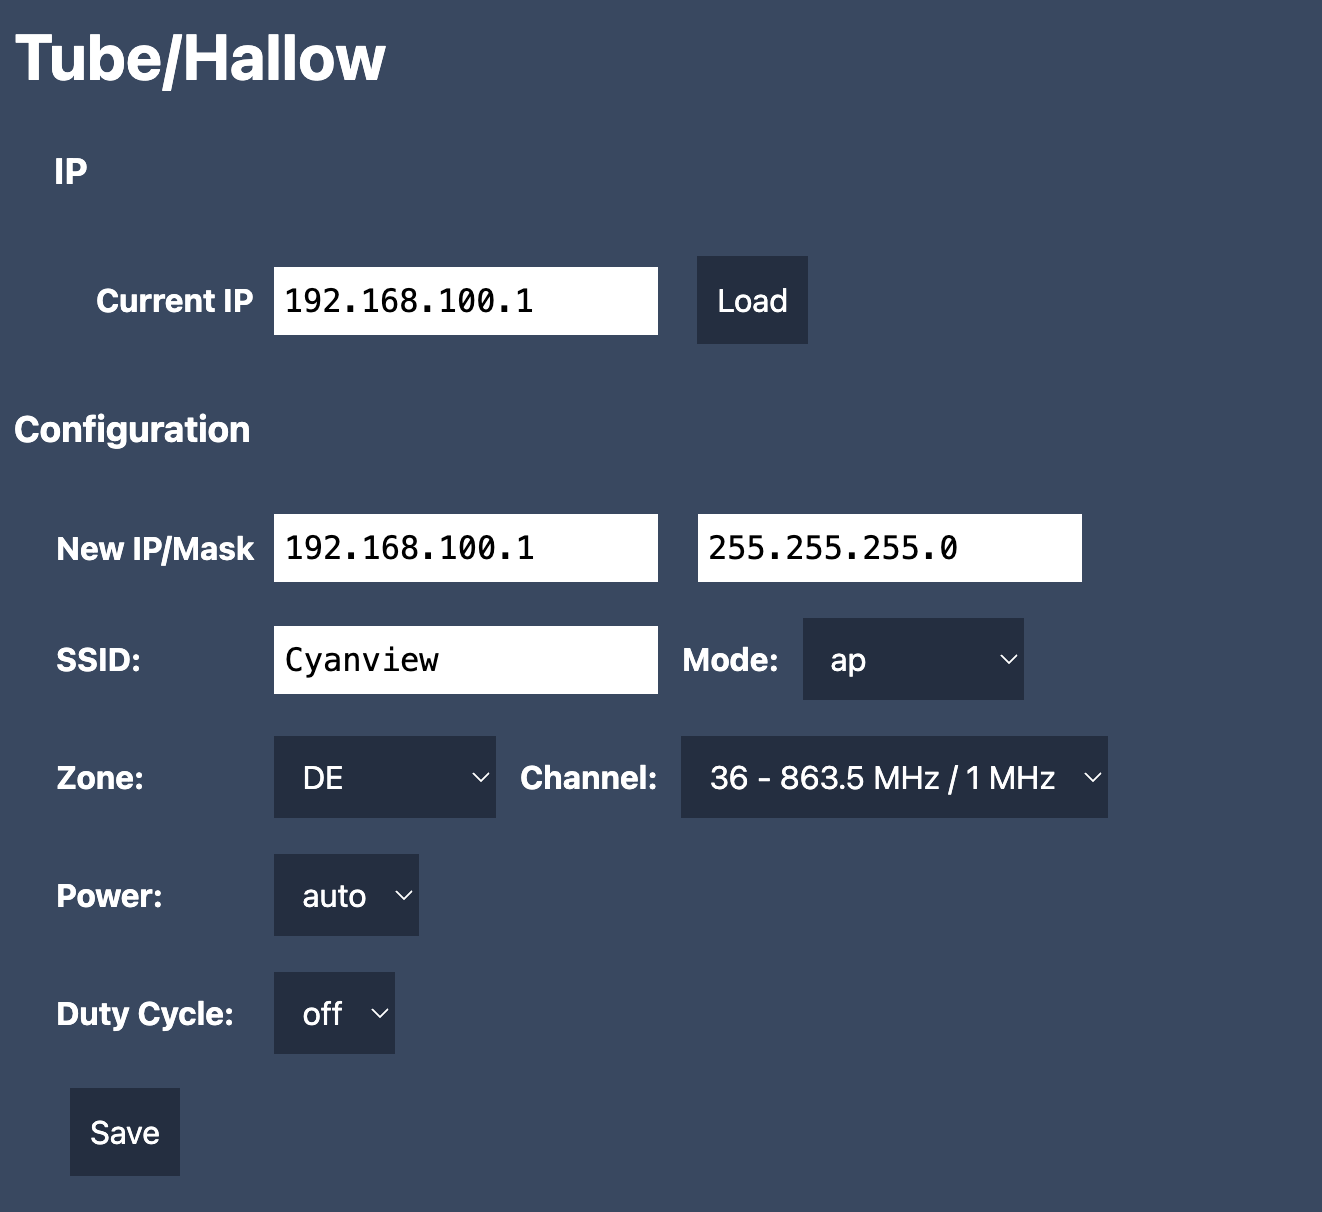
After clicking on saved, you should see this:
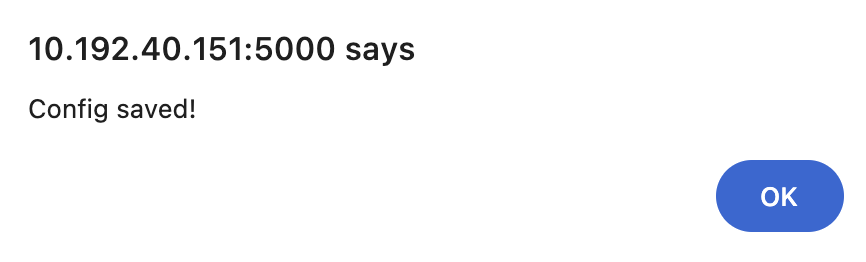
You can click on Load again to double-check. Also note that this webpage disables the DHCP server on the Halow-U/Tube-AH.
Halow-U
- on my RIO dashboard:
http://10.192.15.154:5000 - I first click on
Alfa actions - I select action
ping - I ensure the IP is the IP of my Halow-U (by default it should be `192.168.100.1``)
- Click on
runand
While you're at it, install a firewall on it like we did on the RCP:
Now, go back to the dashboard home:
- On my RCP dashboard:
http://10.192.15.154:5000 - Click on
Alfa config - Ensure the IP is your Halow-U actual IP (by default:
192.168.100.1) - Click on
Loadand wait until actual Halow-U config is loaded properly - I changed the IP of my Halow-U to
192.168.100.2(so my Tube-AH is in192.168.100.1/24and my Halow-U in192.168.100.2/24, no conflict) - I changed the SSID
- I changed the mode to 'sta' (so my Tube-AH is an AP and my Halow-U, sta for station, will connect to it)
- Click on
Save
After clicking on Save, you should see this:

Pay attention that here, we changed the IP of the Halow-U to 192.168.100.2.
So if you want to load the config to check, use this new IP.
If at some point you don't remember this IP, you can reset it to factory default, see troubleshooting section
Wrap up
We have:
- an RCP
- a RIO
They both have IP's to:
- Communicate with Cyanview devices on LAN (
10.192.0.0/16) - Communicate with Cyanview devices on RF (
10.193.0.0/16) - Communicate with Halow-U/Tube-AH (
192.168.100.0/16)
And also:
- A Tube-AH on RCP LAN
- A Halow-U on RIO USB (exposed as a USB Ethernet)
- They both have the same SSID:
Cyanview - They both have the same country and frequency:
Channel 36 - The Tube-AH is configured as an
AP - And the Halow-U is configured as
Station(you could have multiple Halow-U on a single Tube-AHAP)
Check
You can go on your RCP dashboard: http://10.192.40.151:5000
And from there you should be able to go to Alfa actions and ping:
- The Tube-AH:
192.168.100.1 - The Halow-U:
192.168.100.2 - The RIO (through RF):
10.193.15.154
REMI through RF
As we have a firewall installed on Tube-AH and Halow-U that blocks unwanted traffic. It also blocks the discovery (broadcast messages between RIO and RCP). So the REMI setup is similar, but different:
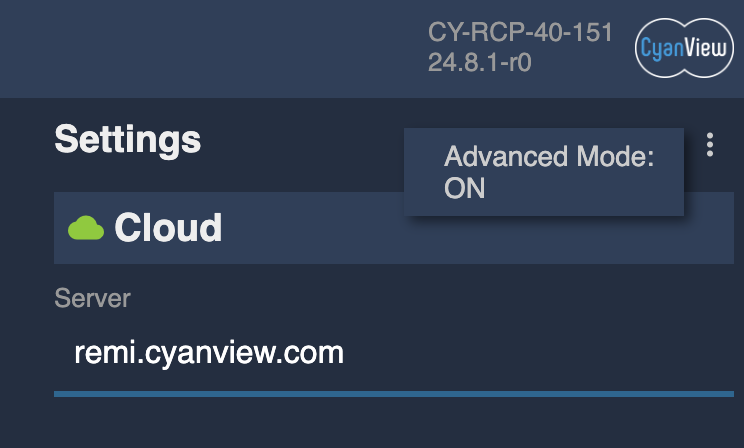
Navigate to your RCP web UI: http://10.192.40.151:
- go in
REMItab - activate the
advanced modein the top right corner (using...)
Add your RIO RF IP in the Manual IP section and click on +
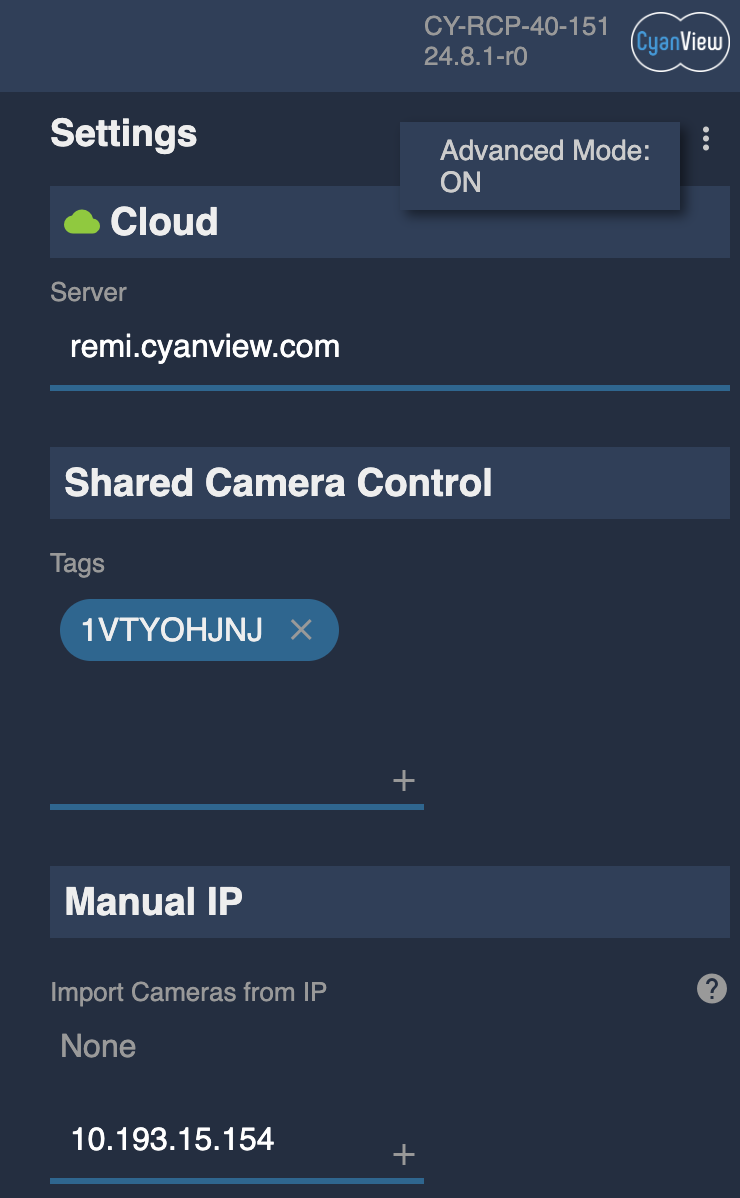
Then your RIO should appear in the middle section:
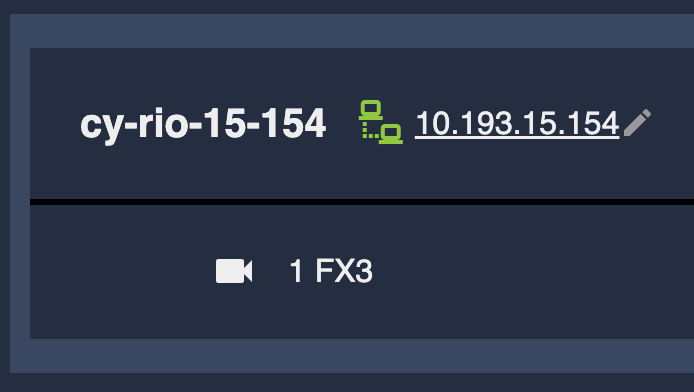
You can see interesting information:
- the RIO serial number:
cy-RIO-15-154 - the RIO status:
green - the RIO IP of this direct connection:
10.193.15.154 - all cameras "exposed" by RIO, here:
FX3
Note that this direct connect using Manual IP doesn't require you to put common tags.
And also note that its status is different from REMI LAN and REMI cloud through discovery.
And note also that you can click on the RIO IP (10.193.15.154), it will open a new tab:
- with the IP of your RCP
10.192.40.151 - with a random port (something like
10.192.40.151:40003) - this page is the RIO webpage, forwarded by RCP through the RF
- so as long as you can reach your RCP, you can modify your RIO setup remotely
Click on the checkbox on the right of FX3 (in RCP, REMI) to import your camera, then in configuration you should see:
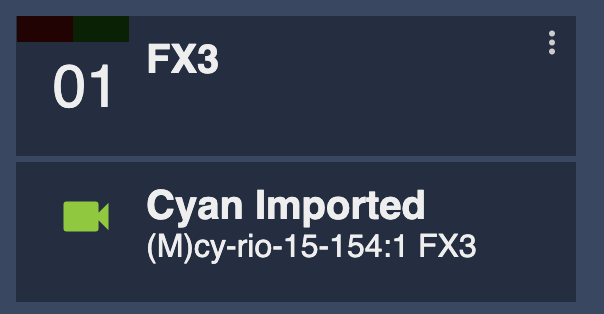
At this stage:
- RCP/RIO are linked through RF
- Your camera is configured on RIO
- Imported on RCP
So you can remove the Ethernet from RIO to the switch and shade your FX3 through RF.
Wiring - final/live

Some notes:
- Once setup is done, you can remove your laptop
- Once the RF setup is done, this will persist across reboots, etc.
- So you can remove every IP (from RIO and RCP) in the range
192.168.100.0/24
So it could look like this (but you can definitely keep them, it doesn't hurt):

Examples of topologies
Wireless FX3
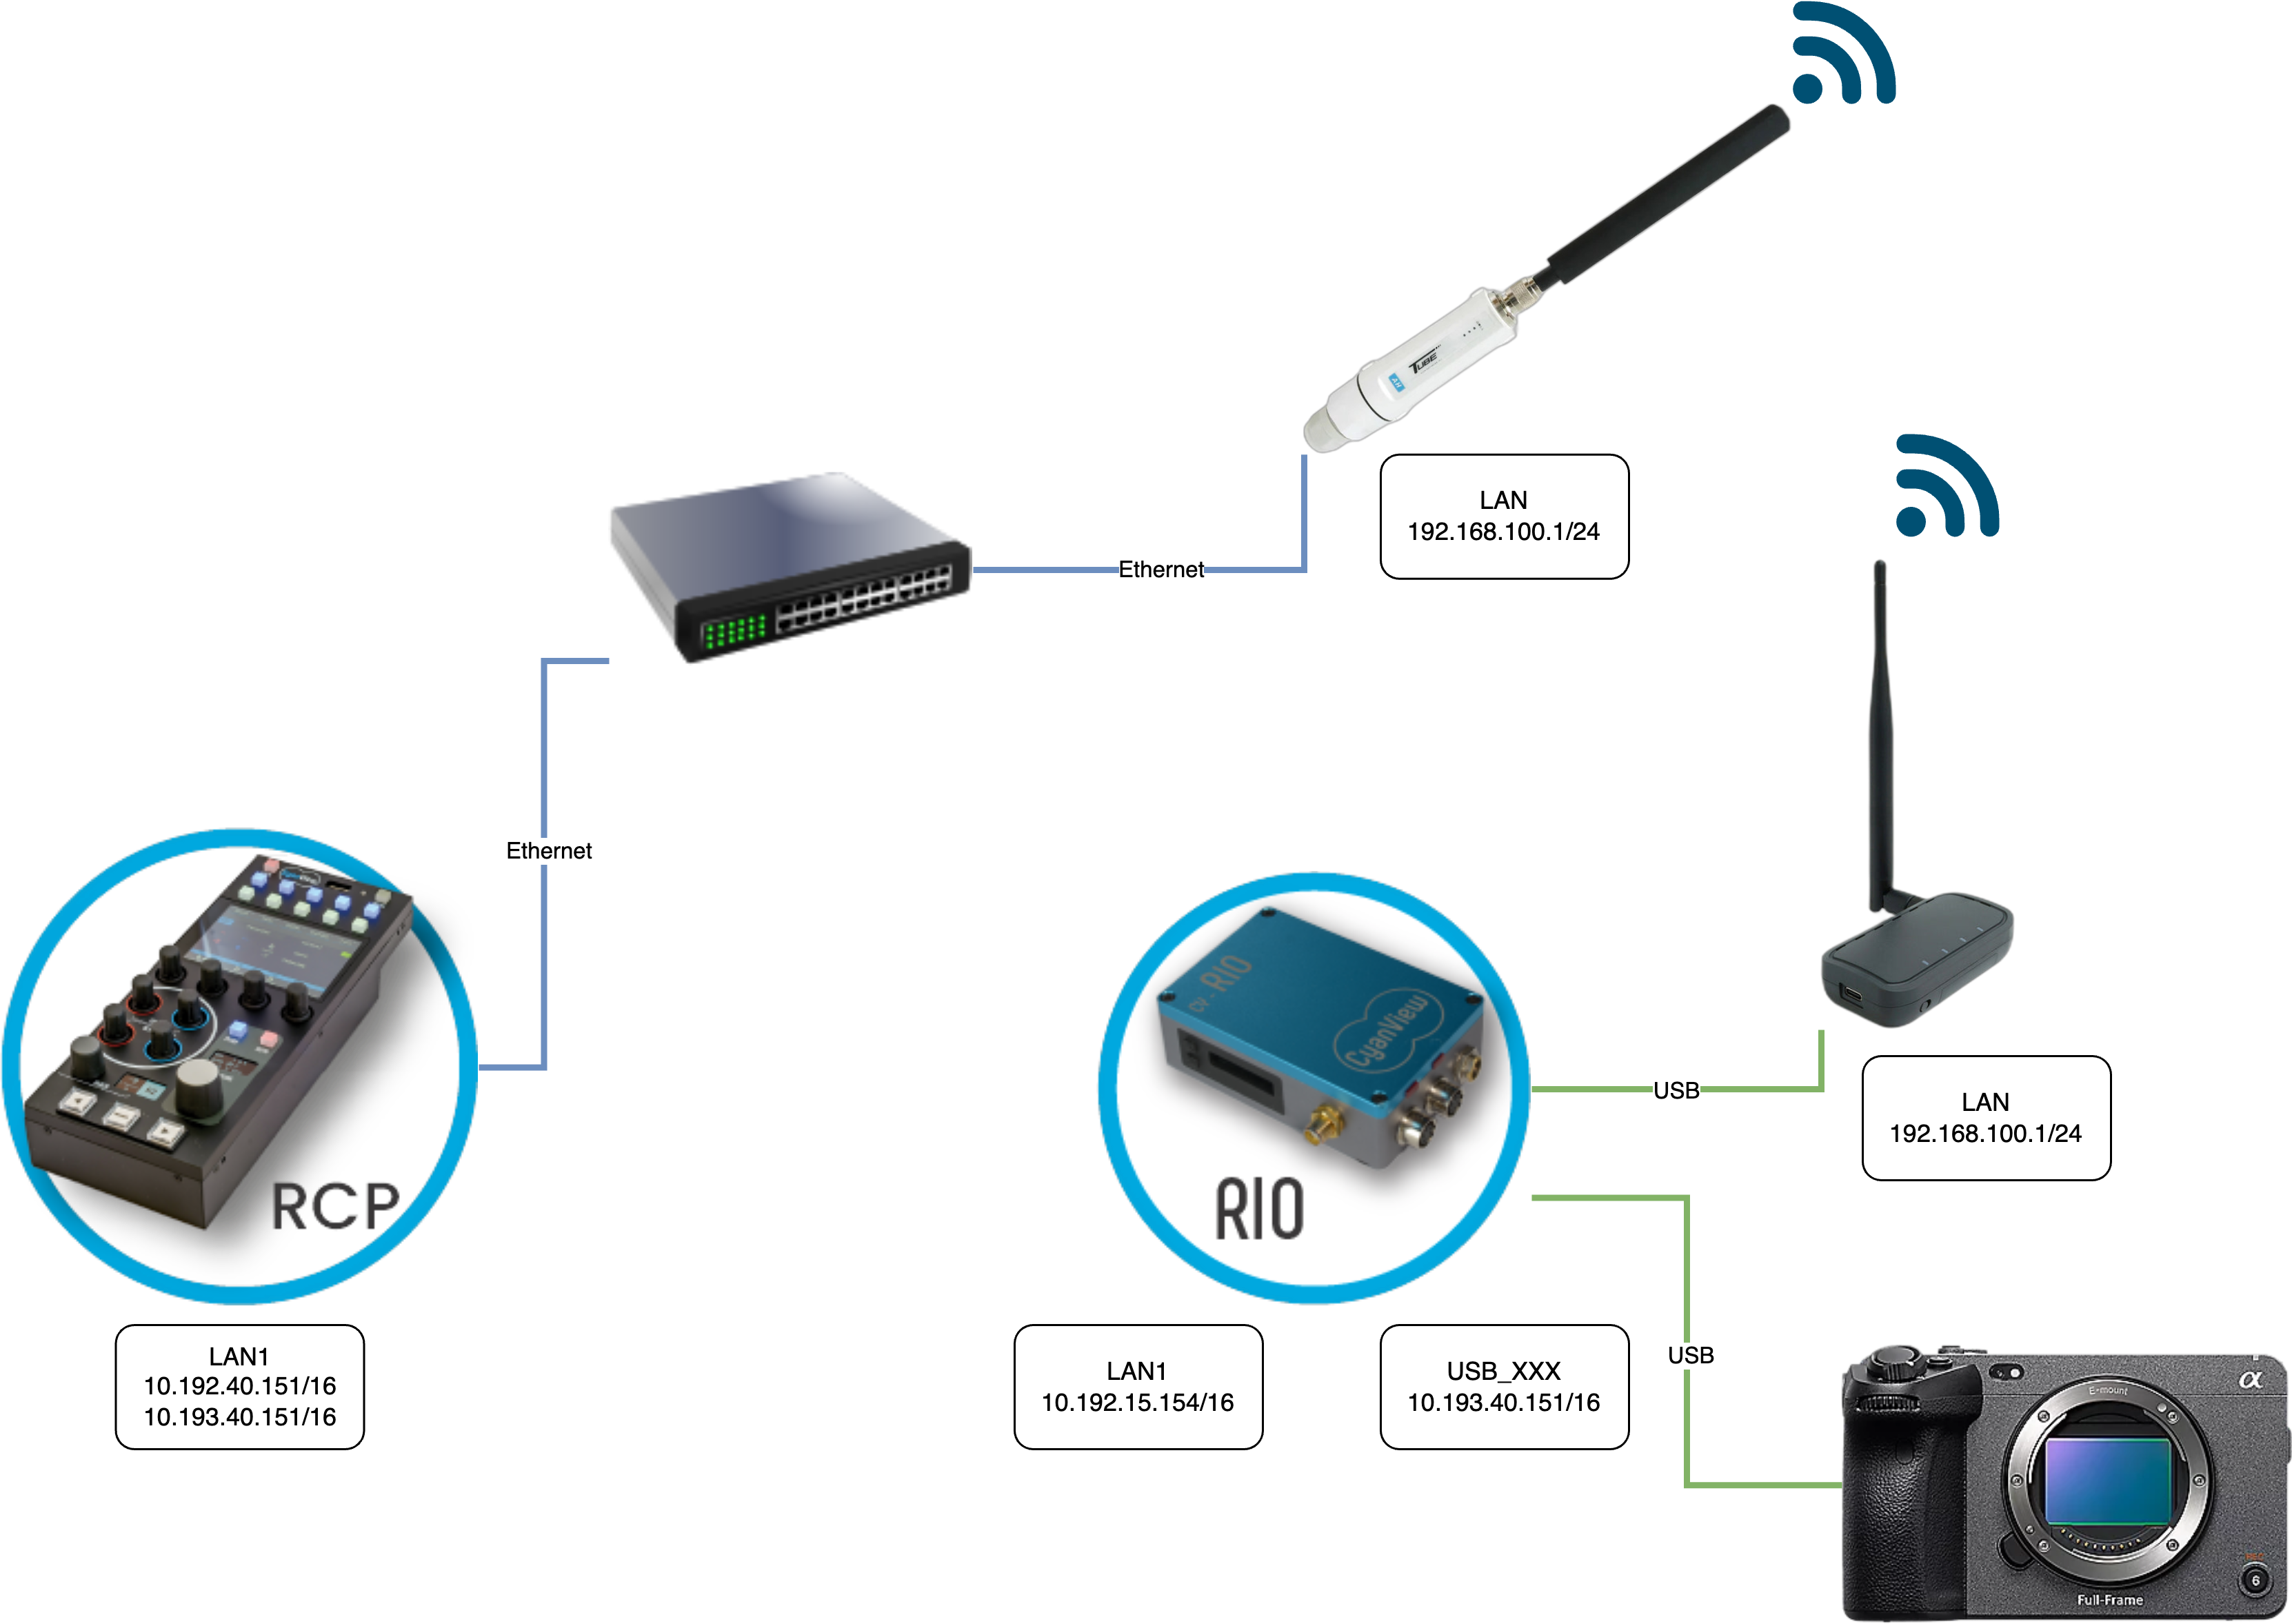
gear needed:
- 1 x RCP
- 1 x RIO (or RIO-live)
- 1 x Tube-AH
- 1 x Halow-U
- 1 x FX3
- 1 x USB-C to USB-A (with data)
wiring:
- RIO is powered through D-TAP
- RIO powers the Halow-U through USB
- RIO communicates with FX3 through USB
More info on FX3 setup here
Wireless FX6
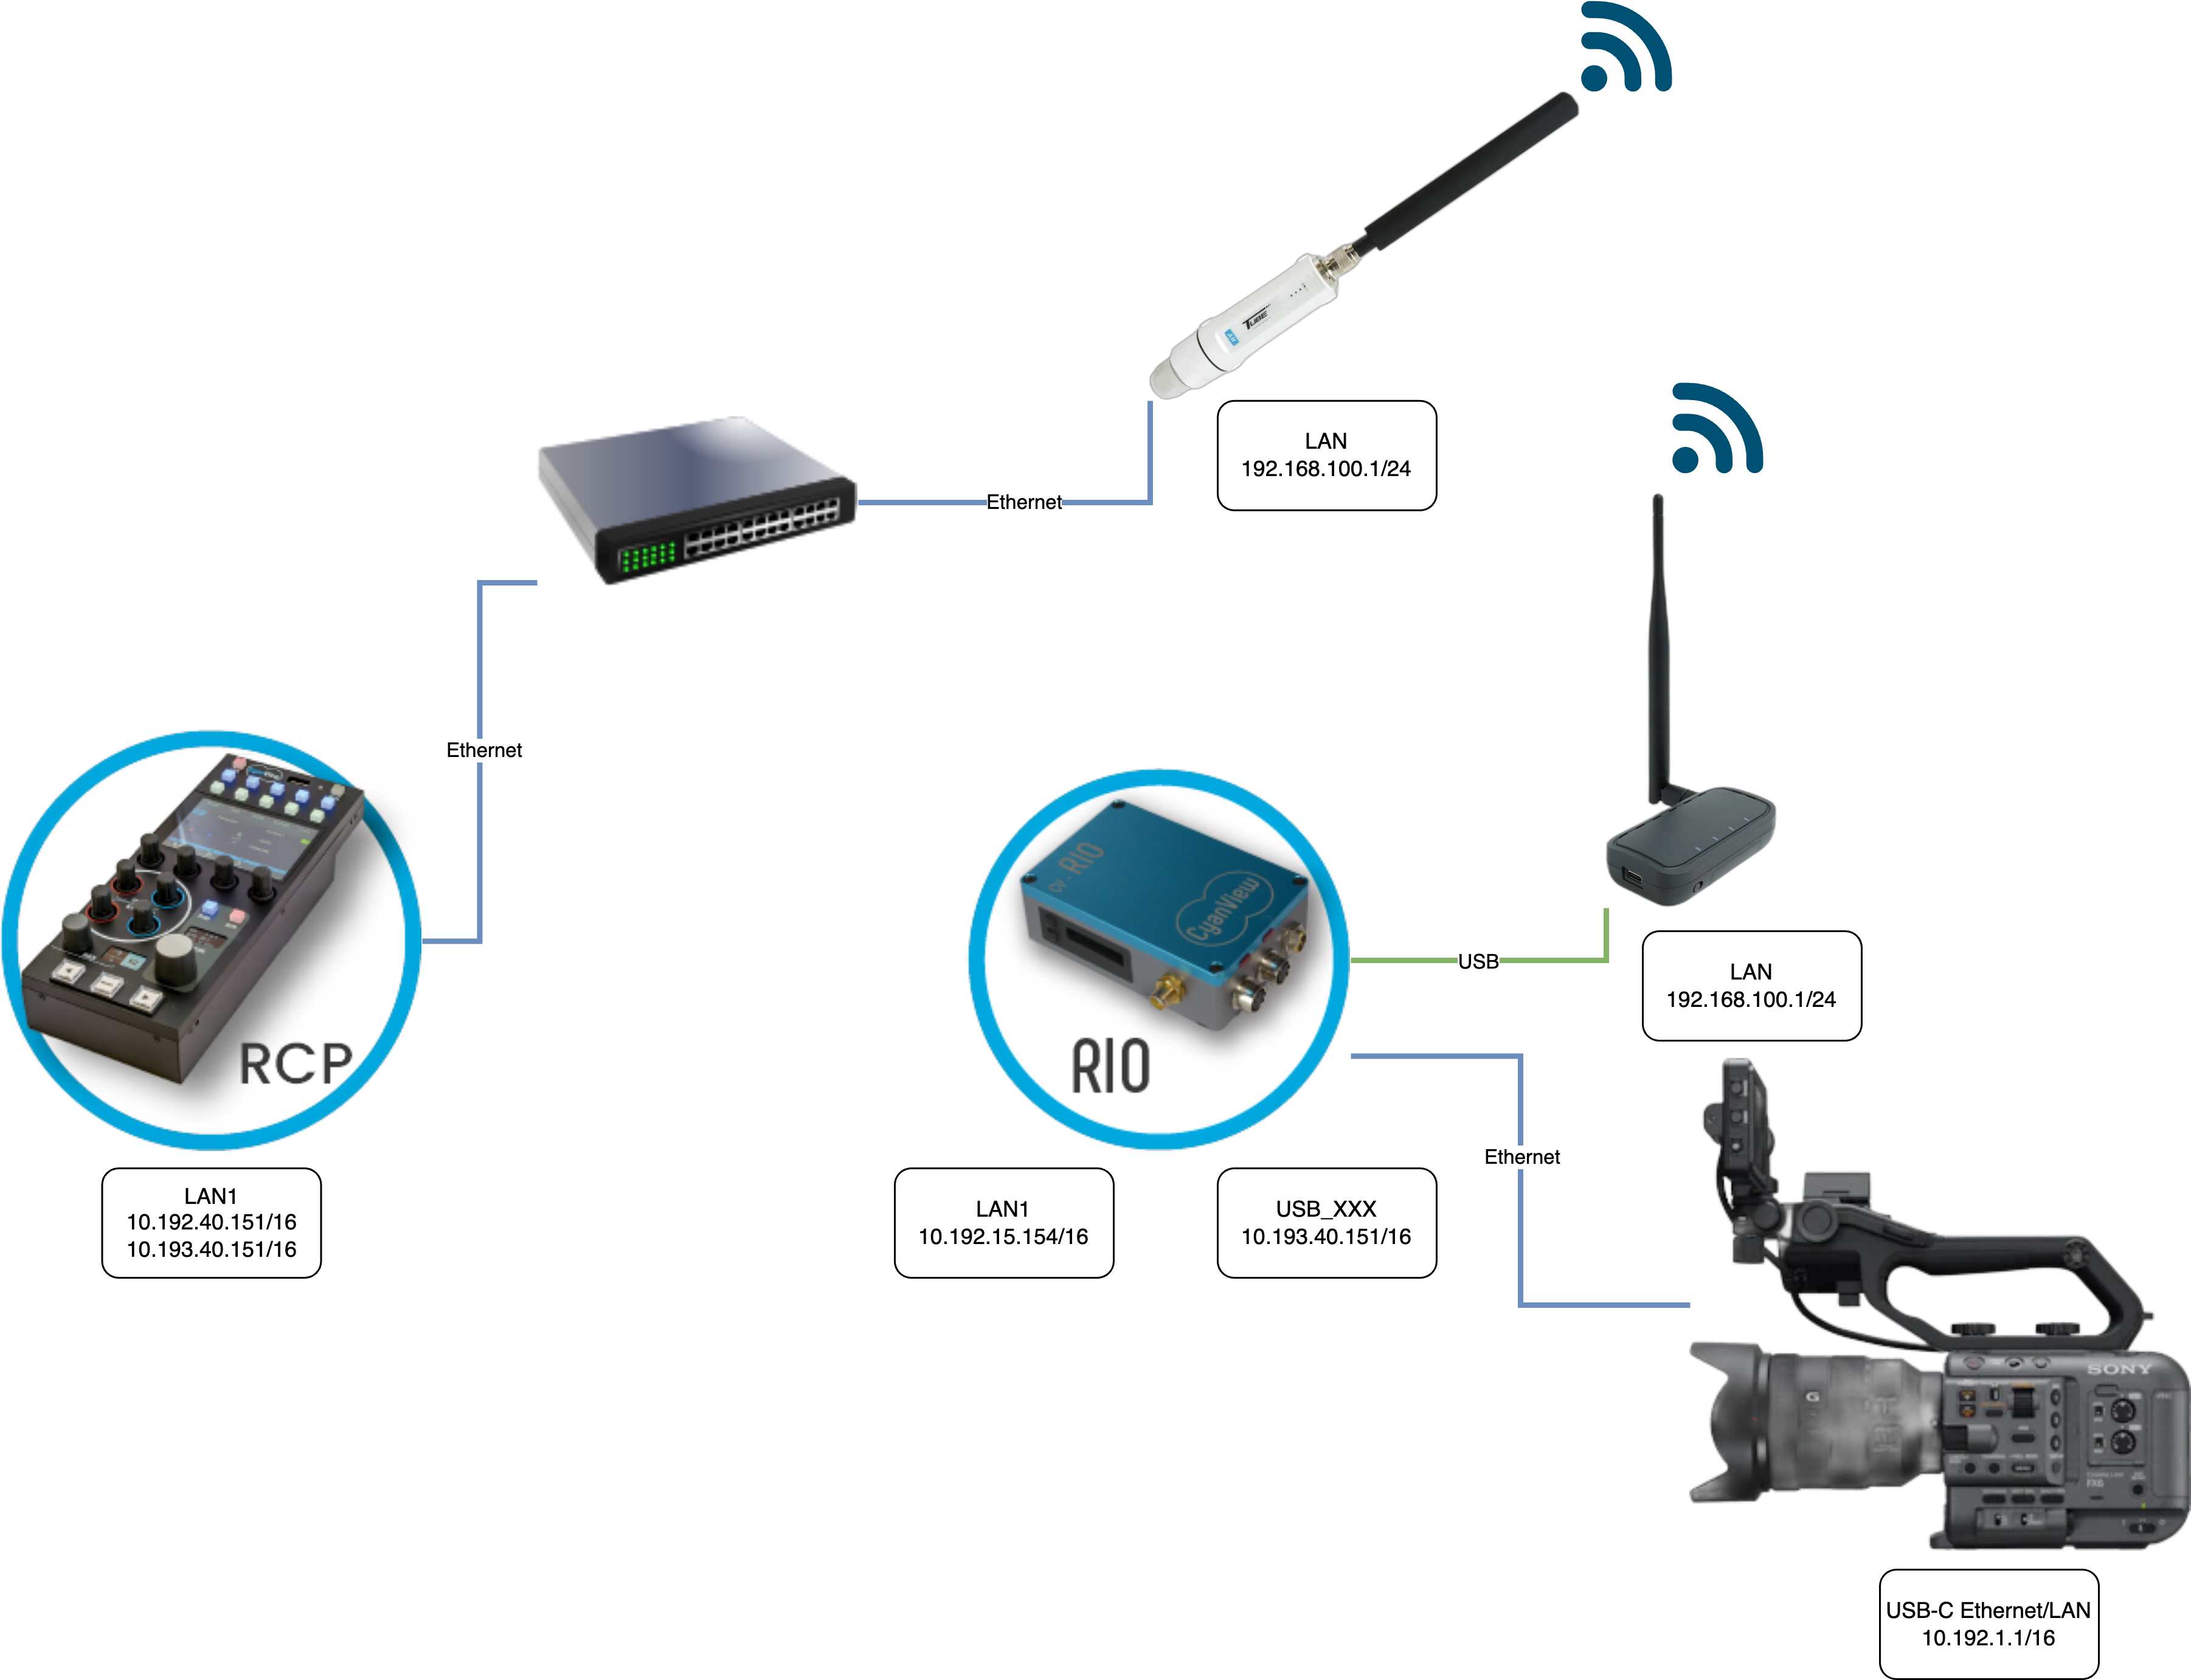
gear needed:
- 1 x RCP
- 1 x RIO (or RIO-live)
- 1 x Tube-AH
- 1 x Halow-U
- 1 x FX6
- 1 x USB-C Ethernet dongle (compatible with FX6)
wiring:
- RIO is powered through D-TAP
- RIO powers the Halow-U through USB
- FX6 has a USB-C Ethernet
- And RIO uses its onboard Ethernet to go in the FX6 Ethernet dongle.
- FX6 IP is in the range
10.192.0.0/16so RIO can talk directly to it
More info on FX6 setup here
Mesh
Typical use case:
- If you have a really long distance and typical AP/Station doesn't work
- If you have obstacle that obstruct one or multiple nodes (a building, etc.)
Setup:
- Exactly like the setup above (IP setup, RF setup)
- Except you put everything in "mesh_ap" mode instead of "ap/sta"
How to set up on site:
- put a laptop on "Tube-AH/RCP" side
- Ensure your laptop has an IP in the range of Halow-U/Tube-AH, something like:
192.168.100.254/24 - Ensure you can ping your Tube-AH:
ping 192.168.100.1 - Put the Halow-U on a battery, put it "close to Tube-AH" (to start from a known/working case)
- ping the Halow-U from your laptop:
ping 192.168.100.2 - move the Halow-U on battery away, direction the final location
- Once the pings increases (something like 30-50ms), stop, maybe come back a little bit to get back to "normal" (10-20ms)
- Take a second kit (this could be a second hop or your RIO directly) and do the same (you should be able to get past the 'hop')
This approach is simple and allows you to understand and ensure your "mesh paths" are valid/tested.
You can use whatever as a hop:
- A Tube-AH
- A Halow-U
As long as:
- They're in mesh_ap (like every other nodes)
- powered
They don't need to be connected to anything else than power.
Troubleshooting
Latency
You should have a latency of 10-20ms, even with multiples nodes.
If you have more than that, improve the placement.
And if that doesn't help, you can try the mesh topology.
Signal quality
Here is a "rule of thumb" scale:
good: 0 to -70dbm-
OK tier: -70dbm to -80dbm -
limit: -80 to -90dbm -
bad: -90 and below
Try to stay in the good section.
Hallow-U LED patterns
Boot
With USB port on the left and antenna on top right.
The boot (from power to pings) takes 1 minute 30 seconds
| step | LED 1 | LED 2 | LED 3 | LED 4 | duration | time |
|---|---|---|---|---|---|---|
| 1 | steady blue/red | steady green | off | steady green | 20s | t=0s |
| 2 | steady blue/red | blinks green (slow) | off | steady green | 1m | t=20s |
| 3 | steady blue/red | steady green | off | steady green | 10s | t=1m20s |
| 4 | steady blue/red | steady green | steady green | steady green | 0s | t=1m30s |
So if you plug the device on a RIO/RCP, after 1 min 30s, you should have 1 blue/red and 3 steady green LEDs.
If not:
- Try doing a reset
- Try with a proper USB cable
Reset
If you lost the device IP and you want to "reset" it back to factory.
The idea is to:
- Press the button
- Power device and keep it pressed
- Wait the reset, release button
- Wait for reboot
Here is the pattern, press and hold button, power device:
| step | button | LED1 | LED2 | LED3 | LED4 | duration | time |
|---|---|---|---|---|---|---|---|
| 0 | pressed | off | off | off | off | 0s | t=0s |
| 1 | pressed | steady blue/red | steady green | off | steady green | 20s | t=0s |
| 2 | pressed | steady blue/red | blink green (fast) | off | steady green | 10s | t=20s |
| 3 | pressed | steady blue/red | blink green (slow) | off | steady green | 5s | t=30s |
| 4 | released | steady blue/red | blink green (slow) | off | steady green | 10s | t=35s |
| 5 (rebooting) | released | steady blue/red | - | - | - | 2m | t=45s |
| 6 | released | steady blue/red | steady green | steady green | steady green | 0s | t=3m |
From start to finish, it takes up to 3 min (first boot, reset, reboot in factory settings).
Network/RF Loops
Pay attention that Halow-U/Tube-AH are acting like a "switch", so if you have 2 Tube-AH (one in AP and one in client) on the same switch, you create a network loop.
Also avoid "bridging" on RIO as it can also create network loops:
- Tube-AH is connected to the Ethernet switch
- Halow-U is connected to the Tube-AH
- Halow-U is also connected to the switch because of RIO
IP conflicts
They're working on L2, so RIO and the RF modules don't have to be on the same IP range. But ensure that each module has its own IP, not in conflict with anything else.